

How to convert rows to columns and vice versa in Excel.
- 24-07-2022
- thuypham
- 0 Comments
When using Excel, the data presented is not beautiful. You want to convert data from rows to columns and from columns to rows to be more beautiful. In this article I will guide you.
In this article, I show you how to convert rows to columns and vice versa in Excel 2013. However, if you use Excel 2007, 2010, 2016 then you also do the same .
The article consists of 2 parts:
- How to convert rows to columns in Excel
- How to convert columns to rows in Excel
Mục lục
1. How to convert rows to columns in Excel.
For example, I have the following data.

To convert rows to columns in Excel, simply do the following:
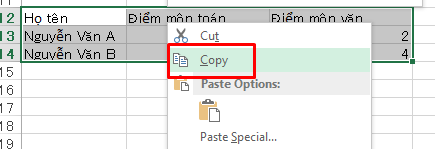
- Step 1: You highlight the data to be converted into columns, right-click and select copy
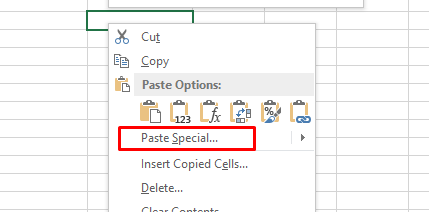
- Step 2: You select the cell to save the above data, right-click and select Patse Special.
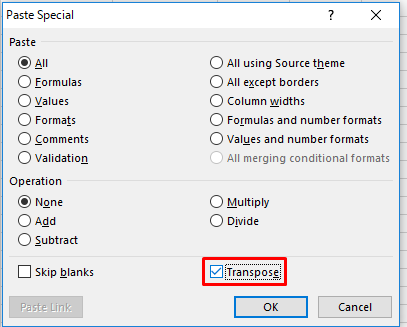
- Step 3: The Patse Special dialog box appears, tick Transpose then click OK.
The result is:
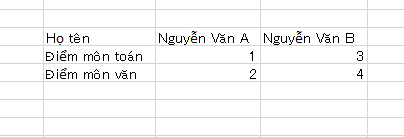
According to the results on the section Full name, Math score, Literature score have been converted into columns. Easy to do, right?
2. How to convert columns to rows in Excel.
Part 1 alone showed you how to convert rows into columns in Excel, so vice versa to convert columns into rows in Excel, you just need to do the same. Specifically, I have the following example:

- Step 1: You highlight the data you need to convert the column into a row, right-click and select copy.
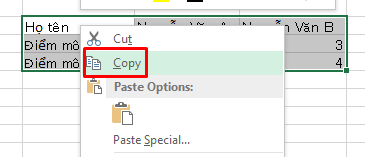
- Step 2: You select the cell to store the data, right-click and select Paste Special. The Patse Special dialog box appears, check Transpose like when converting rows to columns and click OK.
Now let's see the results:

Conclusion: The above article has shown you how to change rows to columns in Excel and vice versa. Simple and fast right? This way you can save a lot of time having to re-enter data when entering the wrong row or column. Hope this article is useful to you.
Good luck.


