

How to create a framework for the most impressive project report, graduation thesis
- 24-07-2022
- trienkhaiweb
- 0 Comments
Normally, when you make a thesis report, project or graduation thesis, you have to close the cover to create a complete set of documents. However, I see that many of you still have to ask Photo shops to make covers and print covers for them. That makes you not active in your work. Therefore, today, I will show you how to create a standard cover according to regulations. Specifically, please follow along in the article below.
Create border for project report, graduation
Although the report cover is only a formal part, it is also one of the criteria for teachers to assess the consciousness of each person. So, no matter what, in reports and theses, you should also create a cover for your document to make it look good in front of your teacher. As standard, the border for the cover page has the following dimensions: Top and bottom 2cm, left 3cm and right 2cm.
The detailed steps are as follows:
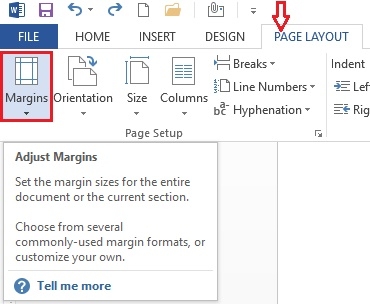
- Step 1: First, select Page Layout , go to the Page Setup command group and click Margins .
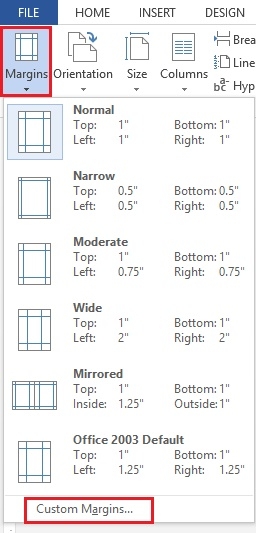
- Step 2: A drop-down menu, click on “Custom Margins” .
- Step 3: The Page Setup dialog box appears, click on Margins and start adjusting the parameters in that dialog box.
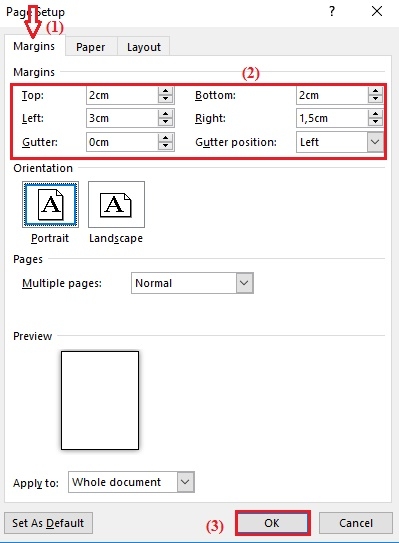
According to the standard parameters above, I just need to re-fill it to match the border of the report cover. Then, you click on the print template (horizontal print vertical) and click “OK” to finish. Once the report is properly aligned, you need to outline the cover page.
To create the border of the cover frame, do the following:
- Step 1: You place the cursor on the first page that has been edited as the cover page. Then you hover on the toolbar and select the Design Tab , select Page Borders .

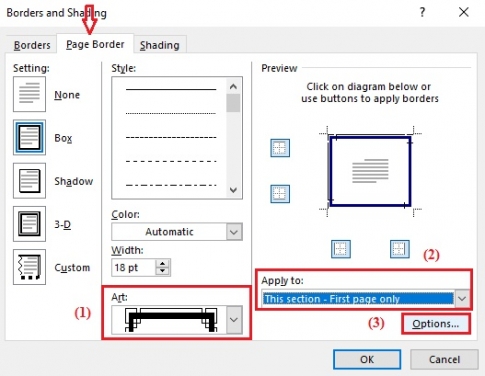
- Step 2: The Borders and Shading dialog box appears, click "Page Border" . In this table, you need to pay attention to two items.
- First, in the Art section: You choose the available border style, which is a large and small parallel stripe as shown below that you have chosen.
- Second, in the section Apply to: You choose "This section – First Page only" (the frame is only created for the first page).
Then you click on “Options…”
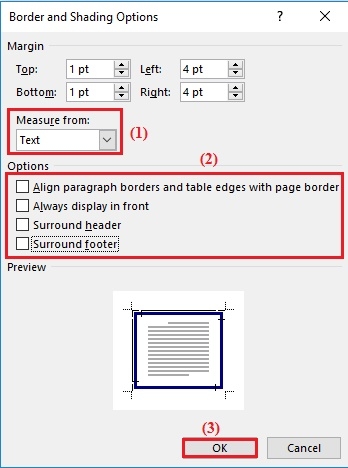
- Step 3: The Border and Shading Options dialog box appears, in the Measure from section, select "Text" and uncheck all the items at the bottom of the dialog box. Finally, click on “OK”.
In the end, you will have a standard cover page as prescribed.
For example, below is the cover page that I have prepared and followed the steps that I have guided above for you. Border frames have many different patterns, you can freely choose according to your preferences.

How to create covers for brochures is not difficult, just adjust according to the prescribed standard parameters, you can proceed. In addition to the mandatory templates, you can also create your own new cover templates as long as the parameters of margins and borders are still in accordance with the regulations. So, from what I have shared in this article, you can create your own cover without the help of anyone else. Wishing you success.


