
How to create large initial letters easily with Drop Cap
- 24-07-2022
- trienkhaiweb
- 0 Comments
Have you ever read a book or magazine, and noticed that the first letter of the article is printed in large print, occupying two or three lines of the text? From then on, you also feel interested in how to create that letter. However, you wonder how to do it and how difficult or easy it is? Rest assured, to help you do that, the following article will share with you the specific steps to create large first-line letters in word documents.
When you create a capital letter, it will create a highlight for the text, making the viewer feel the scientific presentation and have a higher aesthetic angle. However, before doing so, you just type and complete the text, proceed to align the text margins and finally create large letters at the beginning.
To create large letters at the beginning of the line, follow these steps:
- Step 1: You select the text you want to write the first letter out loud. Then you highlight the letter that you want to create the letter.
- Step 2: Next, hover your mouse over the Ribbon toolbar and click the Insert Tab , navigate to and click on "Drop Cap" . A selection panel appears, including available templates and templates created by yourself. In this article, I wanted to create my own template, so I clicked on “Drop Cap Options”.

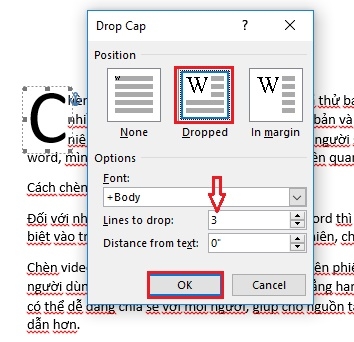
- Step 3: Drop Cap dialog box appears, you choose the appropriate parameters and samples at your discretion. Most of the time, when setting up, you only care about the template you want to make and the parameters and fonts you want to install.
For example, I choose the "Dropped" style, then I choose the "Body" font style, the letter has a height of "3 lines" in the text. After setting the parameters, you just need to click “OK” again. Your text has been created as you wanted it to be.

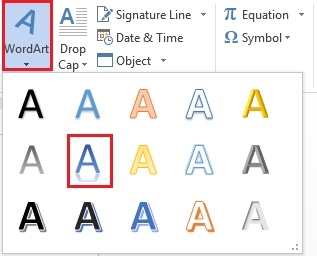
After you create the big bullet point, to make it more artistic and aesthetic, you can edit it through the “ WordArt” tool. There, there are a lot of font options, you can freely choose according to your taste.

After you select, a new Tab appears on the toolbar that is “Format” . In this Tool Tab, you can fully edit styles such as text color, text border, background color, 3D image types. You can completely edit it to feel right and according to your preferences.

So, with the above steps, now your text has put on a new outfit, right? Not only makes this text more beautiful, more artistic, but you can also apply this approach to other documents if you feel it is necessary. Hopefully, through this article, I can share with you more small operations in word. Although it is small, it makes an important contribution to the beauty and science of the text.


