

How to create Tab aka dot (…) in word
- 24-07-2022
- trienkhaiweb
- 0 Comments
In Word, when it comes to creating Tabs, many people wonder what it is. Although not known to many people, Tab has a lot of utilities for you in work. At the same time, using Tab on text will make your text more scientific and logical. So how to set Tab and create Tab you need to do, please refer to the article below.
Create Tabs in Text
Tabs in word are the way that text editors often use to present various types of documents such as contracts, reports, etc. Tabs also create accurate and beautiful forms and data entry forms.
On Word, there are 3 types of Tabs, which are Left-aligned Tab, Right-aligned Tab and Center-aligned Tab.
To create Tab on word is not difficult. You just need to do the following steps:
Method 1: Set on the Paragraph dialog box
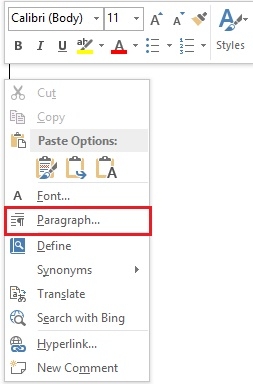
- Step 1: You right-click on the Word document, then a quick action table appears, hover and click on the "Paragraph" item.
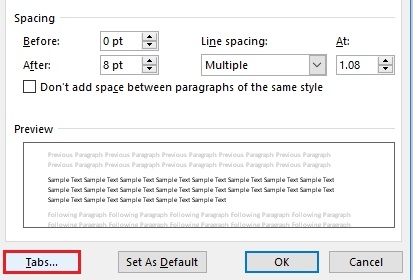
- Step 2: Paragrap dialog box appears, move your mouse to the bottom to select “Tabs” to open the Tabs panel.
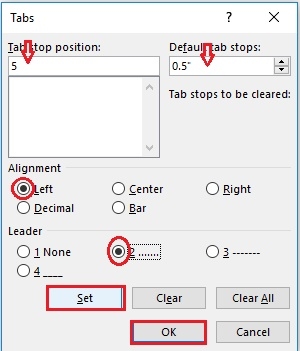
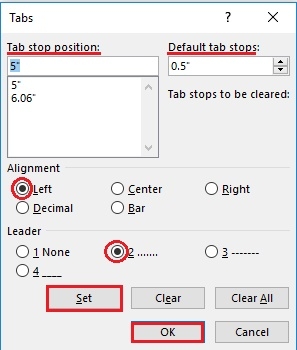
- Step 3: In the Tabs panel, you will see:
- Tab stop position : the length in the text will appear dot when we click Tab (calculated from the left margin of the text).
- Default tab stops: the distance from the beginning to the end when we press the Tab key.
- Alignment: type of alignment, you can choose Left – left, Center – center, Right – right…
- Leader: format type when pressing Tab.
You choose the values you want and then click “Set” to change. Then you click “OK” if you finish setting up Tab
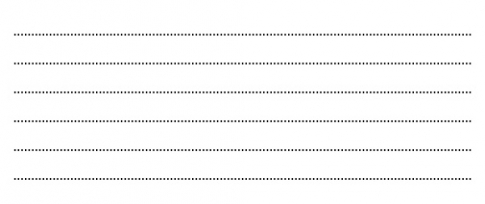
You have the following result:
Method 2: Create Tabs on Ruler
First, your word must open the Ruler bar. If you haven't opened it, click View and check the "Ruler" box.
- Step 1: You adjust the Tab icon to use at the top position of the left ruler.
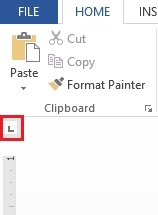
- Step 2: You put the mouse on the position you want to place the Tab then hover over the Ruler bar and click on a position you want.
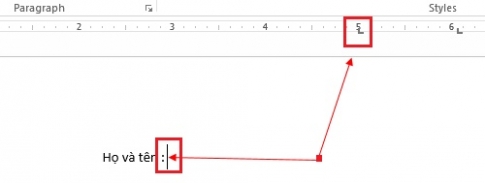
- Step 3: you select the right mouse point at the tab you need to customize the format of the tab, click twice, a table will appear, you select the correct tab you want to change the format and select the format below then you Click “Set” to save the changes.
- Step 4: After selecting, the last step is at the cursor position you press the Tab key on the keyboard, that's it.
Creating Tabs will help you work much faster and more efficiently. With the above instructions, you can perform the steps to create, set up as well as use the Tab key to insert dots in the text. In the process of implementation, if you still encounter any problems, you can feedback below for more specific instructions. Wishing you success.


