
How to enter and present table content in Word 2013
- 24-07-2022
- trienkhaiweb
- 0 Comments
When you create tables in Word or Excel, you must enter the contents of the tables that you have inserted into the text. Entering content is not difficult, it is just difficult to align the presentation so that the viewer feels easy to see and understand. So, today, I will show you how to present your text beautifully and scientifically.
The content of the article consists of 2 parts:
- How to enter content into a table
- How to present table content
Mục lục
1. How to enter content into tables.
- To enter data into a cell in the table, click on that cell and enter the content. You can move the mouse to click on each cell or use the arrows on the keyboard to move up and down, left and right.
- After entering the contents of the cells, you can Adjust the font, font size, color of the text according to your wishes. It does the same thing as for setting text quickly that I instructed you in the previous post.
2. How to present table content
– Align the cell size: When the input in the cell is missing, you can expand the cell's width and height. To do this, do the following:
- Step 1: You select the cell or group of cells to resize
- Step 2: You go to the Layout Tab on Ribbon toolbar and find the Cell Size group. Then you can click on the arrows to increase or decrease the height and width values or directly enter the parameters you want to edit.

- Table Row Height: Change the height
- Table Column With: Change width
Above is how to edit fixed according to a value of selected cells. Besides, you can also edit the size of the cells flexibly according to the content you enter.
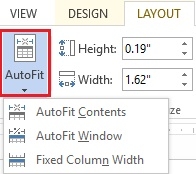
To do this, you do the following: Also on the Layout Tab click on "AutoFit" to choose one of the three contents contained in the table, that is:

- AutoFit Content: Change cell width according to content
- Auto Fit Window: Change the width of the cell according to the width of the text.
- Fixed Column With: Fixed according to the current width value.
– Align content in cells: Same table, but the content of each column and each cell is different. Maybe this column you need to align left, this column you need to align right… To perform these operations, you do the following:
- Step 1: You select the cell or column or row you want to align the content
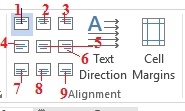
- Step 2: Go to the Alignment command group to choose different alignment methods:

- Align Top Left (1) : Aligns the content to the top left margin of the cell
- Align Top Center (2) : Align the content to the top margin and center the cell.
- Align Top Right (3) : Aligns the content to the top right margin of the cell
- Align Center Left (4) : Align center left of cell
- Align Center (5) : Align the content to the center of the cell
- Align Center Right (6) : Align the content to the center right of the cell
- Align Bottom Left (7) : Aligns the content to the bottom left of the cell
- Align Bottom Center (8) : Aligns the content to the bottom center of the cell
- Align Bottom Right (9) : Aligns the content to the bottom right of the cell.
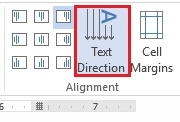
Text Direction : Change the direction of the text in the cell. For example, in a cell, the input content is too much compared to the limit of the cell. Therefore, you can use this command to rotate the text vertically to save space in the cell.

Cell Margins: Aligns the content in the cell. To do this, follow these steps:
- Step 1 : Select the cell or group of cells that you want to select to set the margins for the contents in that cell.
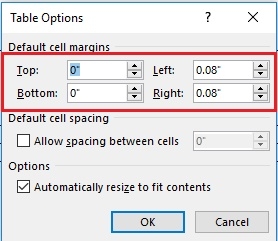
- Step 2: Click the Cell Margins icon, the Table Options dialog box appears
You just need to set the margin for the cell by clicking the value for the Top, Bottom, Left, Right items.

When composing documents, besides paying attention to the content, the form is also important not to be underestimated. Just looking at the form of presentation on the text, other people can already assess your working and studying attitude, not needing to pay attention to the content. No matter what, appearance is always important. Therefore, you should pay attention to how the table is presented and edited to have the most beautiful data tables. If you are not sure, please refer to the article and do it.
Hope you are succesful.


