

How to insert images, insert watermarks on the text background
- 28-07-2022
- trienkhaiweb
- 0 Comments
When you edit a document, you want it to be your copyright, you can insert a logo image or watermark on that text. That way, others won’t be able to steal your copyright. So how to insert Logo or text on top of the text?
If you are really interested in that, please refer to my article below.
How to insert images or watermarks under the text background
In Word, it not only allows you to insert pictures in documents or create artistic words, but also allows you to make images and watermarks on the text background to keep your copyright.
The operation of making images or text blurry on text is called Watermark. This is a tool used by many people to indicate the status of a document, be it a confidential document, a draft, or insert images of a company or organization’s Logo.
To create a blurred image or text on the text background, do the following:
- Step 1: Open the document you want to insert a watermarked image or Logo, then hover your mouse on the Ribbon toolbar, and click the Design Tab.

- Step 2: In the Design Tab, go to the Page Background command group and click “Watermark” and select any available template that you want to insert. The watermark will be displayed on your text.
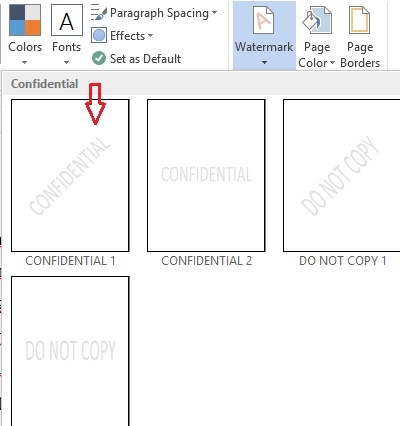
If you want to remove the insertion, just go to “Watermark” and select “Remove Watermark” .
To create a new Watermark, you can do the following:
- Step 1: On the Ribbon toolbar, select the Design tab and select the Watermark item, then continue to select the “Custom Watermark” option .
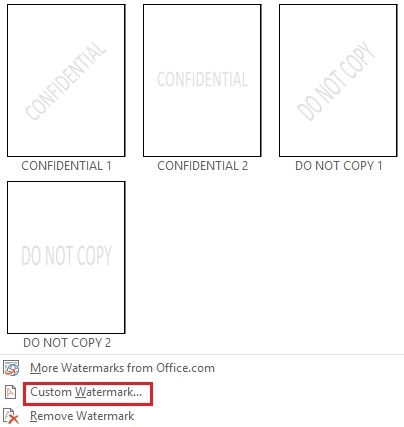
- Step 2: The “Printed Watermark” dialog box appears. You can then insert a picture or watermark on the text background.
Method 1: Insert watermark text on the text background
On the “Printed Watermark” dialog box, click on the items and edit them accordingly.
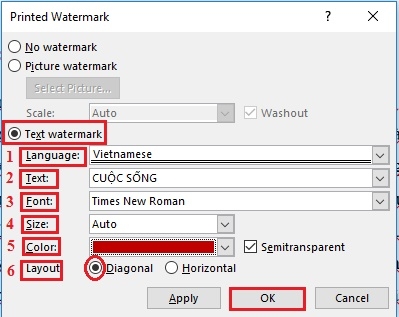
First, you click on the item “Text watermark”
- Select language (1)
- Type the text you want to enter (2)
- Select font (3)
- Choose color (4)
- To create a semi-transparent effect, you tick the box “Semitransparent” (5)
- Choose an instance type (6)
You click on “Diagonal” if you want to create a watermark diagonally or select “Semitransparent” if you want to create a watermark horizontally.
Finally, you click “OK” to finish inserting the watermark on the text background.
Method 2: Insert a watermarked image on the text background
On the “Printed Watermark” dialog box, click “Picture watermark” . Next, click on “Washout” (1) so that the image is behind the text and click “Select Picture” (2).
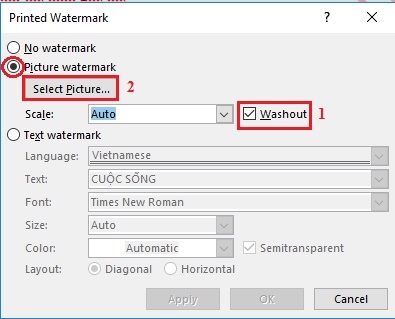
A menu will appear for you to choose from. You can search for an image by clicking “Bing Image Search” or you can also get an existing image on your computer by clicking “From a file” .

You select a photo to blur on the text then click “Insert”.

So your photo has been blurred on the text background.

Above are the steps for you to insert images or watermark text on the text background. With this operation, your text will become more professional, more beautiful and create its own highlight. It can be said that this is a good feature that many people use. Most versions of Word have this feature, however, the location of the Watermark is different, if in Word 2007, 2010 the Watermark item is in the Page Layout Tab, then word 2013 is in the Design Tab on the bar. tools.
Good luck to you ^^


