
How to insert tables, draw tables in Word 2013
- 24-07-2022
- trienkhaiweb
- 0 Comments
Currently, when it comes to text editing, people not only think about typing, but besides editing, there are many cases where you need to insert other objects, of which tables are also an example. particular. Because there are content, you will find it easier to understand and scientific when you enter the content into the table. So do you know how to insert a table into a Word document? In the following article, I will show you how to insert tables into Word both beautifully and scientifically.
How to insert a table into a Word 2013 document
To insert tables into documents, you can draw tables according to the available structure or you can also draw tables according to your needs.
Method 1: Draw tables according to the existing structure
- Step 1: You click where you want to insert the table on the current document.
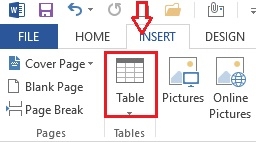
- Step 2: Next, hover your mouse over the Ribbon toolbar, click the Home Tab to find the Tables command group to select Table.
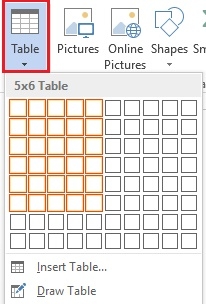
- Step 3: The Insert Table table appears, hover your mouse over the squares on the Table cell, the number of horizontal cells corresponds to the vertical column, the number of vertical cells corresponds to the horizontal row.
For example : I want to insert a table with 5 columns, each column has 6 rows, I hover as follows:
After hovering, you left-click, the table will appear on the position you want to insert.
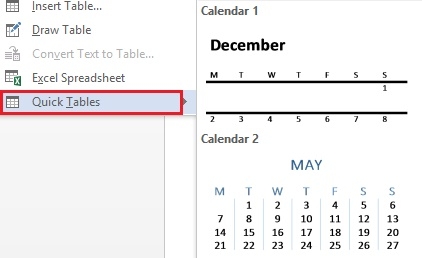
Besides, you can also choose different types of table creation by clicking on “Quick Tables” in the Inser Tables panel to choose table templates with different designs.

Method 2: Draw the chart yourself according to your needs
- Step 1: Similarly, you also click on the position where you want to insert the table
- Step 2: You click on the Insert Tab on the toolbar and select the Table item. When you click on the table, a menu will appear, click on “Insert Table” .
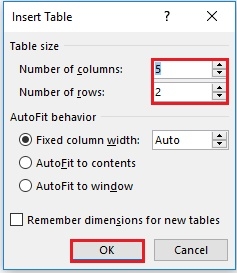
- Step 3: The Insert Table dialog box appears with the following contents:

- Number of columns: Number of columns of the table
- Number of rows: Number of rows in the table
- Fixed column with: Creates a table with fixed column widths according to a value.
- AutoFit to contents: Creates a table whose column widths depend on the contents of those columns.
- AutoFit to window: Create a table whose column widths are consistent with the width of the paper.
- Remember dimensions …: Save the table structure definition for next creation.
To set up a table, you need to know the number of columns and rows. Therefore, it is imperative that you fill in the information in the column number and row number. Finally, after you're done editing, click Ok to create the table.
After you click OK, we have the following result:
Above are two ways to insert a table on the current Word document. You can freely choose for yourself a suitable table by drawing yourself or choosing the available templates to fill in the content. This is one of the symbols used by many people because it helps people to quickly understand the problem. If you do not know the steps and how to do it, please refer to the above article.
Wishing you success.


