
Insert Text Box text frame in Word 2013
- 28-07-2022
- trienkhaiweb
- 0 Comments
Word 2013 is one of the highly rated versions of Microsoft’s software application. Because besides the new features, Word 2013 also improves even the simplest and most ordinary features and one of them includes a Text Box. No longer as simple as before, Text Box has been upgraded to a new level with graphic effects along with text, allowing you to freely create according to your wishes. So how to use and use Text Box like? I will guide you right here:
Instructions for inserting Text Box in Word 2013
Text Box is simply a text box in the margins that you want to insert into a Word document. In addition to editing the content inside, you can also customize the color and background design for the Text Box. Moreover, when using Text Box, it is easier for users to present text because it allows moving to any position, in addition, it is possible to group related text boxes together quickly.
How to insert Text Box into the current Word document.
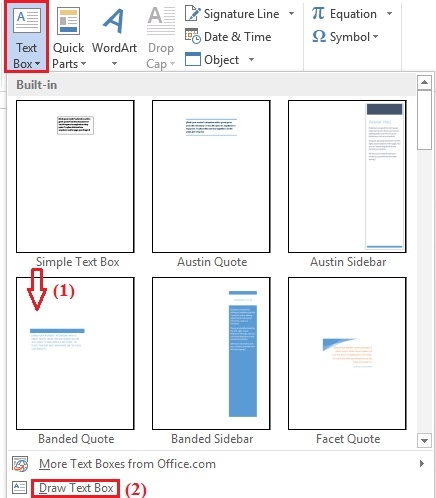
- Step 1: You hover your mouse on the Ribbon toolbar and click on the Insert Tab , then you find the Text command group and click on “Text Box” .

- Step 2: You choose any style you want to insert, click on the template (1) . If, your content is not satisfied with the available templates, click on Draw Text Box (2) to design yourself the most satisfactory templates. Immediately the template you choose will appear on the Word screen. Your next thing is to insert the content you want into that Text box accordingly.

How to format Text Box objects
When you want to format Text Box objects, you need to use the commands in the Format Tab.
The function of each group of commands when you use them to edit Text Box objects is as follows:
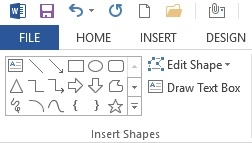
Insert Shapes command group: Allows you to add special objects to the Text box. Besides, you can also change the object of your choice by clicking on “Edit Shape” and customize it as you like…

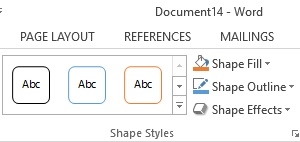
Shape Styles command group: Allows you to select and change the Style as you like. Besides the default Styles on the toolbar, you can also click the down arrow to refer to other Styles. In addition, you can also choose:
- Shape Fill: fill color for Text box
- Shape Outline: choose a color for the border
- Shape Effects: choose different effects.

Text command group: You use this command group to manipulate Text content in Shapes objects. After typing Text, you click “Align Text” to align the content in Shapes with three content options align to the top of the object, center the object and align the bottom of the Shapes object.

Arrange command group: You are allowed to use commands in this group to arrange Shape object position on text
- Position: You can set the position for the Shape object on the text page by clicking the Position icon. You can choose the position of the Shapes object at the top, bottom, center…
- Wrap Text: Text usually has both text and images, objects. Therefore, this command allows you to insert objects above the content or below the content, to the left of the content or to the right of the content…(8)
- Bring Forward: Displays the Shape object in front of other objects.
- Send Backward: Display Shape object after other images.
- Align: Use this tool to align the margins for one or more Shape objects at a time.
- Rotate: Rotate the Shape object, use this tool to change the direction of Shape objects on the text.

Size command group: The commands in the group allow you to resize and rotate Shape objects.

Above, I showed you how to insert a marginal text frame into the text. Usually, when inserted into the text, the content in this text frame is often noticed and interested by more people. Therefore, there are important information, many people often use Text Box. If you have not used Text Box, try to practice whether it is difficult or easy, it is knowledge to help you use Word more proficiently. Wishing you success.


