
Instructions for setting the default font in Microsoft Word
- 24-07-2022
- trienkhaiweb
- 0 Comments
Currently in the new versions Microsoft Word has added a lot of new fonts, you don't like the default font? So how to change the font and reset the default font to your liking?
The following I will guide in detail how to install the default font on Microsoft Word 2013.
Mục lục
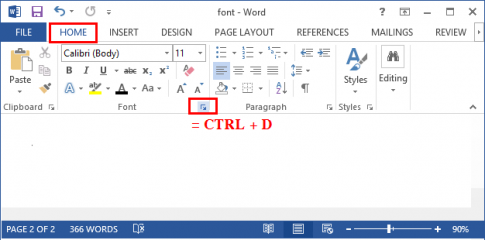
1. In the editing window select “Home then select font”.
We click the icon in the lower right corner of the font or use the key combination "Ctrl + D" to open the font format window.

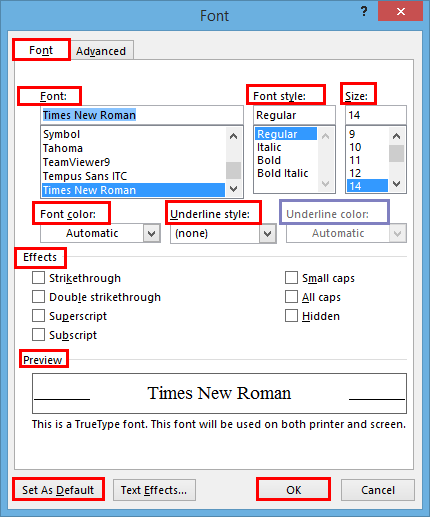
2.In the "Font select font" format window

Let's start setting the properties
- Font : Choose a font, you should choose a suitable font and support for Vietnamese.
- Font style: Choose font format:
– Regular : default font.
– Italic: Italic (Ctrl + I).
– Bold: Bold text (Ctrl + B).
– Bold Italic : Text is both bold and italic.
- Size: Select the font size.
- Font color : The color of the text. Example: You choose red.
- Underline style: Underline the text. Example: You choose to underline.
- Underline color: Choose a color for the underline. (Only used when Underline style is selected).
- Effect: Select the effect (the way it is displayed).
– Strikethrough: Cross out a single word.
– Double Strikethrough: Double strikethrough .
– ….
For each property that you select, the Preview section will display the change you choose.
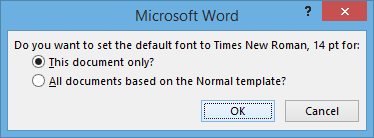
After you have set the properties select Set As Default and select All new documents based on the Normal template to set the default. And if you only want to change the text you are editing, select This document only . And select OK to finish the installation.

For Microsoft Word 2007: Do the same as for Microsoft Word 2013. After setting the properties, select Default then Ok to finish the installation.
For Microsoft Word 2010: Do the same as for Microsoft Word 2013.
Good luck !


