
Remove ripples, red underline under text lines in Word
- 24-07-2022
- trienkhaiweb
- 0 Comments
When editing text, you often encounter wavy lines below the lines of text. This makes you as well as the viewer feel confused and uncomfortable. Usually, these ripples appear when you just reinstall the Office Word suite on your computer. And to remove these ripples is also quite simple. Let's refer to the article below to find out how to handle the blue (red) wavy lines when you edit text.
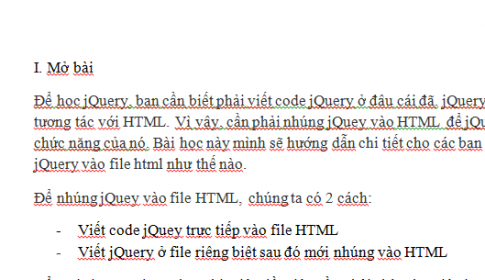
For example, you are getting an error like this:

How to remove red ripples under lines of text in Word
You will immediately see the difference when on the same text you type two different fonts. When you type Vietnamese, red ripples always appear under your text lines. But on the contrary, when you type in English, this ripple completely disappears. Why is there such a difference?
Microsoft is a word processing software with the default language is English. Besides, it comes pre-installed with a dictionary and accompanying words. In order to provide maximum support for users, help users edit documents in the fastest and most accurate way. Word has set up a spell check feature with words typed in the text. And of course, words that are not in the dictionary will be rippled in red to let the user know that the word is not in the dictionary.
Therefore, when you edit Vietnamese documents, you should turn off Office's spelling errors. To do that, I would like to introduce you to the easiest steps.
The specific steps are as follows:
To remove the red ripples under the lines of text, you can do one of two ways:
Method 1: Remove red ripples word by letter
For this case, you can only erase the ripple letter by letter. Therefore, you should only apply this method in case you only need to remove some red ripples in the text.
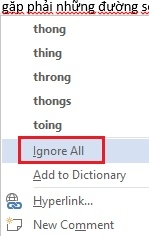
To do this, simply hover over the text that you want to remove the ripple, then right-click and select “Ignore All”. So you have erased those ripples.

Method 2: Remove ripples for all text.
When you want to remove the red ripples under the text on the text, you need to perform the following steps:
- Step 1: First, click on File and then select Options.

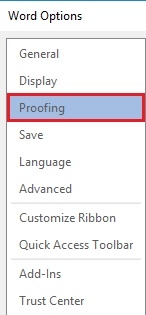
- Step 2: The Word Options dialog box appears, select "Proofing" in the first column of the dialog box.

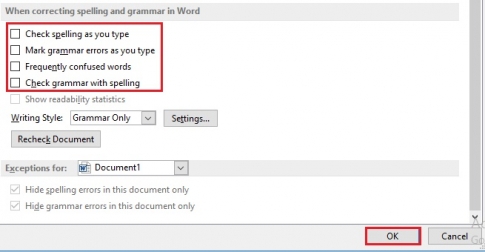
- Step 3: In the "Proofing" window, look to the right column next to it and find the "When correcting spelling and grammar in Word" section. You uncheck all the boxes in that section (as shown). Finally, click "OK" and you're done.

Now, your entire text has lost the red and blue ripples under the text lines.
Above, I showed you how to remove the blue (red) ripples on the text when you just reinstalled Word. In essence, it will not affect the printing of your text. However, the appearance of these ripples, makes you feel uncomfortable. So, if there is a need, you can apply the above steps and do it. Extremely simple and fast, I'm sure all of you can do it. Wishing you success.


