
Set up contact form 7 event conversions for google adwords & google analytics using tag manager
- 28-07-2022
- trienkhaiweb
- 0 Comments
If you are currently in need of a solution that fits the following criteria, take a close look at this article:
- You are currently using the contact form 7 plugin on your WordPress site.
- You want to catch the contact form submission event as a conversion goal in Google google adwords.
- You have implemented Google Analytics on your website using Google Tag Manager.
Mục lục
Step 1: Log in to google tag manager and create a tag
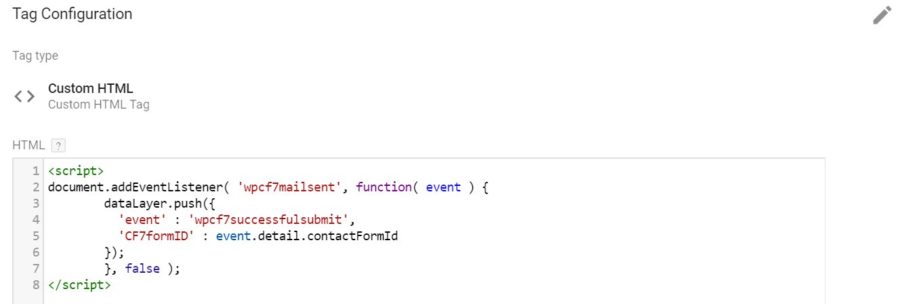
First of all, and a very important note: make sure your tagmanager code has been correctly included in the header of your website according to google’s instructions. (Note this part is not in the video article). Go to https://tagmanager.google.com Tag configuration: Tag Type: Custom HTML -> Tag type: Custom HTML paste this code in
Triggering: Select the trigger: All Pages if you want to catch this event site-wide. This section means that this successful form submission event will be caught on your entire website, you can completely configure this form submission event separately on each detail page in case you use an ad campaign. advertising for many different landing pages and need to measure the effectiveness and customer behavior of each subpage.
In the demo video, I use it in the actual case that I want to get the form information submitted by the customer from a purchase page.
We name the tag CF7 listener, click save . 
Step 2: Create a GTM Trigger (GTM Trigger)
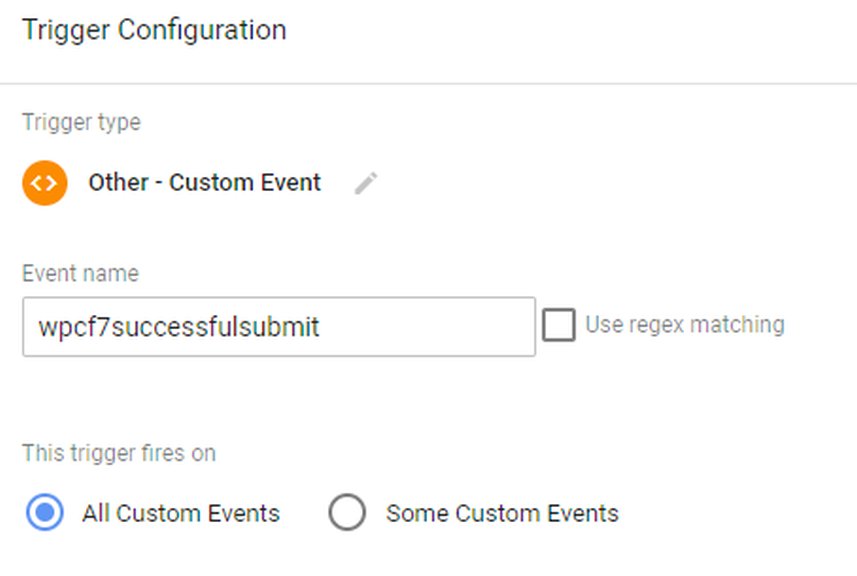
Select the custom event trigger, fill in the new ” wpcf7successfulsubmit ” event variable declared above , name the trigger as you wish and click save.
Step 3: Go back to the tag generator (Tag)
Tag type (tag type): google ads conversion tracking Back to your google adwords page, go to “Tools and settings” -> Measurement -> Conversions Click the (+) button to generate conversions, after configuration click “create and continue”. After successful creation, google redirects the interface to the tag setup section, select (“use google tag manager).Copy the conversion ID and conversion label and paste it to the side of google tag manager’s tag configuration and save it. back with both tagmanager & google ads.At the trigger configuration section of this tag, select the trigger you just created in step 2.At this step it’s almost done, you can skip step 4, however, , I encourage you to do it to understand more about the google tag manager tool.
Step 4: Create variable on google tag manager.
In this step, we create one more variable on the google tag manager CF7formID, which receives the formID value from the user’s form submit event. Then go back to the google ads Conversion Tracking Tag and select the CF7formID variable for the Conversion Value field. Then click Publish. If you watch the video, you will see that google provides a preview feature to debug whether the events and variables are correct.
Step 5: Continue to install google analytics with the events created in the previous steps.
Tag type: google analytics:Universal Analytics Setting is similar to step 3 (watch the video for better understanding). The article is translated and developed from the original article: https://chrisberkley.com/blog/contact-form-7-event-tracking-google-tag-manager/ If you find the article interesting, please share to Motivate the team to make more quality videos!


