
User manual and basic admin functions WordPress CMS
- 28-07-2022
- trienkhaiweb
- 0 Comments
Mục lục
What is WordPress CMS?
A content management system, abbreviated as CMS, is an application capable of creating, modifying, and publishing digital content. In most cases, it also supports multiple users, allowing them to manipulate the website admin page in an intuitive & easy way. Advantages of WordPress CMS:
- Extremely friendly with SEOER, MARKETER, WEBMASTER
- Coder support with strong community with massive documentation system.
- Easy feature development at a much lower cost than web framework projects, due to the large number of developers + strong support community.
- Decentralize the user system
- Easily change the interface for webmasters who don’t know how to code (templates), for free or at a very low cost.
One of the reasons why WordPress is so popular is that the installation environment is extremely simple compared to other frameworks and languages: PHP : version 5.2.4 or later MySQL : version 5.0.15 or later or whatever any version of MariaDB. If you are more interested in wordpress development as well as wordpress programming, you can see instructions for installing xampp localhost & instructions for installing wordpress on localhost here.
Basic WordPress Administration Guide
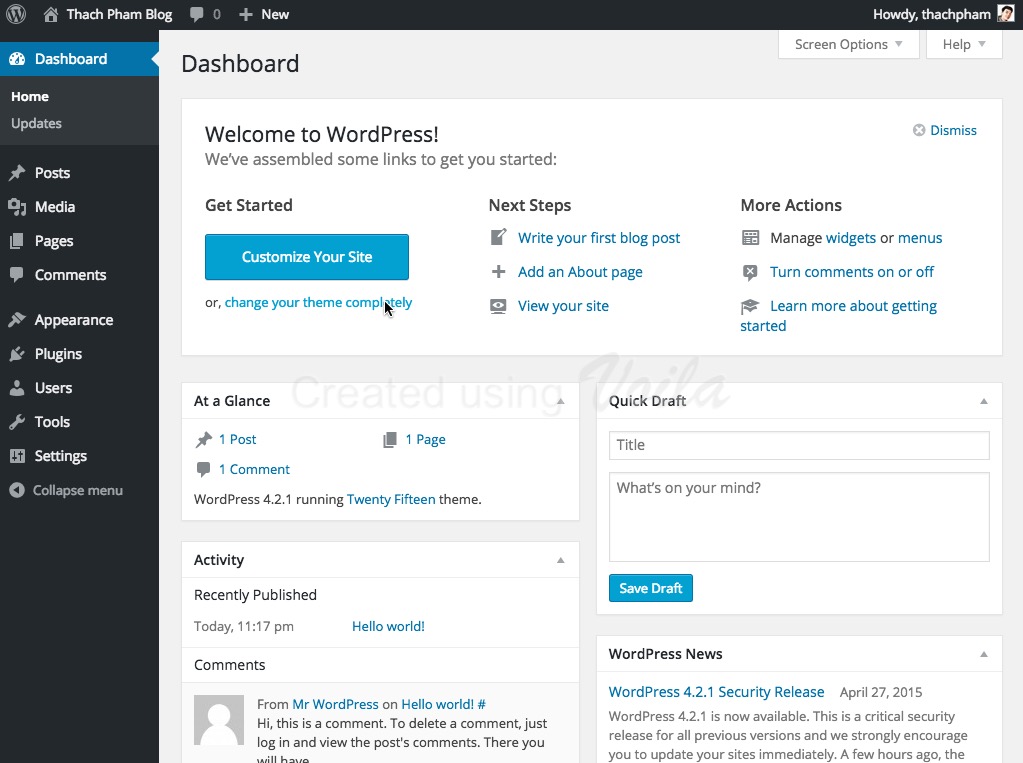
You log in to the website administrator (with the admin account and password you have installed or provided by the webmaster) After successfully logging in, you will go to the Admin Dashboard. It is built for you to have an overview of your entire website, divided into 3 main areas. 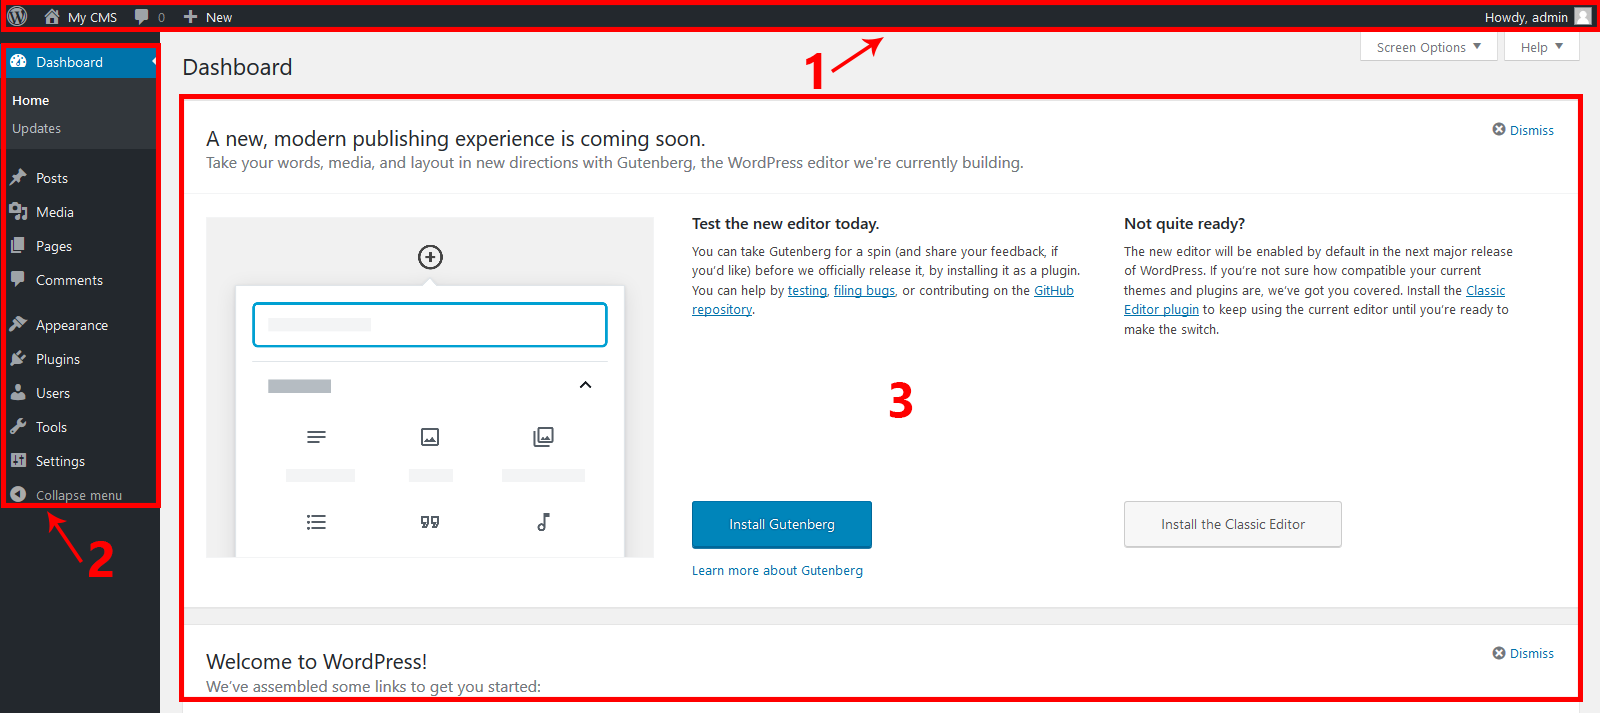
- Area 1 : Quick action toolbar (admin bar)
- Area 2 : Menu to manage WordPress features.
- Area 3 : Information display frame, content manipulation, …
In this article, we will detail how to use the functions in Area 2 (detailed WordPress management menu). Some basic wordpress features by menu: 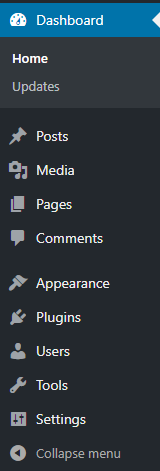
Dashboard: Dashboard
This Dashboard area is a collection of tools related to monitoring website statistics and updating versions of Themes, Plugins, WordPress …. It includes 2 parts as follows: Home : Home Tracking area WordPress progress, as well as detailed reports on posts, comments, etc. 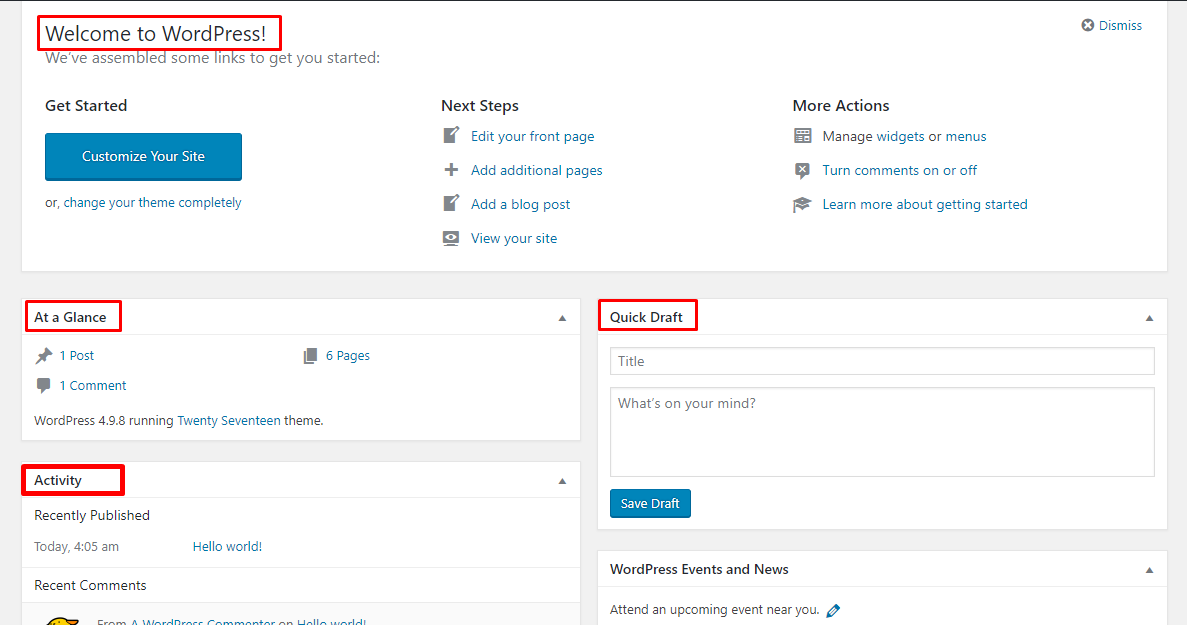
Other modules like:
- Welcome to WordPress : Display the latest news about WordPress.
- At a Glance : displays the number of posts, comments, and pages that your website currently has. It also shows the WordPress/Theme version you are using.
- Quick Draft : Entering content here will start a new blog post. However, you cannot publish an article from here because it is only for posting ideas for you to come back to later.
- Activity : gives you information about the latest posts and comments. It shows the status of all comments and a short list of the most recent comments.
Update : Update
The place for you to update the latest patches of Themes, Plugins, WordPress are using. Every time there is a new version it will display a notification for you to see.
Posts : Posts
This is the most important part, it is the part for you to post and manage it. At the website administration interface → Posts.  All posts : Displays all previously set posts. Add new : Add a new post. Or you can click on this link: how to create a new post for wordpress .
Media: Manage Gallery of images, videos, …
All the images/files that you upload while composing content you can easily manage at Media → Library area in Dashboard. Here you can see all the files you have uploaded and can choose to display the grid or the general style, you can also view the date and can click the Add New link to view it. Upload files without going to the content editor page.
Pages: Manage Pages
This section is similar to the Posts section, but it will not have Categories and Tags. About its use is for you to post content pages that have generic elements and are not classified by a Category or tag, such as about page, contact page, … and are often used for further development. features as well as create more landing pages for your website quickly All pages : All pages Displays all the pages you have created previously. Here you can edit, preview and delete pages. Add new page : Add new page To create a new WordPress site, choose Pages → Add New At Pages, the features are similar to Post. However, Pages does not use the category structure and tags as in Posts. Pages uses the parent page structure and the order to arrange the position of the page. Comment: Manage comments This is simply an area where you can manage, edit, and delete comments on the website. Appearance: Manage themes Themes: Themes Installing a theme for WordPress is very easy, it only takes a few minutes to install and apply the theme to your website.
Widgets
Widget is a feature commonly used for sidebars, or in some cases theme programming, it is a collection of functions; Each widget corresponds to a function for you to insert into the sidebar (sidebar) or anywhere of the Theme. 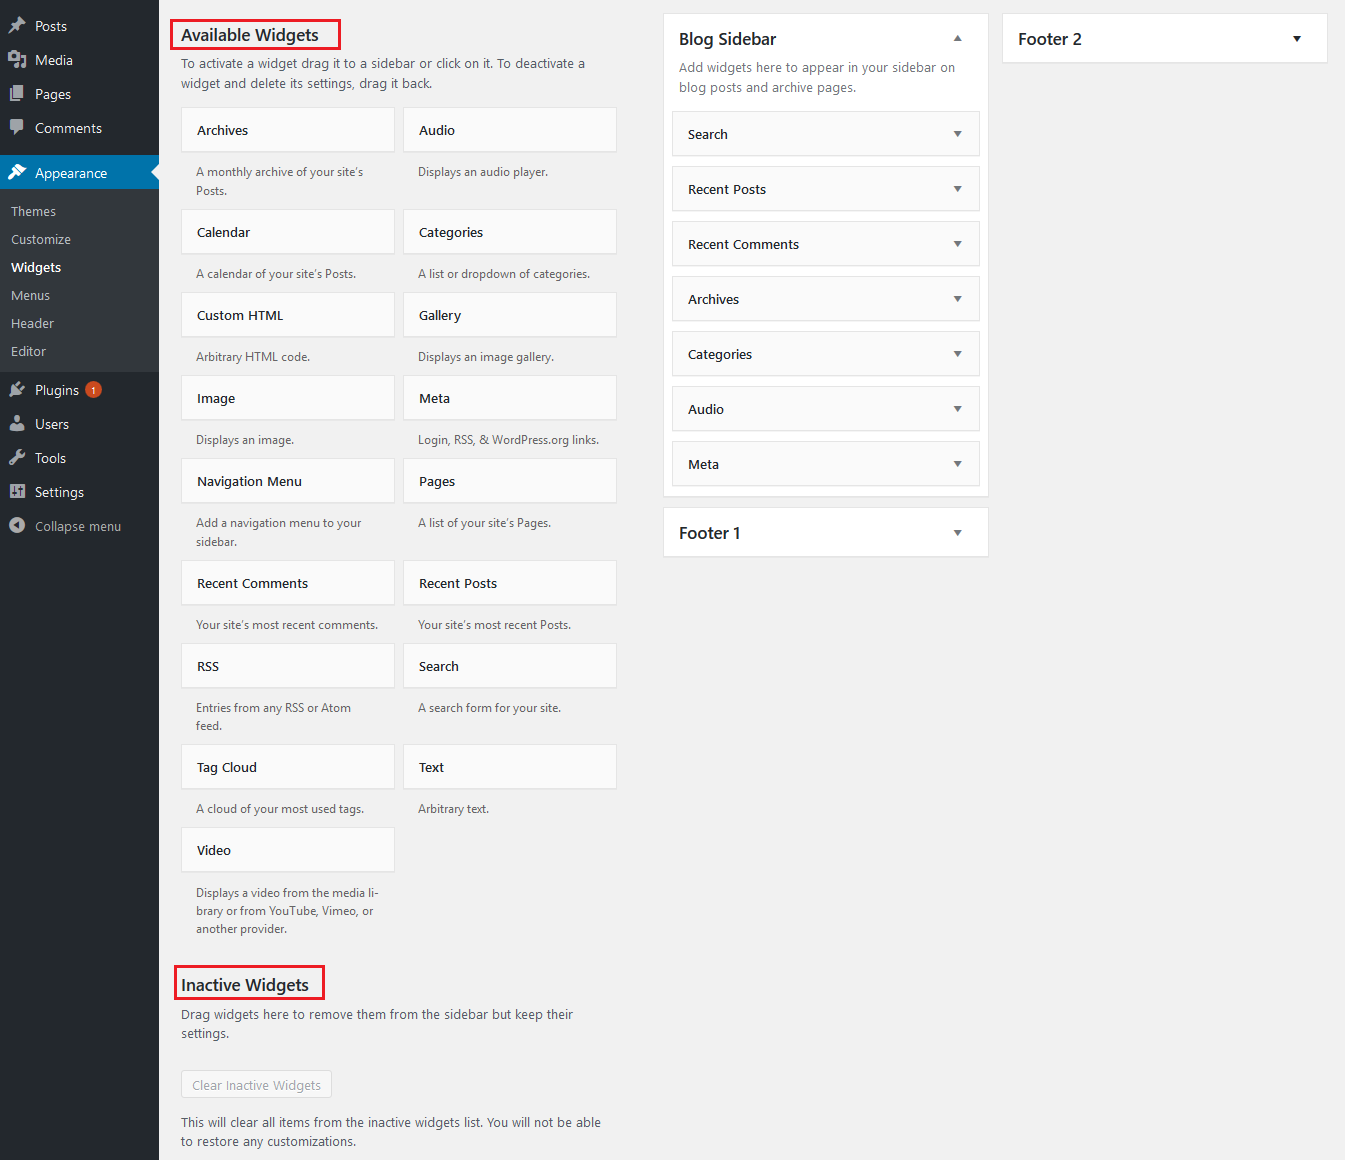
- Available Widgets (Available Widgets) : That is, the types of widgets that the theme provides, in addition to the popular widgets, there will be many other widgets, especially the interfaces you buy will have more widgets than most. other free themes.
- Widget position : That is, where the widget will be placed, usually the right hand column (sidebar) and the footer (footer). Sometimes it will be the left hand column if the design puts the main content on the right hand side. Widgets are also usually not limited to placement, for example, if the theme offers 3 locations, any widget can be placed in any of those 3 places.
- Inactive Widgets : If there is a widget you are using, and for some reason you don’t want to use it anymore, you should include it in this area. WordPress will keep its settings, and whenever you want to use it again just drag it from this area to the desired location, and you won’t have to edit the settings. For example fanpage, when you create widget for it, you will need to set the link, height, width. If you remove this Inactive Widgets part, the next time you need to use it again, you will not have to waste time resetting that information.
To put widgets on your website you need to understand:
- What is the widget you want and its location in the Available Widgets area.
- The position of the Widget you want to place, usually Sidebar means Left Column or Right Column, Footer means footer, if you are not clear about the feature, contact the theme developer or coder for a clear answer. best.
Then you just need to drag and drop the widget to the area you like (click & hold the left mouse button and drag): 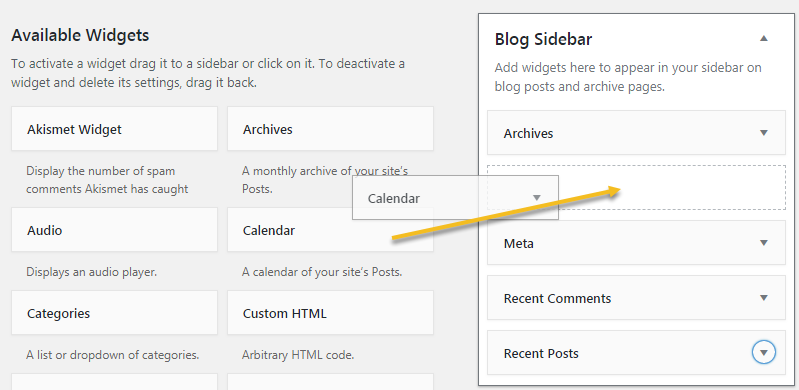 If dragging and dropping is inconvenient, another way you can do is simply click on the widget and you want and then select the position for it from the small window shown below (the widget below has 3 positions: Blog Sidebar, Footer). 1 and Footer 2):
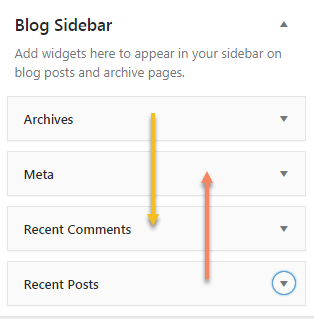
 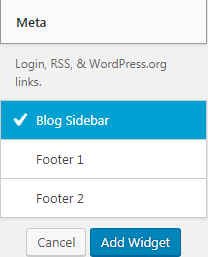 Finally click on Add Widget and you’re done. Adjust the position of the top and bottom of the Widget, you can adjust their position above and below by dragging up and down:
  Menus Menu means the menu bar displays the links on the Theme, depending on the Theme you will have how many menus, displayed above or below, left or right, not we want it to be displayed. we can create multiple menus but we can only specify one menu to be displayed per Menu Location. There are many themes that support many different Menu Locations, but in the default theme, there is usually only one location. For themes with pre-configured menus, it’s very simple, you just need to access the menu available in the developer’s theme, select and edit. To access the Menu management page, go to Appearance → Menus in the Dashboard . Detailed article on how to use the wordpress menu .
Editor
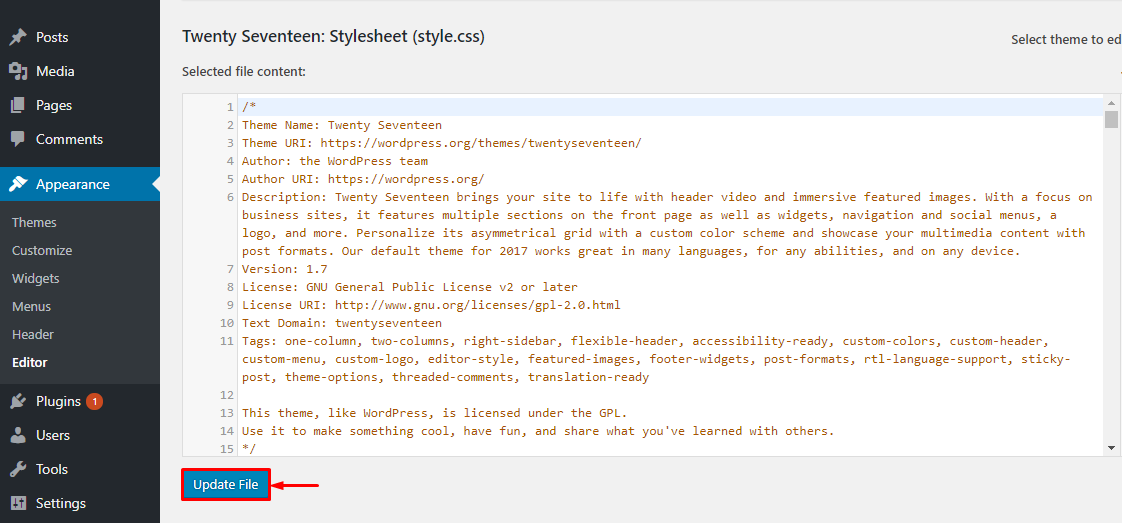
Editor in WordPress helps you change the source code of the interface according to your needs. At Appearance → Editor → Select theme to edit → Select. 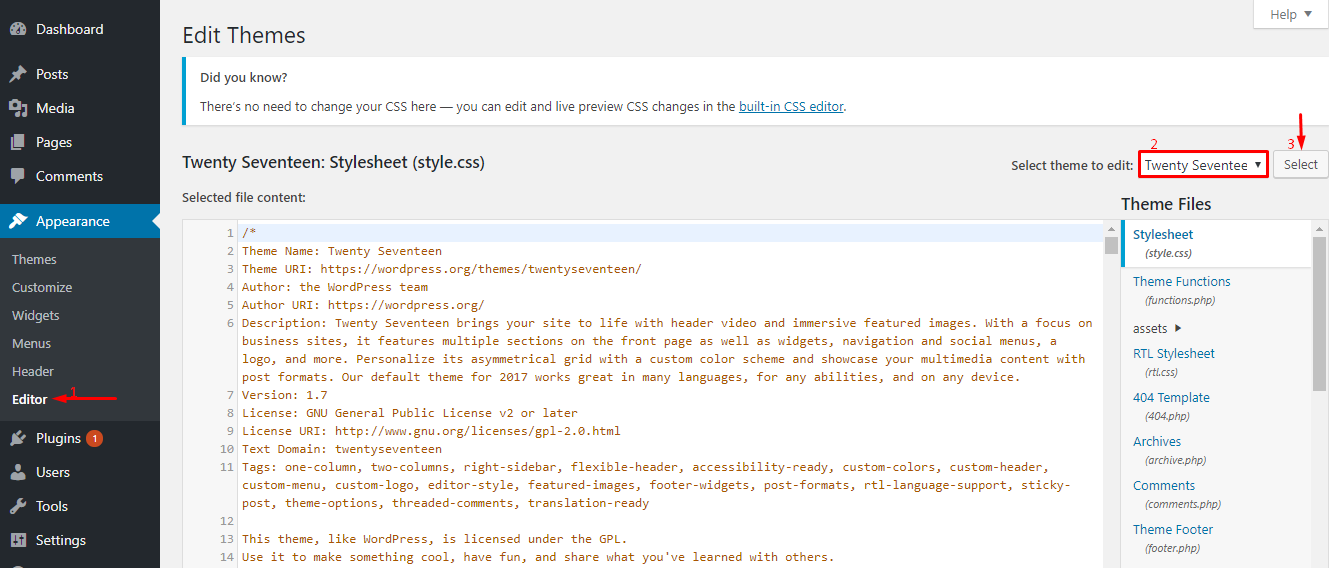 After successful selection, you will see the Templates section on the right column, the Themss of the interface you selected above will appear. You click on Themes to edit → Update File to save the changes.
Plugins: Manage add-ons
The main purpose of Plugins is to extend the functionality of WordPress. Just by installing and activating the plugin, you can add new features to your website without knowing any coding. There are thousands of free and premium plugins built for different purposes: From social media sharing to security, and more. So you are sure to find a plugin that suits your needs. Installing WordPress Plugins is an easy job even for a beginner. Free Plugins are available in the Plugins directory of WordPress.org. Just like themes, they can be installed using the built-in WordPress installer. To install WordPress Plugins, click the Add New button under Plugins and enter the name of the plugin you want to install in the search box. Select the plugin you need and click Install to install, click Activate to activate and use. Important note when using plugins: only use plugins downloaded directly from the wordpress repository and be very wary of null plugins and carefully check the plugin’s source code. The first is for copyright reasons, the second is when using the null plugin, often hackers will include some gifts in the source code, and I guarantee you will have an extremely bad experience! Repair costs are higher than buying genuine themes or ordering from professional website design companies
Essential Plugins for WordPress:
There are so many plugins for WordPress, it can be difficult to choose the right one that you really need. In fact, there are many plugins that support the same purpose, for example there are dozens of WordPress Caching plugins. That’s why we decided to list the best WordPress plugins needed for every WordPress site Yoast SEO : Probably the most popular SEO plugin for WordPress. It will help you with search engine optimization. From meta tags to recommendations. Wordfence Security : This plugin will keep WordPress safe from hackers and malware. It has firewall and malware scanning modules which are very useful. Contact Form 7 : Simple but very powerful to help you create any contact form from simple to complex. Note : We do not recommend installing a lot of Plugins in WordPress because it can reduce the performance of your own website, install the really essential plugins and delete the unnecessary ones.
Users: Manage accounts
To create more users, go to Dashboard → Users → Add New , here you will need to declare the information for the new user. Information with the word required is mandatory to declare (cannot be left blank). 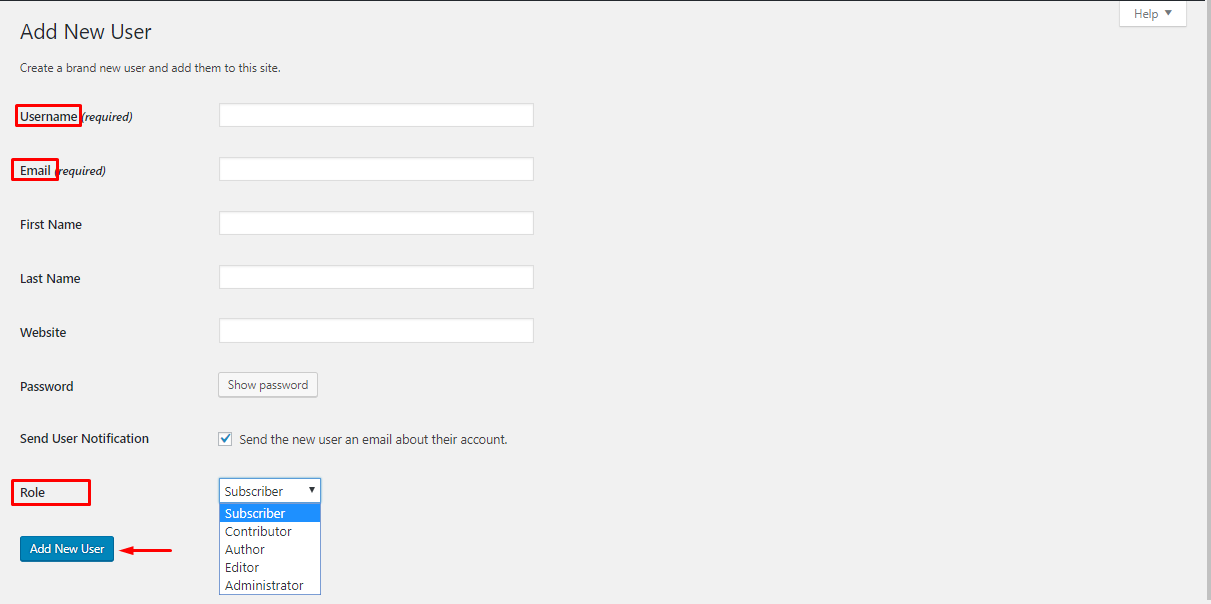 When creating a user, you can assign permissions to each of those users at Role:
- Administrator : The group of users who have the right to use all the features included in a WordPress website, excluding other websites in the internal website network.
- Editor : This group has the right to publish articles to the website (publish) and manage other posts of other users.
- Author : This group will have the right to post to the website and manage their posts.
- Contributor : This group will have the right to write new articles but not be allowed to post, but can only submit for review (Save as Review) and manage their posts.
- Subscriber : Users in this group can only manage their personal information.
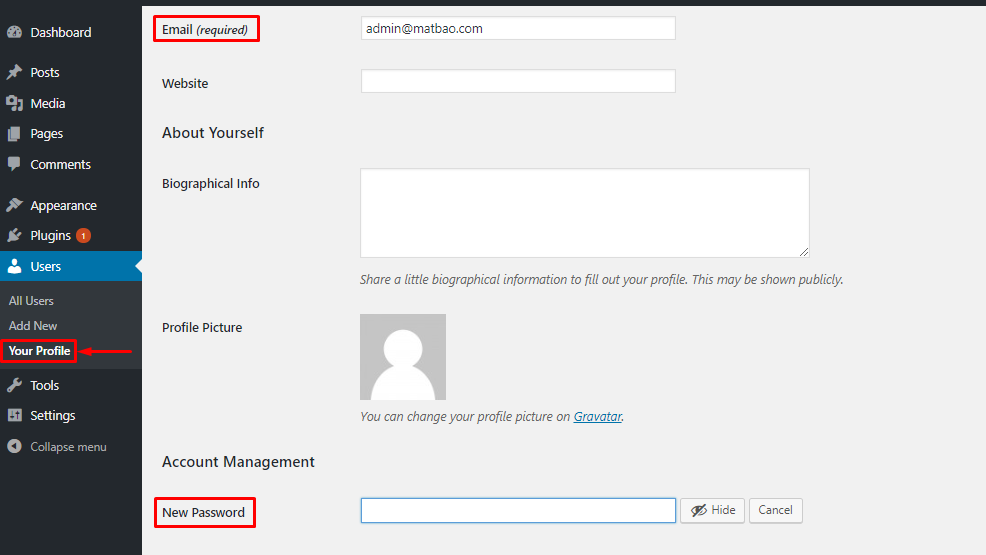
- You can change your WordPress admin Email, Password in Your Profile.
 To delete a user user, go to Dashboard → Users → All User , here you will see a list of Users.
 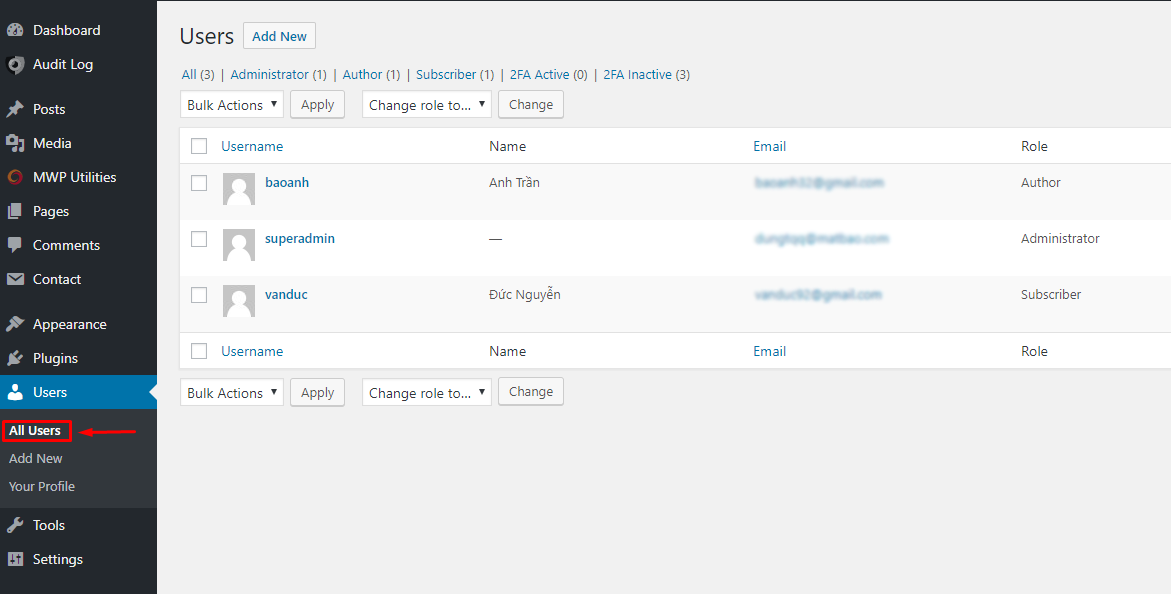 Next, move the mouse pointer up to the User Name to be deleted and click Delete , the website will redirect to the operation confirmation page → press Confirm Delete to finish deleting the User.
 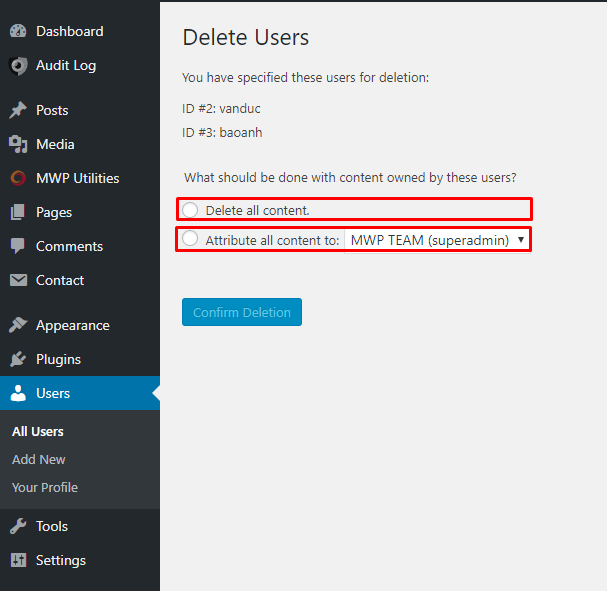 Note : There are 2 options before confirming Delete User that you need to check.
- Delete all content : Delete all content from this User posted on the website.
- Attribute all content to : Transfer all deleted User’s posted content to existing User.
Extra features (less used)
Tools: Tools
Available Tools : Available Tools This feature contains Press This application that helps you to cut content (text, video, images) from other web pages. Next, you edit and add those content directly. Choose to save and post on your Website. Import : Data import settings Import content (posts, comments) from other website systems to WordPress Website automatically. 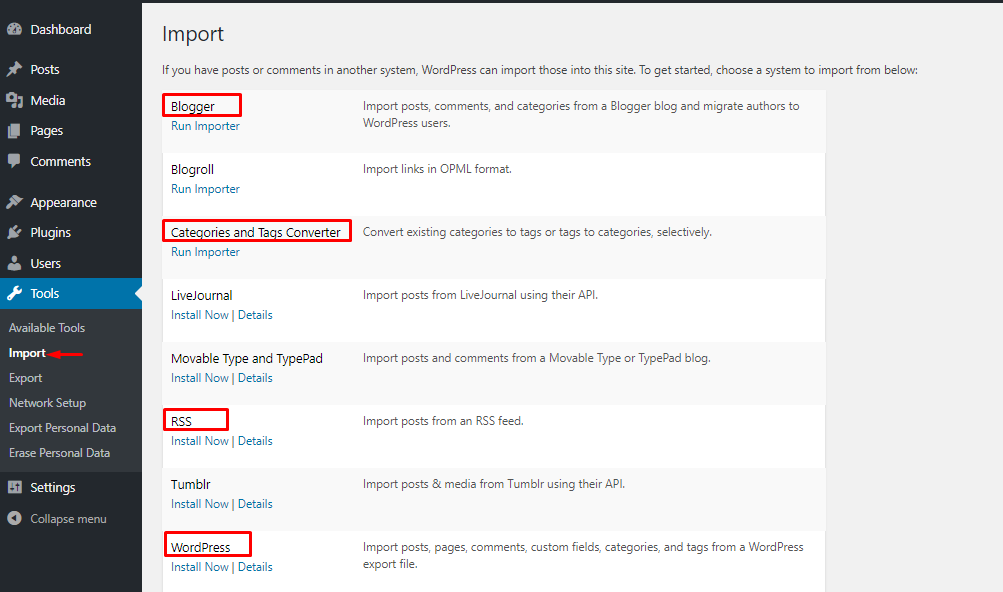
- Blogger : This tool helps you to push content (categories, articles, images and comments) from your Blogspot site to this WordPress Website.
- Similarly, You can push articles (Posts) from your LiveJournal, RSS accounts to this WordPress Website. You can also push posts and comments from Movable Type, TypePad accounts. If you have an account on Tumblr, you can push articles and multimedia files posted on your Tumblr account to the WordPress Website.
- Categories and Tags Converter : Tool to help you convert categories (Categories) into Tags and vice versa.
- WordPress : You have 2 WordPress Websites, in which 1 new Website and 1 old Website. You want to push the content (posts, comments, categories, tags) from the old Website to the new Website, you need to use this WordPress tool.
Export : A WordPress data export setting that saves posts, pages, comments, categories, and tags into an XML file (known as WordPress extended RSS or WXR format). 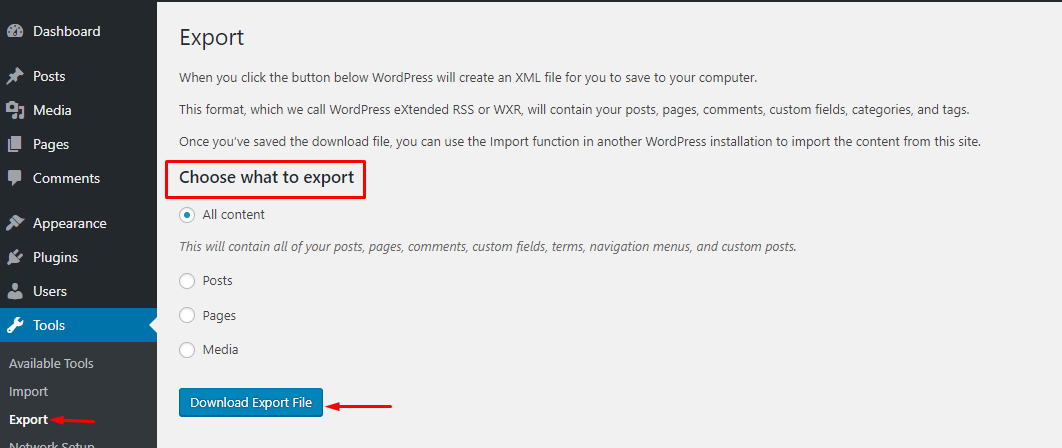
- All Contents : Export all content related to Posts and Pages, Menus, Custom field and Custom post type.
- Posts : Export all content related to Posts.
- Pages : Export all content related to Pages.
- Media : Export all content related to Media.
After selecting the content type, you can click the Download Export File button, it will download a .xml file containing the data you export. Whether this file is large or not depends on how much content you have.
Settings: Settings
General : Settings overview This area is where the important settings about your website’s configuration are located. In Settings → General we have the following settings: 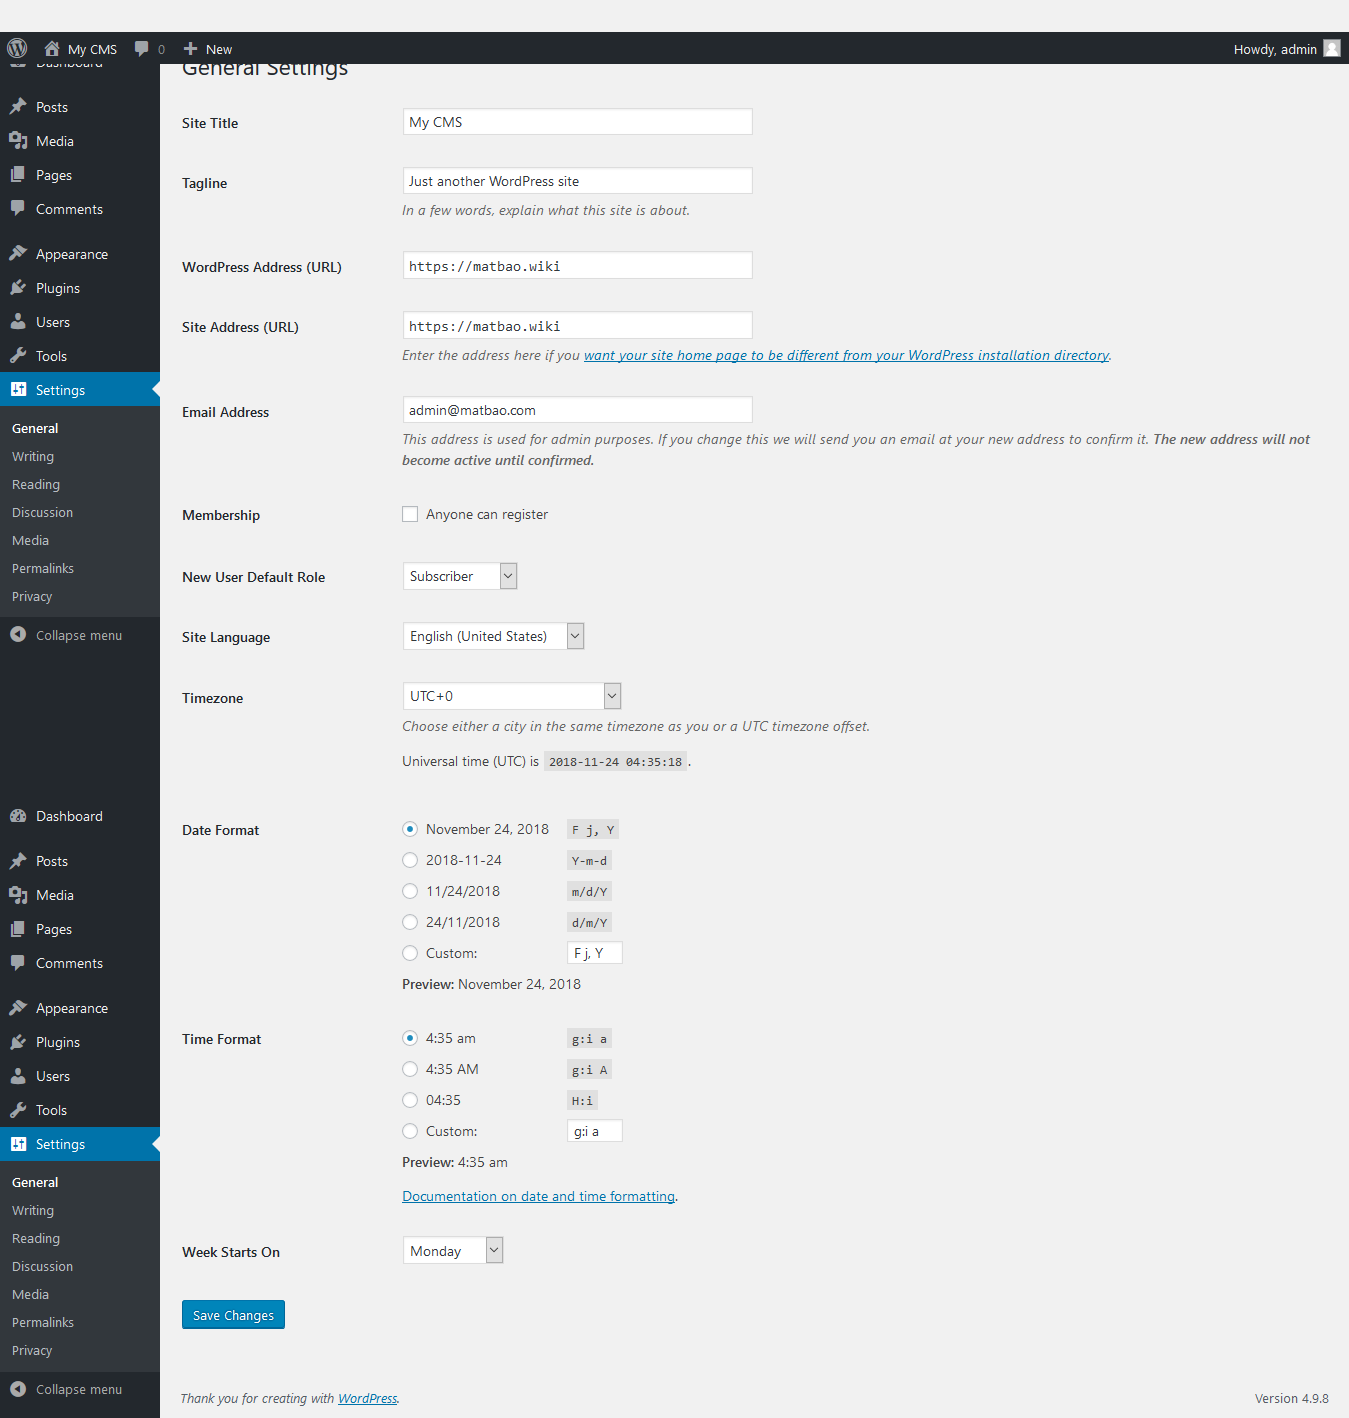
- Site Title : The name of the website, this name will display by default on the website title.
- Tagline : Description – slogan of the website.
- WordPress Address (URL) : The address of your current WordPress website. This address will affect the link of the Post and Page on the website.
- Site Address (URL) : The address of your homepage website, if you set a WordPress website as your homepage, it should be the same as the WordPress Address.
- E-mail Address : Email address of the website administrator, important notices about the website will be sent here.
- Membership : If anyone ticks the box Anyone can register, guests can register themselves for a user account on your website at http://domain/wp-login.php?action=register.
- New User Default Role : The user group that new users sign up for will be defaulted after they complete registration.
- Timezone : The time zone you want to use on the website, Vietnam is GMT + 7.
- Date Format : The date format you want to display on the website.
- Week Start On : The date you want it to be the first day of the week.
- Site Language : The language you want to use on the website, currently there is no Vietnamese in it.
Those are the settings in this section, please read the explanation carefully and the setting is right for you. Writing : Editing Settings The settings in this section will directly affect the process of composing and publishing your content on the website. 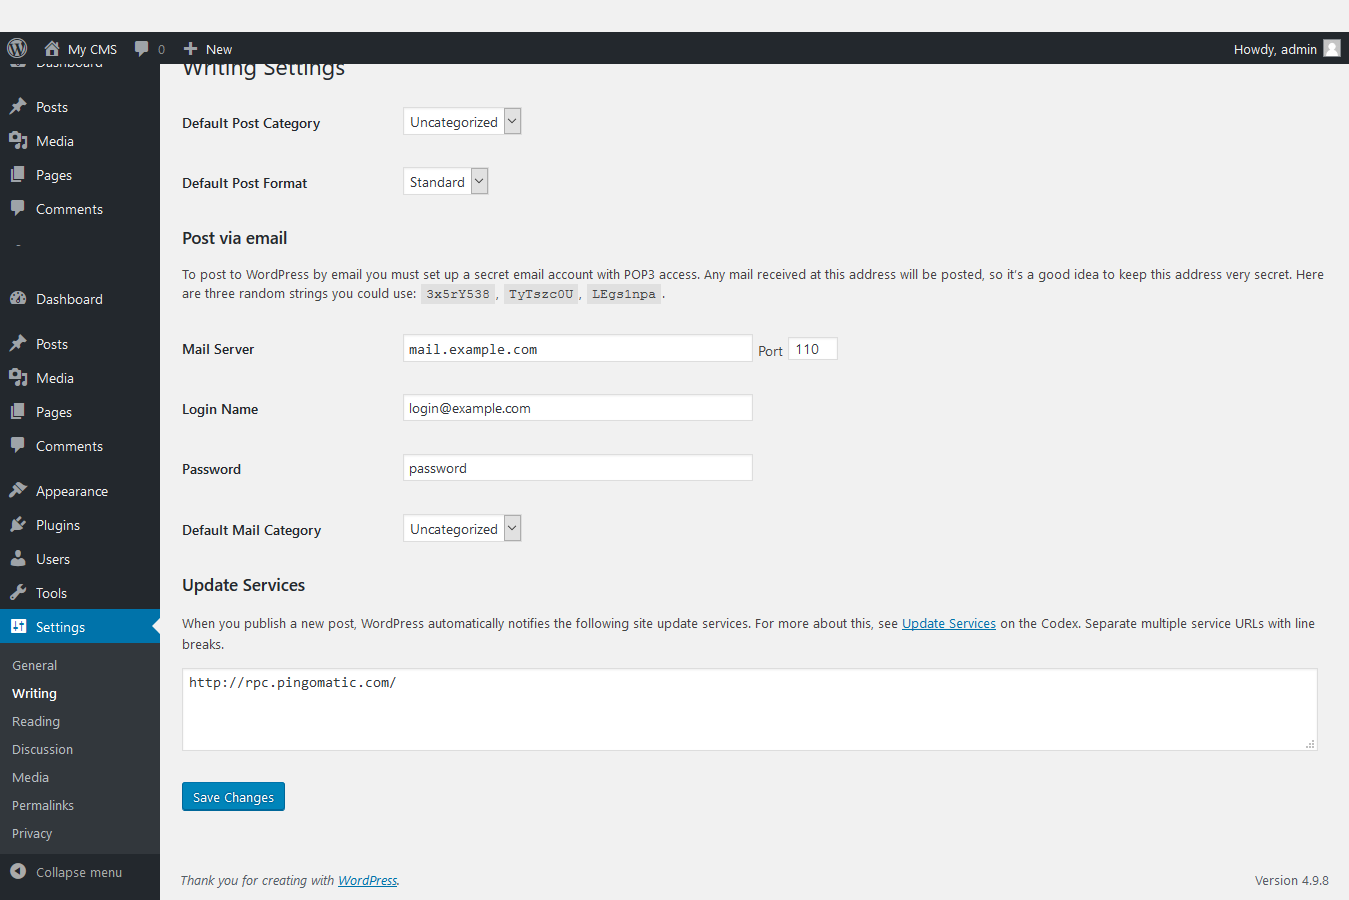
- Default Post Category : The default category of a Post post if you forget to select a category when posting.
- Default Post Format : The default post format type when you post if you forget to select it.
- Post via e-mail : Posting feature via e-mail.
- Update Service : The ping service that you want WordPress to automatically ping when there are new posts.
Reading : Page view settings Affect the display of content on the website. 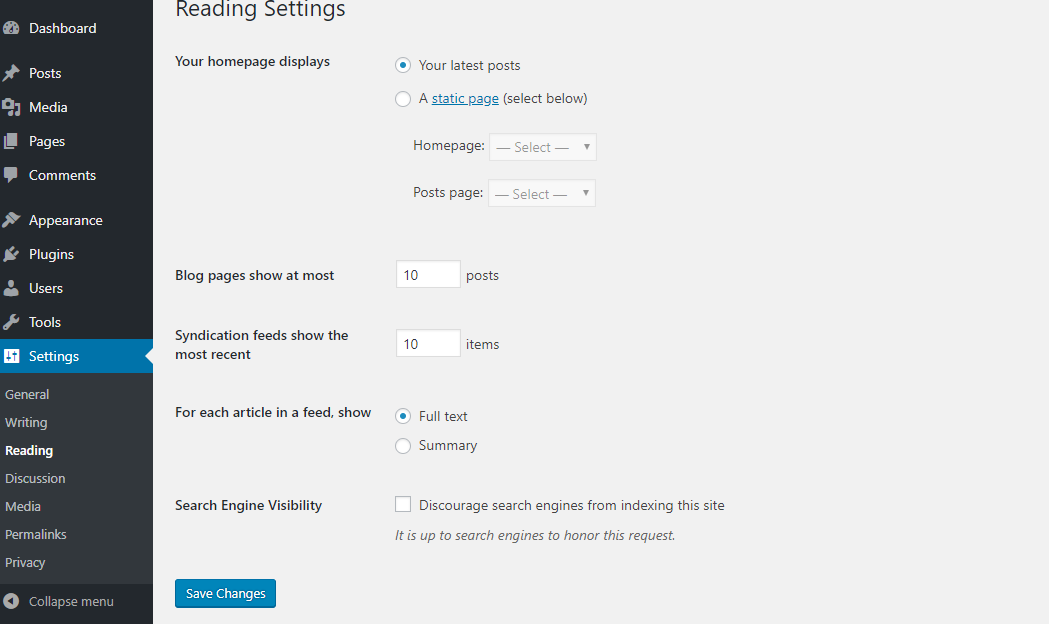
- Your homepage displays : displayed at the homepage interface.
- Blog pages show at most : The number of posts displayed on the blog page. Currently, you just understand that a blog page means a page that displays a list of the latest posts on the website.
- Syndication feeds show the most recent : The number of new posts displayed in the website’s RSS Feed page (http://domain/feed).
- For each article in a feed, show:Full text : display content on RSS Feed with full content. Summary: display content on RSS Feed with shortened version.
- Search Engine Visibility : If you check this section, it means that search engine bots (for example Google) cannot index your content, so your website does not show up on search results. at Google.
Discussion : Comment Settings Impact the comments feature on your WordPress website. 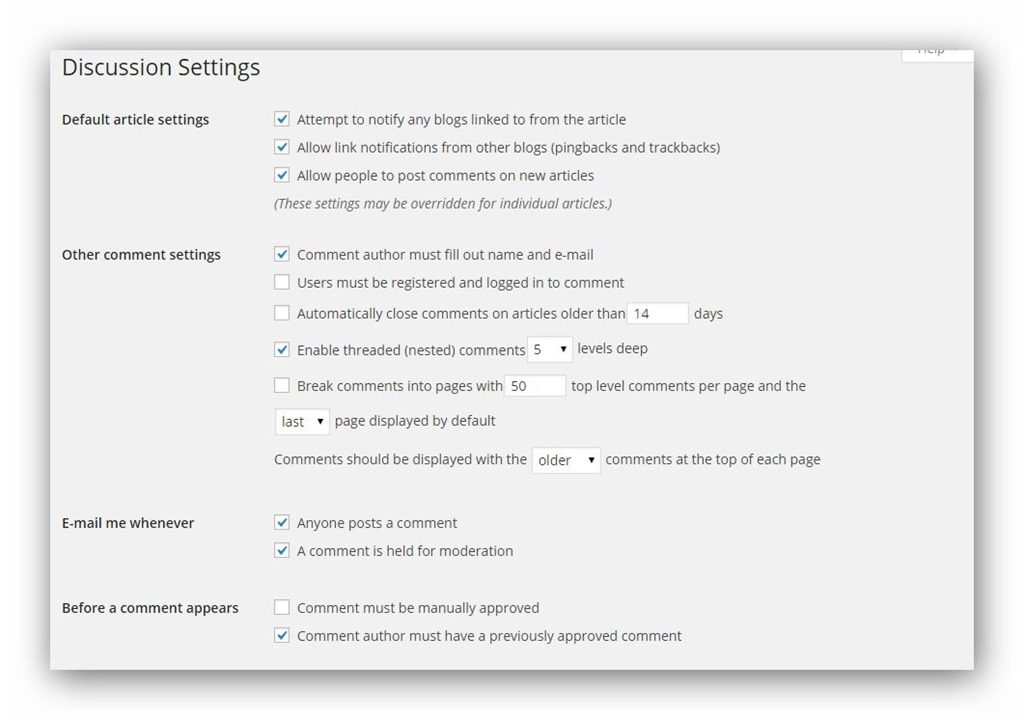
- Default article settings: The settings here will be related to enabling comment related features by default. These settings can be modified on an individual post/page.
- Other comment settings: Other settings related to posting comments.
- E-mail me whenever: Set up to receive e-mail notifications about comments.
- Before a comment appears: Apply before the comment is displayed.
- Comment moderation: Automatically put a comment on pending approval if it contains a keyword, link, email or IP address in this list. Each blocking rule must be placed on a separate line. For example, if you write “Bad-boy Thach” in the frame of this section, the comments with the word “Bad-boy Thach” will be put in a pending state, not displayed immediately. Applies to sender name, email, IP address and comment body.
- Comment Blacklist: Words that are forbidden to comment. Each forbidden word will be declared with one line. If a comment contains a forbidden word, it will be marked as Spam.
- Avatars: Option to display the comment sender’s avatar image.
Media: Media Settings The set create this will image enjoy arrive position ability to upload media files ( picture photo /video/ music ,..) up content . 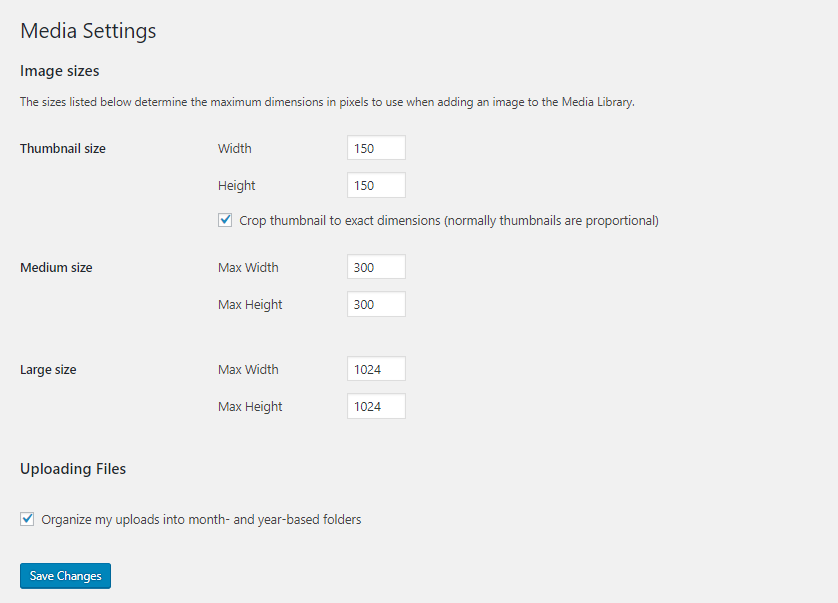
- Image sizes: The settings in this will determine the default WordPress image sizes that are generated after uploading an image to the gallery.
- Uploading Files: Settings related to uploading files.
- Organize my uploads into month- and year-based folder: Automatically put uploaded files into folders with date structure compared to upload time.
Permalink Settings: Static Path Settings This is where you’ll enable static paths for your entire website instead of using a dynamic path structure. Static path means that your Posts, Pages, Categories, Tags, etc. addresses will be represented by specific names, not numbers. 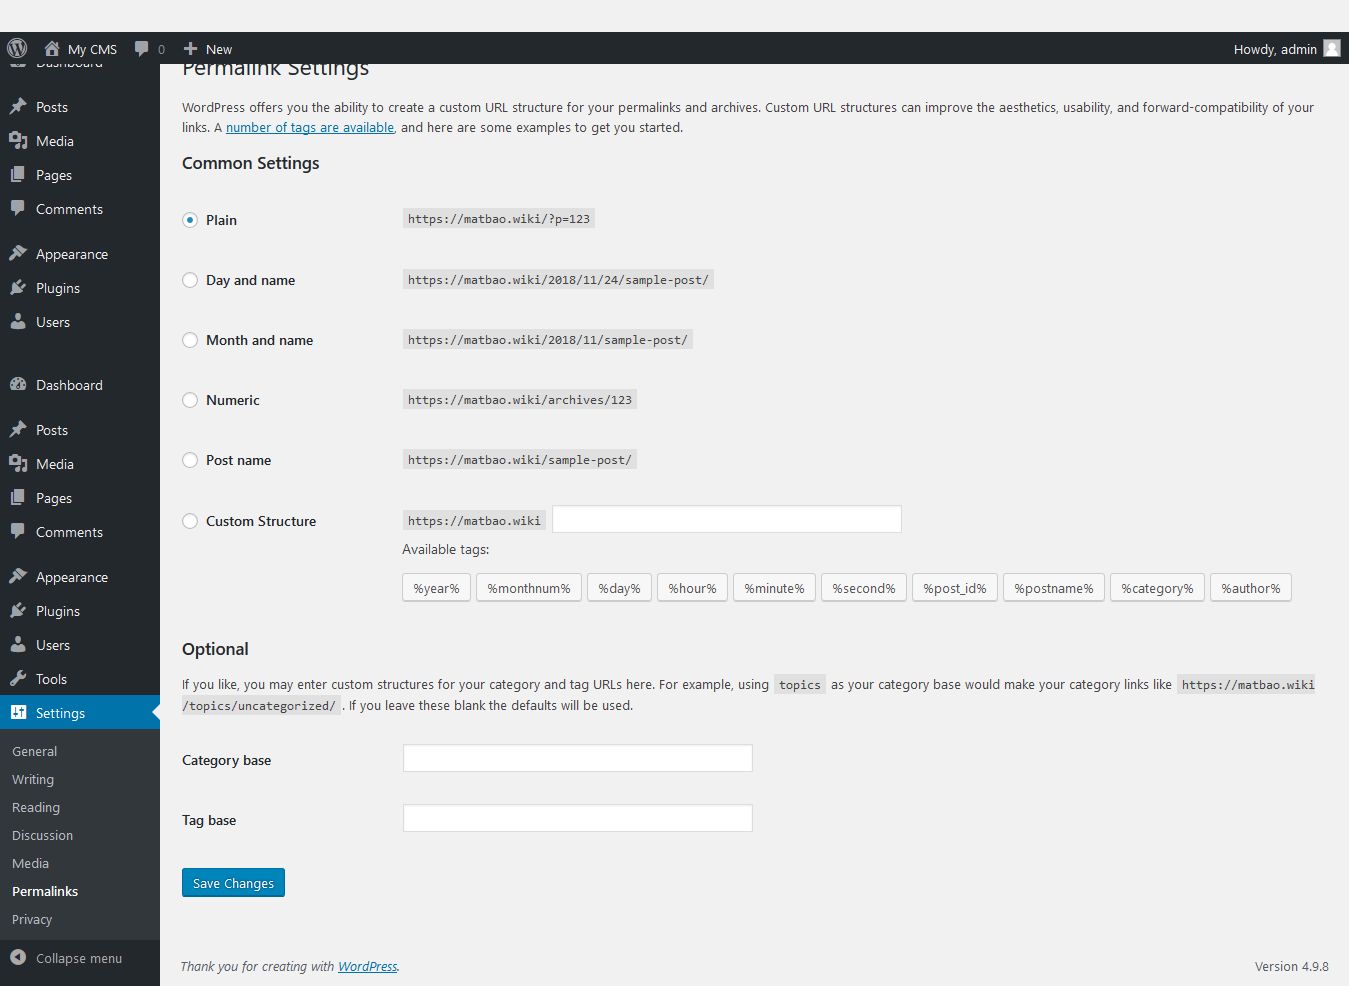 Common Settings: Common settings .
- Default: Default path structure (dynamic path).
- Day and name: path structure with full display date and post name.
- Month and name: path structure with display type month, year and post name.
- Numeric: The path structure shows the post’s ID instead of the name.
- Post name: Show only the post name on the link
- Custom Structure: Customize arbitrary path structure, see more at the end of the article.
Optional (Optional settings are not required):
- Category base: The parent path name of the links to the category page. By default it will be http://domain/category/name-category/, if you enter “chuyen-muc” here it will display as http://domain/chuyen-muc/name-category.
- Tag base: The parent path name of the path to the tag pages. By default it will be http://domain/tag/name-tag/, if you enter “the” here it will display as http://domain/the/name-tag.
At this point, you can completely manage a wordpress website in a basic way, if you have difficulty, please leave a comment or contact us. Thank you !


