
How to point domain to host
- 24-07-2022
- chuong xuan
- 0 Comments

- Lesson number: 29
- Year of implementation: 2021
- Belonging to the project: A Beginner's Guide to Using WordPress
After buying a domain name and choosing a suitable hosting, the next thing you need to do is point the domain name to that host.
There are 2 basic ways, I will show you the easy way first.
P/S: In this part 3 article there are video tutorials pointing from some of the major domain name registrars – this is essential help for those who are just buying a domain name for the first time.
Mục lục
1. Use the nameserver of the hosting company
Each hosting has its own nameserver, where they keep different records connecting the IP address (of the hosting) and the domain name.
This name server is like a phone book, when you want to call someone, you need to go to the contact list to find the corresponding name and then press the call button, the phone will call that person's number. There is a relationship between a person's name and a phone number.
In addition, when you want to access a certain website, you type the domain name into the browser's address bar, then the browser also has to go to a folder to find the corresponding address (IP range). This directory is called the name server.
By default, the domain name will use the name server of the company selling the domain name. For example, if you register a domain name at GoDaddy, you'll see its nameservers like this in the DNS management section:
You will now replace the domain company's nameservers with the hosting company's nameservers.
When you purchase a hosting server, you will be provided with the host company's nameserver address. For example, here are the name servers of some hosting companies:
DreamHost:
- ns1.dreamhost.com
- ns2.dreamhost.com
- ns3.dreamhost.com
Bluehost:
- ns1.bluehost.com
- ns2.bluehost.com
vHost:
- ns1.vhost.vn
- ns2.vhost.vn
Each hosting company has its own nameservers and you need to check the specific nameserver addresses of each. Usually when buying hosting, they will send your email with very detailed information.
Once you know the domain name server information of the hosting company, the next thing is to change the default nameserver of the company selling the domain name to the domain name server of the company you just purchased.
You go to the DNS manager of the corresponding domain name:

Scroll down to the bottom you will see the name server of the company selling the domain name, click change to switch to the name server of the hosting:

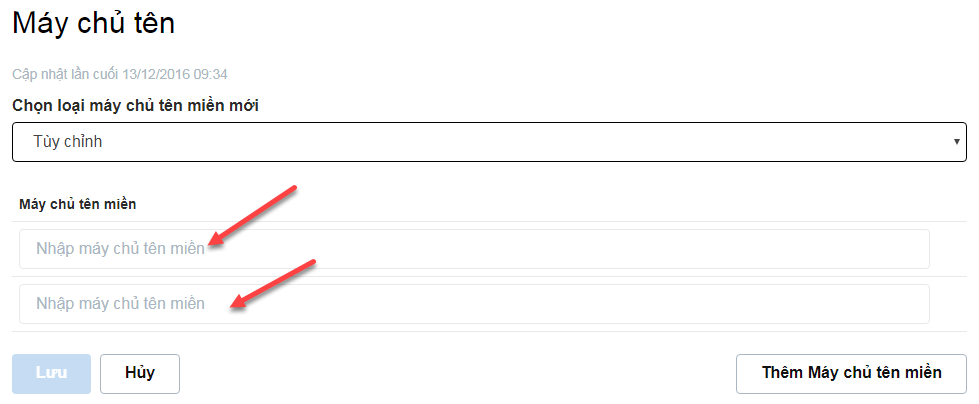
Then you enter the new nameserver:
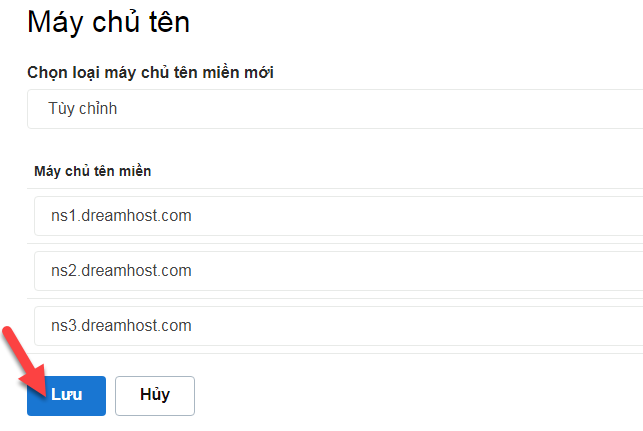
Normally it has 2 fields as above, if you need more then click on Add Domain Server. After entering completely, click Save:
So successful, if fast, it only takes about 5 to 10 minutes for your domain name and hosting to be connected. At least a few hours.
2. Connect via IP address & use the name server of the company selling the domain name
To connect in this way, you need to know the IP address of the host that corresponds to your domain name.
After entering the domain name in the hosting, the hosting company will give you this IP range.
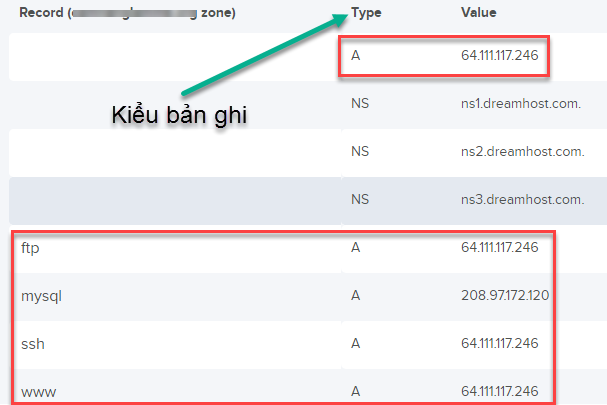
It is like below:
Where Type is the record type, here is A. And Value is the corresponding IP address value.
Next, go to the DNS administration section and enter the corresponding parameters:
The main server is part ftp, mysql, ssh, www. If nothing like the first then the server part is @
Next, click Save.
Note that you must keep the correct & complete records that the hosting company provides to you.
The result will be like this:

3. Pointing Guides From Some Large Domain Name Sales Companies
The above is an overview guide, some of you can do it right away. However, the domain management interface of companies selling domain names is different and it can be difficult for newbies. So in this section, I will guide you in detail, specifically how to indicate some companies that sell specific domain names. Note that I only guide method 1, which is how to use the name server of the hosting company.
A. NameCheap
After logging in, click MANAGE:

It will switch to the domain name management interface, you scroll down to the name servers section, then click Custom DNS to enter the host's name servers (method 1):

It will show you the information fields for you to enter the nameserver of the hosting company:
Where do you get this nameserver information?
After you buy hosting, the hosting company will give you both its IP and Name Server. For example, the company Dreamhost provides their own Name Servers as follows:
Here are the 3 nameservers of the hosting company, and I'll copy them into the space above:

Click on the green checkmark to save. Normally it will take about 5 minutes for the domain name and hosting to be connected, when accessing the website you will see the following:
4. Conclusion
Method 1 you should prefer to apply because it has many advantages (see comparison table).
In essence, both method 1 and method 2 use name servers, the only difference is that in method 1 you use the name server of the hosting company, and in method 2 you use a name server. name of the company that sells the domain name.
Method 1 is easier because you don't have to enter quite complicated records like method 2, especially for newbies.
Detailed comparison ( bold is better):
| Name Server company sells hosting | Connect via IP address | |
| Complexity | Easy to do | Difficult to do |
| IP changes | No need to update again | Must update again |
| Add subdomains | No need to do more in the domain management section | Must enter the corresponding IPs for the subdomain |
| Point subdomain to 2 different hosting | Can't do it | Can do |
| Limit number of records | No | Some companies sell domain names with limited records (e.g. GoDaddy) |
Goodbye and see you again.


