
How to create a table of contents for posts in WordPress
- 24-07-2022
- chuong xuan
- 0 Comments
- Lesson number: 7
- Year of implementation: 2021
- Video tutorial: no
- Belonging to the project: A Beginner's Guide to Using WordPress
There are websites that never need a table of contents, such as fast news sites like vnexpress, 24h or vietnamnet.
But there's one site where you always see a table of contents, and that's Wikipedia. And one more thing that always has a table of contents, that is the book.
Why are some places necessary and others not? Let's think about using a table of contents.
The main function of the table of contents is to help the reader:
- View overview
- Know where the content you need is located
So a table of contents is essential in long, complex articles, while useless in short news articles.
OK, if your articles are usually around 1500-2000 words, consider creating a table of contents to help your readers even more.
By default, WordPress does not create a table of contents for posts. You need to install the plugin to get this feature, it's called: Table of Contents Plus.
This plugin is a bit old, hasn't been updated in over 2 years, and this risks incompatibility with recent versions of WordPress. However, when I tested it, it was fine, did not cause any problems, so I also used it for my site.
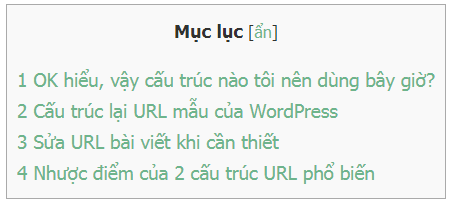
After successful activation, the table of contents immediately appears in the articles, it has the following form:
If you are not satisfied, go to the Settings area to adjust some settings:

Mục lục
1. Position / Position
Choose the location of the table of contents, there are 4 options:
- Before first heading : The table of contents will be right before the first heading tag, this is the default and most commonly used option.
- After firsr heading : The table of contents is after the first heading.
- Top : Table of contents at the top of the article.
- Bottom : Table of contents at the end of the article.
Personal choice:
2. Show when / Show when
By default, the table of contents will only be displayed when there are at least 4 heading tags. You can increase or decrease this number if you want. For me personally, 4 is a very good default number. If there are less than 4 headings and you still try to create a table of contents, it will be forced.
3. Auto insert for the following content types / Automatically insert the following content types
Table of contents will automatically be created in the article, you do not have to insert it manually. Accordingly, this section allows you to choose what types of content it will automatically be inserted. In most cases, posts and pages will suffice. I personally only use it for articles:
If you are automatically inserting some articles that do NOT want a table of contents , insert the following short code anywhere in the article:
In case you want to insert manually, you can uncheck all the above. And for a specific article where you want to insert a table of contents, at that location you just need to add the short code below and then click save:
(*) toc stands for table of content.
4. Heading text / Title of the table of contents
The default title of the table of contents is Table of Contents , and of course in most cases you don't need to change anything:
Changes, if any, include:
- If you remove the tick, there will be no Table of Contents as the title
- Change the text of Table of Contents to another word, for example Article Body, List, List, Summary, etc.
Next is the option Allow the user to toggle the visibility of the table of contents / Allow users to click to hide / show the table of contents. Its default you should keep.
Hide the table of contents initially, Default is unchecked, it makes the table of contents appear immediately when you enter the article. If you check this option, the table of contents will be hidden at first and only appear when the viewer clicks it.
5. Show hierarchy / Show smaller hierarchies
By default, it helps to display smaller hierarchies, such as a table of contents like this:
Adding keywords and Analytics belong to the same level, and that is the largest level that should always appear outside the table of contents.
Whereas Big Issues & Minor Issues are the smaller hierarchies of Analytics and if this option is unchecked it will NOT be displayed.
There is no fixed advice in this section, depending on your content you will consider whether or not to add a hierarchy. Just be careful not to over-hierarchy, as you may not want an item in the Small Issue to show up outside of the table of contents.
6. Number list items / Numbered list items
By default, selected, your table of contents will be numbered as follows (leftmost):
This is similar to the case above, depending on the need to choose or not.
Personally, I usually number the titles, so I'll leave it unchecked.
7. Enable smooth scroll effect / Enable smooth scroll effect
The purpose is to help readers when clicking on the table of contents will be smoothly transferred to the content to read instead of coming right away (slightly unexpected). The default value is ticked and I recommend keeping it because it is also related to the feature that prevents the title from being covered by some fixed content at the top (e.g. the title menu, just like the look and feel of the page). Page). what your website looks like). using).
8. Interface related options
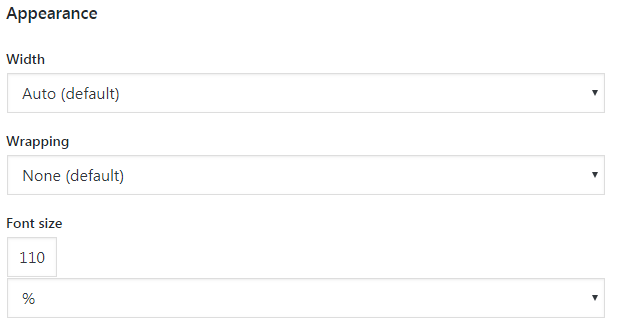
It is located in Appearance .
In there:
- Width : ie the width of the table of contents, by default it is automatic. You can choose to set the width as a percentage of the width of the web page. I personally leave it at 100% (in Relative). It is not recommended to choose a fixed width (in Fixed Width) as this may worsen the display on mobile phones with small screen sizes.
- Wrapping : This makes sense if your table of contents is significantly smaller than the width of your web page, you can now choose to align left or right.
- Font size : used to adjust the text size of the table of contents, usually larger. Personally, I choose 125%, you just change the number as you like.
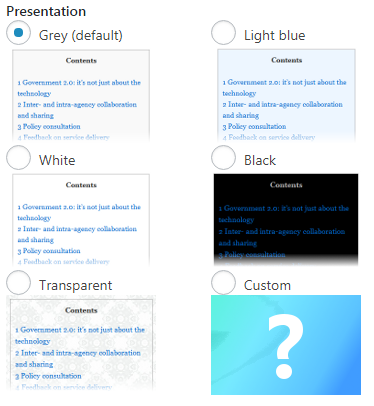
The Presentation backend allows you to choose the look and feel for the Table of Contents:
To find what you like, just try to select and save it.
9. Advanced / Advanced area features
This area you use less and is also more difficult to adjust than the 8 options above, but there are some options that are very important if you want a nice table of contents. Notable ones I will bold.
- Lowercase: Make sure the link text is lowercase
- Hyphenate: Use hyphen – instead of _ in anchor text
- Include homepage: Displays a table of contents on the homepage for eligible sections
- Exclude CSS file: Prevents this plugin from loading CSS formatting. When checked, the visibility options (in the Appearance section above) will be ignored (not applied).
- Preserve theme bullets: If your theme has an unordered table of contents format, check this if you want to apply that formatting to the table of contents (since the table of contents is also a list/list).
- Heading levels : Normally, all heading levels will be included in the table of contents (if you have a check mark in the Show Hierarchy section). Here you have additional options to include specific titles. Personally, I only choose from headings 1, 2, 3. Too much hierarchy will mess up the table of contents.
- Smooth scroll top offset : This is a great feature to help you avoid having the title covered by something tied at the top of the web page (usually a menu). By default, it is 30px. You can increase this number until you see all the masks. For example mine should be 70px to not be masked. Note that this only works if Smooth scrolling is enabled.
- Restrict path: if you want the table of contents not to appear in a certain page or area then fill it in here, for example your site has a URL structure containing a directory like example.com/king-te/uber- give-for-grab . (articles in the economic directory) and you want the economic directory to have no table of contents, you can fill in the blanks as follows: / Kinh-te/
It has some more information, but it's a bit confusing so I won't write it here.


