

Operations to edit tables in Word
- 24-07-2022
- trienkhaiweb
- 0 Comments
Tables are one of the most commonly used objects today to present in documents. Because this is a short, easy to understand presentation. However, when using a table, you not only know how to insert a table, but you also have to know how to adjust the template table to suit the content and needs. So how to edit, the following article I will guide you specifically.
The content of the article consists of 4 parts:
- How to highlight rows, columns, cells on tables
- Add and remove columns on tables
- Add and delete rows on a table
- Operations with cells on tables
Mục lục
1.How to highlight rows, columns, cells on tables
To select any cell in the table you can do one of two ways:
+ Method 1: You just need to move your mouse to and click on the cell you want to select
+ Method 2: When you click on the table, on the Ribbon toolbar will appear a new Tab that is Tab Layout. You click on it and click on Select then select Select Cell.
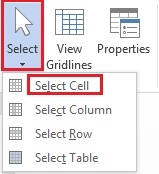
To select a row in a table you can do the following:
Method 1: On the table, you hover your mouse over the first position of that row, wait until the mouse changes to a cute name, then you left-click, immediately the whole row is selected (highlighted).
Method 2: On the Ribbon toolbar, click on the Layout Tab, click the Select icon and select "Select Row".
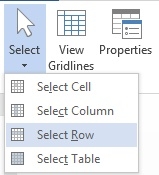
To select columns in the table, you also have two ways as follows:
Method 1: On the table, you hover over the first position of the column, when the mouse changes to an arrow, you left-click to select the whole column.
Method 2: Also on the Layout Tab, click the Select icon and select "Select Column".
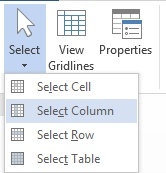
To select the entire table, simply left click on the icon (as shown) on the left corner of the table.

2. Add and remove columns on tables
To add columns on a table you can do one of two ways:
Method 1: First, click on the position you want to add, then on the Layout Tab, click on the Rows and Columns command group to choose one of two options:

- Insert Left: Insert column to the left of the cursor
- Insert Right: Insert column to the right of the cursor
Method 2: You click on the location you want to add, then you right-click, a quick menu panel appears, click Select.
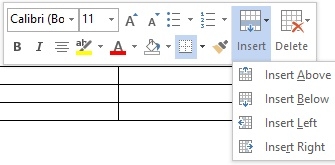
- If you want to insert a column on the right, choose Insert Right
- If you want to insert a column to the left, select Insert Left.
To delete a column, do the following:
Method 1: You click on the location you want to delete. Then, on the Layout Tab, select the "Delete" command and select 'Delete Columns' .
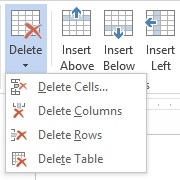
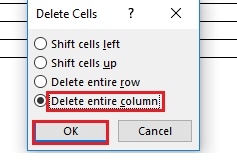
Method 2: You right-click, a menu appears, click "Delete Cell" .
At that time, the Delete Cells dialog box appears, check the box "Delete entire Column" and then click "OK".
3. Add and delete table rows
To add rows on a table, you need to do the following:
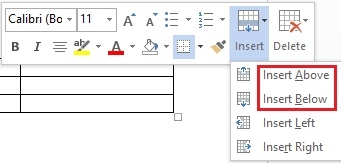
Method 1: You click on the position you want to add, then select Tab Layout and select the Rows & Columns command group to choose one of two options.

- If you want to insert more rows above the cursor, select “Insert Above”
- If you want to insert more rows below the cursor, select “Insert Below” .
Method 2: Click on the position you want to insert, then you right-click, a quick menu appears, select Select to select.
To delete rows on a table, do the following:
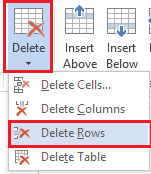
Method 1: You click on the Delete item on the toolbar and select the item "Delete Rows".
Method 2: On the menu, right-click and select Delete Cells.
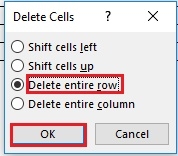
The Delete Cells dialog box appears "Delete entire row" and then click Ok.
4. Table cell operations
To add cells, do the following:
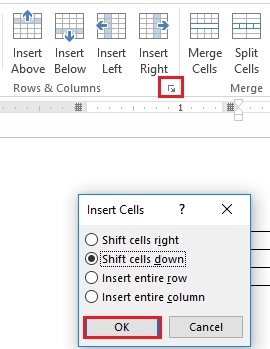
Click on the position you want to add, then on the Layout Tab click the arrow in the lower right corner of the Rows & Columns command group.
Then, a dialog box appears, click on the cell you want to select and then "OK" is done.
 '
'
To delete cells on a table, do the following:
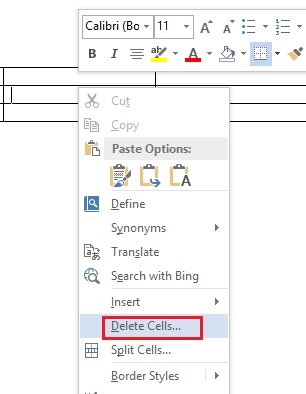
You right-click, a menu appears, click "Delete Cells".
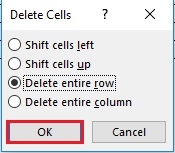
A dialog box appears, tick the item you want to select and then "OK" is done.
To merge or split cells together, you do:
Method 1: You select the cells you want to split or want to merge then right-click

- If you want to merge cells, select “Merger Cells” (1)
- If you want to split cells, select “Split Cells” (2)
Method 2: You select the cells you want to merge or split, then hover your mouse on the toolbar, select the Layout Tab and find the Merge command group.
- If you want to merge cells, select “Merger Cells”.
- If you want to split cells, select “Split Cells”.
So I have guided you all the operations related to tables. Each operation has many different ways of doing it. Therefore, I hope, through this article, you will learn new knowledge, help you manipulate tables faster and more efficiently.


