
How to Create & Edit Menus in WordPress
- 24-07-2022
- chuong xuan
- 0 Comments

- Lesson number: 9
- Year of implementation: 2021
- Video tutorial: No
- Belonging to the project: A Beginner's Guide to Using WordPress
My site has 2 menus. One above the logo:
And the one right below the logo:
The most important purpose of a menu is to give website visitors an overview of the content of the site and to help them know where they want to find out.
If you pay attention, it can take a long time to create an official logo for your website, but the menu should be available within a few days or at most weeks when the official website is online.
A website always has at least 1 menu, its location and actual number are pre-determined by the interface you choose. Menus can be at the top, bottom, left hand side, etc.
Now we come to the practice part.
Mục lục
A. Overview
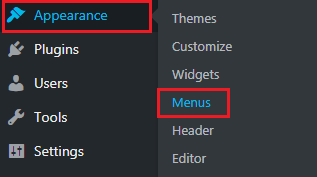
After logging in to WordPress , in your Dashboard go to Appearance > Menus :
If using the Vietnamese interface, go to Interface > Menu :
You will be put in a custom area like this (English):
I'll briefly explain some of the sections at the top:
- Edit Menus : ie Edit Menu, in this section you will edit the menu, add and remove links and items for it.
- Mange Locations : means Manage menu locations, in this section you will place the menu you created in the location that your WordPress theme provides. It can be above, to the left or below.
- Select a menu to edit : i.e. Select Menu To Edit, a web page can have many menus, you want to choose which menu to edit then select here, then click the Select button next to it.
B. Basic operations
1. Create a New Menu in WordPress
You click create a new menu (right next to the Select button at the top) To create a new menu, name the menu you want to create and then click Create Menu :

Then you look to the left hand side will have an area like this:
This is a very important part, because it provides the content for the menu, consisting of 4 parts:
- Pages : The pages on your website have
- Posts : As a post on your website
- Custom Links : Custom (free) links that you want to add
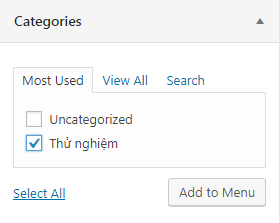
- Categories : Are categories (folders) on your website
(See also: difference between post and page in WordPress ).
What you want to add, just highlight and press Add to Menu .
Suppose I tick the following:
With Pages :
With Posts :
With Custom Links :

I explain a little more in this section:
- URL: is the link that you want to appear on the Menu, it can be any link, belonging to your website or leading to other websites.
- Link Text: is the content representing that link displayed on the menu.
With Categories :
For most websites, a directory is often included in the menu , because a directory is where a group of related articles is located. For example, the Web & WordPress directory on your site contains articles related to that topic, and the SEO directory contains articles on SEO. Those who want to read any topic can go to the corresponding folder.
OK. When you press Add to Menu, you'll see on the right hand side what's included in the menu:

The menu will be arranged in the same order as above, if you want to change the order, just drag and drop each item as you like. For example, I want to put the Home page at the top, and the About and Contact pages at the bottom. Result:

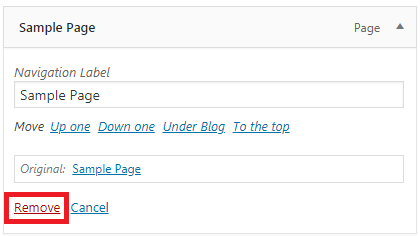
If you want to delete something in the menu, just click on the corresponding item and press Delete. Let's say, I want to remove the Sample Page:
You also have the right to change the content displayed outside the Menu, for example, I find the "You enter the article name here" section on the Menu too long, and want to edit this content. I click on it and edit it at Navigation Label, I change it to "Post", you click on the triangle to make it collapse, this edit will save itself:
Now my menu structure should look something like this (order changed, one item deleted and one item renamed):

Finally, click the Save Menu button to save the design you just created.
2. Choose a location for the menu in WordPress
Creating a new menu is only half the job, your menu still won't show up until you choose an official location for it.
To select a location, go to Manage Locations, and depending on the theme, you will see a number and different types of menus.
For example, this one has only 2 menus:
While this one offers the following 3 menus:
Often the paid interface will provide more options. The one with 3 menus is in the paid theme I bought.
Back to the main issue, select the menu so that it is visible to the outside.
You look at the Theme Location / Location column in the interface . Usually the main menu will be the first menu and has a name like Top Menu, Main Menu or Main Menu.
Next, click in the box on the right so it will drop down options for the menu in that location (menu you created or pre-made themes):

Finally you click Save Changes to save the settings (I switched from the Top Menu to the Main Menu).
Go back to the homepage to check, you will see the following results:

You can click each item in the menu to make sure the result is what you want.
3. Edit Menus in WordPress
To edit a menu, you must either create at least one menu then or the interface provide the menu for you (to have something to edit).
This is the Edit Menu section we talked about in the beginning. You just need to select the corresponding menu and then press the Select button:

Then it will show the list inside the menu. The operations of adding, editing, deleting, changing the order are completely the same as Part 1. Create the menu as I described, so I will not repeat it in this part.
Wish you have a nice menu.


