
Instructions for using Contact Form 7
- 24-07-2022
- chuong xuan
- 0 Comments

- Lesson number: 18.1
- Year of implementation: 2021
- Belonging to the project: A Beginner's Guide to Using WordPress
The contact form is one of the basic components of most websites. Website visitors use it to contact you to do things like:
- General contact (with an offer of any kind)
- Buy products (if you sell and receive orders via form)
While the required fields of information such as name, email, form contact, and comment are the same, the comment section is still not a substitute for the form's duties.
That's because the form ensures information confidentiality, the nature of the comment section is public, and the content in the form is private, by default only the sender and recipient have the right to see it. .
Also, the form actually has some functionality that the comment section doesn't have, such as field options like checkboxes, radio buttons, dates, numbers, etc.
Today we will learn how to use Contact Form 7 plugin, one of the most popular free tools for creating forms.
Mục lục
The basic concepts
To make this article easy to understand, you need to know some terms that are used frequently in this article.
For example, here is a typical Form:
Information such as Your Name (required), Your Email (required), Subject, Your Message is called a label. It is the corresponding name for the input fields (information fields), which are the rectangles immediately below. These input fields are where the user enters information.
Finally is the Submit button, here is the Submit button at the bottom.
How to add a form to a post?
After installing Contact Form 7 (CF7), you enter this area containing its specific settings:
Contact Form 7 will create a default form for you like below:
What you need to pay attention to is the code in this yellow frame, which you need to copy in full.
OK, then you go to the post you want to add the form to and then the section where you want to insert the contact and paste it there.
For example like this:
Finally click save is OK, the result will be as follows:
The important thing you need to understand here is:
[blockquote align="none" author=""]Contact Form 7 adds a contact form via a short code called shortcode , and you have to copy the exact same code and put it in your post where you want the contact form.[/blockquote]
How to edit labels, Vietnameseize forms
You can see that the default form labels are in English like Your Name (required), Your Email (required). You may want to Vietnameseize these labels.
The way to do it is as follows. In the corresponding form you want to edit, click Edit:
You will see something like the following:
You don't touch the square brackets. You only edit the content after the word <label> and before the [
It is this part:
For example, I Vietnameseize it as follows:
Result:
How to create a new form in Contact Form 7?
To create a new form, click Add New:
It will switch to the form creation interface. First you need to enter the form title:
Next, just below you will see the fields (in the form of buttons) you can add to the form:
These include:
- text : used to create short text fields, such as people's names, subject names
- email: used to enter email address
- URL : used to enter the website address
- tel : used to enter phone number
- number : used to enter pure numbers
- date : used to enter date information
- text area : similar to text but used to enter long blocks of text
- drop-down menu : a drop-down list, and usually the user chooses one of these drop-down options. For example, clothing sizes S, M, L. Usually users will only choose a shirt size that suits them
- checkboxes : selection list, allowing multiple options to be selected at the same time, displayed to the outside. For example checkboxes in shipping can be express delivery, gift wrapping. Both of these options have the ability to tick at the same time
- radio buttons: similar to the drop-down menu, but here the options are displayed outside instead of a drop-down like the drop-down menu
- acceptance: when you require the user to accept something in order to send information, you use this option. For example terms of use, agreement on delivery, etc
- quiz: challenge question, users must answer the question correctly before the content is sent
- reCAPTCHA: CAPTCHA code, if your form is often spammed, the form is automatically filled in continuously, you should use this. And if you don't get spam, you shouldn't use it, it won't cause trouble for real users
- file: used to enter file information, such as text files, images
- submit: this is the submit button
The feature of these fields is that it will only allow submission if the sender enters the correct type of information. For example, if the user fills in the email field with the wrong email address such as missing @, for example, it will report an error, or in the number field, if it enters a letter that is not a number, it will also report an error.
By default when creating a new form, Contact Form 7 creates 4 fields for you:
- Name (Your name)
- Email (Your email)
- Subject (Subject)
- Your message
How to add some special data fields
Some data fields are quite easy to add, like text fields, phone numbers. However, there are also some areas that are quite complicated, and you need to learn a bit if you want to be more precise.
Number field
The number field has 3 parts to pay attention to:
- Spinbox/Slider : this is used to adjust the number input format by typing in from the keyboard/or dragging to the slide.
- Default value : this is the default value. If you enter a default value, a value will be available when the user fills out the form.
- Range (Min – Max) : This is the range of values. That is, the minimum and maximum values allowed. where Min is the smallest. Max is the biggest.
Date field
The notable part here is the date range. Where Min is the smallest day allowed. Max is the maximum day allowed.
Checkbox & radio buttons
Both checkboxes and checkboxes * represent groups of checkboxes (in HTML). checkbox * requires the user to select at least one option in the group.
radio represents a group of radio buttons (in HTML). Note that radio version * is optional. The reason Contact Form 7 doesn't provide a radio option * is because by default the radio button requires the user to tick at least one.
Options for checkboxes and radios:
| OPTION | FOR EXAMPLE | DESCRIBE |
|---|---|---|
| id: (id) | id:foo | id the id attribute value of the outer wrapper element |
| class: (class) | class:bar | class is the class attribute value of the outer wrapper element. To set up two or more classes, you can use the class: |
| default: (num) | default:2default:1_2_3 | Pre-check options. The numbers following default: are the orderly positions within the category. 1 is the first position. If you want two or more items to be selected, concatenate the integers with an underscore (_), for example default:1_2_3 . |
| label_first | By default, the checkbox or radio button will be brought to the top and the label at the bottom. By adding the label_first option you can reverse this default. | |
| use_label_element | Wrap checkboxes and radio buttons with <label> tags. | |
| exclusive | If you use this option, only one option will be selected. I mean, when you tick one in a group of checkboxes, the others won't be ticked anymore. In other words, either don't check anything, or only check one. This feature requires JavaScript. | |
| free_text | Append free input text to the end of the list. | |
| data: (name) | data:countries | Get the values from Listo . A list of more than 200 countries. |
For example:
[checkbox your-country “China” “India” “Vietnam”]
Select (drop-down menu)
Both select and select* represent drop-down menus (<select> in HTML). select* requires the user to select at least one option from the menu.
Options:
| OPTION | FOR EXAMPLE | DESCRIBE |
|---|---|---|
| id: (id) | id:foo | id the id attribute value of the select element. |
| class: (class) | class:bar | class value of the select element's class attribute. To set up two or more classes, you can use multiple class: |
| default: (num) | default:2default:1_2_3 | Pre-check options. The numbers following default: are the orderly positions within the category. 1 is the first position. If you want two or more items to be selected, concatenate the integers with an underscore (_), for example default:1_2_3 . |
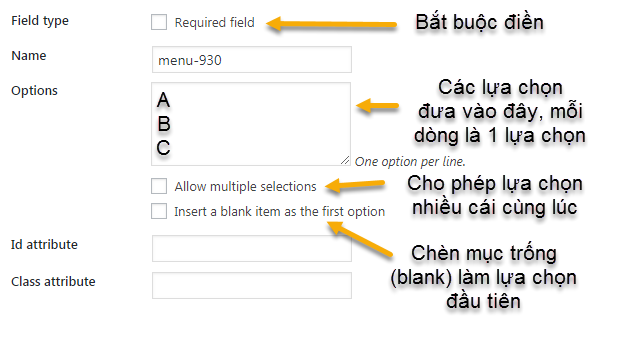
| multiple | By default, the drop-down menu only allows one selection. When you tick this option, you allow the user to select multiple options at the same time | |
| include_blank | Insert a blank item at the top of this drop-down menu's selections. | |
| first_as_label | Use first value as label | |
| data: (name) | data:countries | Get the values from Listo. |
For example:
[select your-country “China” “India” “Vietnam”]
When someone fills out the form, where will you get the information?
By default, Contact Form 7 does not save the information that the user fills in the form to the database (database) but will send the information to your Email. The default is the WordPress admin email.
You are completely free to edit the email that receives contact information (for example, you want to set up a separate email that only receives contact information).
The way to fix it is as follows, you switch to the Mail tab and in the To section you switch to another email:

There is a very important point in this section, it is located in the Message Body area, this is what you receive in the email. By default, it looks like this:
There is a problem that even if you have added input fields such as phone number, date, radio buttons, etc, that information is not automatically added to the outgoing message! (this can confuse you as to where you are doing it wrong)
To fix it, you will have to be more proactive in this part. For example in my case I add the following:
You may be wondering, where does information like [tel-351], [radio-263] and [date-101] come from? It is the name of the information fields. These names are provided at the top of the Mail tab for easy identification:
After adjusting, you click Save to save.
Only then, when the user submits the information, will the entire content be delivered to your mailbox:

Use Flamingo plugin to store form information
When you receive user-submitted information via email, there are several downsides:
- There may be some problem with the email server so the mail is not delivered
- You set up the missing/wrong mail area, resulting in incomplete incoming information
Flamingo will overcome this drawback, it saves contact information in the WordPress database so you always have the sender information when they have pressed the submit button.
You do not have to do anything to connect Flamingo to Contact Form 7. Just install Flamingo, it will automatically save information to the database when someone uses the CF7 form to contact you.
To check your contacts, go to Flamingo, then Incoming Messages:
It will show the existing contacts:

You click on the link under Subject (subject / here is Buy 1 set of clothes ) to view information:

It will show you all the information.
Menu-773 is the name of the information field, which is enclosed in square brackets. For better visibility you may want to edit this, if that's the case you can do so in the form editor:
<label>
Choose clothes size
[select menu-773 “Size A” “Size B” “Size C”]</label>
For example, I would change it to look like this:
<label>
Choose clothes size
[select size-quan-ao “Size A” “Size B” “Size C”]</label>
Or when you create a new field, the field name is located here (by default, the program will generate a random number-function name, such as tel-123, when you want to edit the memory). choose unsigned name, write immediately ):
Change, Vietnameseize the notices
You already know how to edit and Vietnameseize labels. But the Form also has other messages such as when the user enters the wrong information, missing data, etc. These messages are in English by default. You can edit, Vietnameseize for user-friendly Vietnam.
That part, you do in the Messages tab:
Meaningful:
- Thank you for your message. It has been sent . This message appears when the user successfully sent the message. English Meaning: Thank you, your message has been sent successfully …You can adjust depending on the situation. If this is an order, you can write: Thank you, your order has been successfully placed .
- There was an error trying to send your message. Please try again later . This message appears when the message cannot be sent. English Meaning: There was an error when we tried to send your message. Please try again later .
- One or more fields have an error. Please check and try again . This message appears if a field is not filled with standard data. For example, the email field but fills in the wrong email, the phone number field but fills in the text. English Meaning: One or more fields have an error. Please check and try again later .
- There was an error trying to send your message. Please try again later . This message appears in case the outgoing message is suspected to be SPAM. English Meaning: There was an error when we tried to send your message. Please try again later.
- You must accept the terms and conditions before sending your message . This message appears in case the user has not accepted some terms when sending the message. English Meaning: You must accept certain terms and conditions before the message can be sent .
- The field is required . This message appears when the required field is filled in but is left blank. English Meaning: This field is required to be filled in .
- The field is too long . This message appears when the input data is too long, exceeding the maximum allowed capacity. English Meaning: The input field is too long .
- The field is too short . This message appears when the input data is too short, below the minimum allowable threshold. English Meaning: The input field is too short .
- The date format is incorrect . This message appears when the date data entered is incorrect. English Meaning: The date format is incorrect.
- The date is before the earliest one allowed . This message appears when the date entered is earlier than the minimum allowed date. English Meaning: The date you entered is too early .
- The date is after the latest one allowed . This message appears when the date entered is later than the maximum allowed date. English Meaning: The date you entered is too late .
- There was an unknown error uploading the file . This message appears when an error occurs while uploading a file. English Meaning: There was an unknown error when uploading the file .
- You are not allowed to upload files of this type . This message appears when file format upload is not allowed. English Meaning: Upload file format is not allowed .
- The file is too big . This message appears when the uploaded file size is too large. English Meaning: Upload file size is too large .
- There was an error uploading the file . This message appears when there is an error in uploading the file. English Meaning: There was an error uploading the file .
- The number format is invalid . This message appears when the information entered by the user is not a number. English Meaning: The information you enter is not a number .
- The number is smaller than the minimum allowed . This message appears when the user-entered value is less than the minimum allowed numeric value. English Meaning: The number you entered is less than the minimum allowed number .
- The number is larger than the maximum allowed . This message appears when the user input value is greater than the maximum allowed value. English Meaning: The number you entered is larger than the maximum allowed value .
- The answer to the quiz is incorrect . This message appears when the answer entered by the user is incorrect. English Meaning: Your answer is incorrect .
- The e-mail address entered is invalid . This message appears when the user's email entered does not meet the data standard (for example, the @ is missing). English Meaning: The email address you entered is incorrect .
- The URL is invalid . This message appears when the URL the user entered is incorrect. English Meaning: Invalid URL .
- The telephone number is invalid . This message appears when the user's phone number entered is not valid. English Meaning: Invalid phone number .


