
Instructions for using the Redirection plugin to redirect
- 24-07-2022
- chuong xuan
- 0 Comments

- Lesson No.: 19.1
- Year of implementation: 2021
- Belonging to the project: A Beginner's Guide to Using WordPress
The Redirection plugin helps us to redirect the old links to the new link we want. It is especially useful in case you change the URL of a specific article and is an indispensable tool in case you change the static path structure of the whole website, because then the URL of the entire website Will change. .
The reason Redirects are so important is because:
- If you don't convert the old link to the new link, users who visit the old link will get a 404 error page (also known as broken link), which is a serious error in terms of user experience.
- Google and search engines in general won't know the old and new links have the same root, and it won't transfer the old link's ranking to the new one. This is bad if the content is ranking well (you lose PageRank).
- Completely destroy internal links, as well as links from external sites pointing to the old link. Articles that lead to old links all give 404 errors. Visit this article to learn more about the relationship between 301 redirects and SEO.
This can be more easily illustrated as follows:
If you have a store (space for rent) to sell clothes that is very crowded, and then one day the real estate owner reclaims the store, you are forced to move to another address. How do old customers know the new address when they go to the old store to buy but no one is there?
It's simple right? You put a clear notice of the new address at the old store. This is exactly what the Redirect plugin does and it does it even better, it instantly converts visitors from the old URL to the new one (so fast you might not even notice the redirect).
Now it's time to give illustrative examples.
Let's say I have a URL like this: http://setup.abc.com/2017/10/21/ thanh-phuc -va-dau-don/
I want to change to another URL like this: http://setup.abc.com/2017/10/21/ Khoai -suong -va-dau-don/
So the article has a new URL, but the old URL has not yet redirected to the new URL.
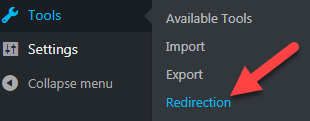
To do that I first access the Redirection :
You go to the redirects tab:
Next, click Add New:

- You enter the old URL in the Source URL box
- You enter the new URL in the Target URL box
- Other parameters are left as default
- Finally you click Add Redirect
You will see the message below that the link has been redirected in a 301 style. That's it, you did it right:

To check, go back to F5 (reload) the 404 error page to see if it redirects now:
Change the static path structure of the entire website
This is the case that used to happen to me.
At that time, I changed the static path structure of the website from the date month year structure + article name to a much shorter structure, the article name.
That is, type abc.com/2017/06/viduthoi/ to abc.com/viduthoi/
I had 600+ posts at the time and actually I had to manually add the redirects one after another, which took over 2 hours and must have missed a few links.
If you are in the same situation and don't want to waste your time like me, please read below carefully.
Turns out the Redirection plugin has a tool that allows you to update multiple URLs in bulk, saving you a lot of work.
However, you need to use the plugin first for it to output the entire URL on the page. The tool we use is Export All URLs.
After installation, you set the following:
After clicking Export Now, click the link below to download the CSV file:
Its content will look like this:

OK, now you have all the article URLs on your site. Next, we need to know how to do this full URL redirect.
You switch to the Import/Export tab in the settings for the Redirection plugin and here we know that we need to upload a CSV file. To see how that CSV file is structured, you need to download the CSV file as follows:
Open that file, you will see its sample structure as below:

In there:
- source and target are source link and destination link respectively
- regex, type, code, match are parameters you keep as default (repeat)
- hits and title are not important in this case and you should delete those 2 columns
And now all you need to do is copy all the old URLs you have with the Export All URL plugin into the source section. Then in the target section, you enter the new URLs. The remaining parameters remain the same:

Next, you upload this file through the Import section (Add file, select the file and then click Upload to upload):
If the download is successful, you will see a message like this:
It's done like that.
Bye, see you again.


