Giới thiệu Redux và quản lý state với Redux trong React
Redux là một thư viện phổ biến cho các ứng dụng JavaScript và React . Nó tuân theo một nguyên tắc trung tâm rằng ràng buộc dữ liệu phải chảy theo một hướng và phải được lưu trữ như một nguồn tin cậy duy nhất. Redux đã trở nên phổ biến vì sự đơn giản của ý tưởng thiết kế và việc triển khai tương đối nhanh.
Redux hoạt động theo một vài khái niệm. Đầu tiên, store là một đối tượng duy nhất với các trường cho mỗi lựa chọn dữ liệu. Bạn cập nhật dữ liệu bằng cách thực hiện một action cho biết dữ liệu sẽ thay đổi như thế nào. Sau đó, bạn diễn giải các hành động và cập nhật dữ liệu bằng cách sử dụng reducer . Reducers là các hàm áp dụng các hành động cho dữ liệu và trả về một state mới , thay vì thay đổi state trước đó.
Trong các ứng dụng nhỏ, bạn có thể không cần kho dữ liệu toàn cục. Bạn có thể sử dụng kết hợp giữa state và context cục bộ để quản lý state. Nhưng khi ứng dụng của bạn mở rộng quy mô, bạn có thể gặp phải các tình huống mà việc lưu trữ thông tin một cách tập trung sẽ có giá trị để thông tin sẽ tồn tại trên các routes và components . Trong tình huống đó, Redux sẽ cung cấp cho bạn một giải pháp chuẩn xác để lưu trữ và truy xuất dữ liệu một cách có tổ chức.
Mục lục
Khởi tạo dự án và cài đặt redux
npx create-react-app reactreduxdemo
cd reactreduxdemo
npm install react-jss
npm install react-proptypes
npm install --save redux react-redux
Bắt đầu dự án, chúng ta tiến hành bọc component Provider cho ứng dụng bằng cách sửa file src/index.js:
import React from 'react';
import ReactDOM from 'react-dom/client';
import './index.css';
import App from './App';
import reportWebVitals from './reportWebVitals';

const root = ReactDOM.createRoot(document.getElementById('root'));
root.render(
  <React.StrictMode>
    <Provider>
      <App />
    </Provider>
  </React.StrictMode>
);

// If you want to start measuring performance in your app, pass a function
// to log results (for example: reportWebVitals(console.log))
// or send to an analytics endpoint. Learn more: https://bit.ly/CRA-vitals
reportWebVitals();
Bây giờ bạn đã bọc các component của mình, chúng ta bắt đầu thêm một store. Store là danh sách dữ liệu trung tâm của bạn. Tiếp tục sửa file index.js như sau:
import React, { useReducer } from 'react';
import ReactDOM from 'react-dom/client';
import './index.css';
import App from './App1';
import reportWebVitals from './reportWebVitals';
import { Provider } from 'react-redux';
import {createStore} from 'redux';

const root = ReactDOM.createRoot(document.getElementById('root'));

const store = createStore(() => ({

}));

root.render(
  <Provider store={store}>
    <App />
  </Provider>
);

// If you want to start measuring performance in your app, pass a function
// to log results (for example: reportWebVitals(console.log))
// or send to an analytics endpoint. Learn more: https://bit.ly/CRA-vitals
reportWebVitals();
Giải thích: ở đây mình dùng hàm createStore để tạo một store toàn cục cho ứng dụng. Với tình huống này mình truyền vào hàm callback bên trong createstore là một object rỗng.
Mình sẽ thêm một vài thuộc tính vào trong object này:
import React, { useReducer } from 'react';
import ReactDOM from 'react-dom/client';
import './index.css';
import App from './App';
import reportWebVitals from './reportWebVitals';
import { Provider } from 'react-redux';
import {createStore} from 'redux';

const root = ReactDOM.createRoot(document.getElementById('root'));

const store = createStore(() => ({
  testvalue: {
    id: 1,
    value: 'hello'
  }
}));

root.render(
  <Provider store={store}>
    <App />
  </Provider>
);

// If you want to start measuring performance in your app, pass a function
// to log results (for example: reportWebVitals(console.log))
// or send to an analytics endpoint. Learn more: https://bit.ly/CRA-vitals
reportWebVitals();
Sửa file App.js
import React from 'react';
import { useSelector } from 'react-redux';


function App() {

  const testvalue = useSelector(state => state.testvalue);
  console.log(testvalue);
  return (null);
}

export default App;
Output:
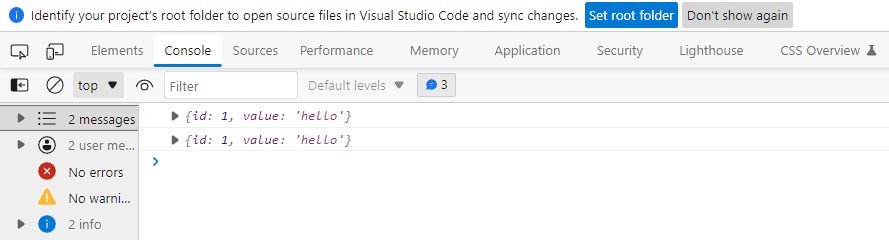
Chúng ta thấy, ở bên trong App component có thể truy cập được vào giá trị trong store, lấy ra sử dụng mà không cần thông qua Context hay props nào, khá tiện. Tương tự với context, mọi component con sẽ có thể truy cập vào store mà không cần bất kỳ props bổ sung nào. Để truy cập các mục trong store Redux của bạn, sử dụng Hook được gọi useSelector từ package react-redux. useSelector Hook nhận một hàm selector làm đối số truyền vào. Hàm selector sẽ nhận trạng thái store của bạn dưới dạng đối số mà bạn sẽ sử dụng để trả về trường bạn muốn.
Khởi tạo dự án bằng redux toolkit theo cách tiếp cận chuẩn
Hầu hết các bài hello world từ phiên bản cũ đều sử dụng createStore, tuy nhiên đây là cách không đưược recommend, chúng ta chỉ hellowold cho biết, ở dưới đây mình sẽ tiếp tục bắt đầu một tính năng phức tạp hơn một chút, dựa theo quickstart của ReactJS.
Xem thêm tại: https://react-redux.js.org/tutorials/quick-start
Bước 1: cài đặt react @reduxjs/toolkit:
npm install @reduxjs/toolkit react-reduxBước 2: tạo file src/app/store.js
import { configureStore } from '@reduxjs/toolkit'

export default configureStore({
  reducer: {},
})
Giải thích: khởi tạo configStore với reducer mặc định là một object rỗng.
Tạo file index.js và đưa biến store được import từ configStore vào, tương tự bên trên, chúng ta cũng phải import Provider để bọc <App/> Component lại:
import React from 'react';
import ReactDOM from 'react-dom/client';
import './index.css';
import App from './App';
import reportWebVitals from './reportWebVitals';
import store from './app/store'
import { Provider } from 'react-redux';

const root = ReactDOM.createRoot(document.getElementById('root'));
root.render(
  <Provider store={store}>
    <React.StrictMode>
      <App />
    </React.StrictMode>
  </Provider>

);

// If you want to start measuring performance in your app, pass a function
// to log results (for example: reportWebVitals(console.log))
// or send to an analytics endpoint. Learn more: https://bit.ly/CRA-vitals
reportWebVitals();
Bước 3: tạo file feature/counterSlide.js nội dung như sau
// reducer

import { createSlice } from "@reduxjs/toolkit";

export const counterSlice = createSlice({
    name: 'counter',
    initialState: {
        value: 0,
    },
    reducers: {
        increment: (state) => {
            state.value +=1;
        },
        decrement: (state) =>{
            state.value -=1;
        }
    }
})

export default counterSlice.reducer

export const {increment, decrement} = counterSlice.actions
Theo tài liệu mô tả, việc tạo một slice yêu cầu một tên chuỗi để xác định tên slice, một giá trị state ban đầu và một hoặc nhiều hàm rút gọn để xác định cách cập nhật state. Khi một slice được tạo, chúng ta có thể xuất hàm reducer vaf các trình tạo hành động Redux(Redux action creators) sẽ tự động tạo cho chúng ta các method actionCreator cho toàn bộ slice.
Redux yêu cầu viết code cập nhật trạng thái một cách bất biến, bằng cách tạo các bản sao dữ liệu và cập nhật các bản sao đó. Tuy nhiên, Redux Toolkit createSlice và createReducer sử dụng immer giúp chúng ta viết logic cập nhật “đột biến” để trở thành các bản cập nhật bất biến chính xác.
Mô phỏng khi log giá trị counterSlice:
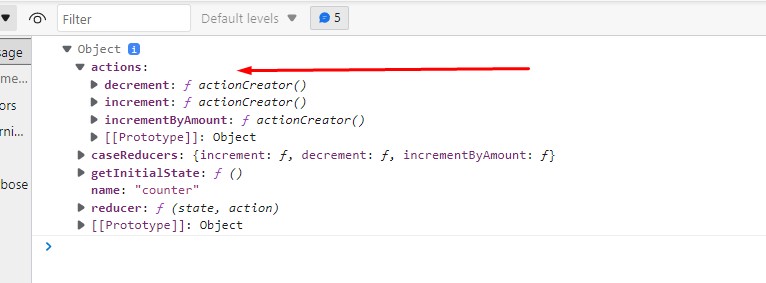
Giải thích: chúng ta thấy hàm createSlice được import từ reduxjs toolkit, chúng tao tạo một object counterSlice với các thuộc tính name,initialState và reducer. 3 phương thức increment(), decrement() và incrementByAmount() được destructure và xuất ra, 3 phương thức này là actionCreator(), được tự động tạo từ 3 reducer mới định nghĩa phía trên, đừn nhầm lẫn điều này, và reducer của counterSlice cũng được xuất ra nhằm mục đích đưa vào component sử dụng.
Xem thêm: khác biệt giữa export default và export const:
https://stackoverflow.com/questions/33611812/export-const-vs-export-default-in-es6
Bước 4: sửa file app/store.js, ở bước này chúng ta import hàm reducer từ counter slice và đưa vào trong store. Bằng cách định nghĩa trước bên trong tham số reducer, chúng ta nói với store rằng sẽ sử dụng hàm reducer của slice counter để xử lý toàn bộ state.
//store -> add reducer to store herer

import { configureStore } from "@reduxjs/toolkit";
import counterReducer from '../feature/counter/counterSlice'

export default configureStore({
    reducer: {
        counter: counterReducer
    },
})
Bước 4: tạo React Component src/feature/counter/Counter.js để bắt đầu sử dụng Redux State và Actions:
//counter component
import React from "react";
import { useDispatch, useSelector } from "react-redux";
import { increment,decrement } from "./counterSlice";
export function Counter(){
const count = useSelector((state) => state.counter.value)
const dispatch = useDispatch()
// khi gap su kien onclick, ham dispatch (gui di) se goi toi cho reducer chay vao ham increment()
return (
<>
<div>
<button onClick={() => dispatch(increment())}>Increment value</button>
</div>
increment
<span>{count}</span>
<button onClick={() => dispatch(decrement())}>
Decrement value
</button>
</>
)
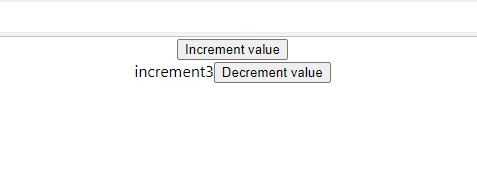
}Bước 5: sửa file App.js thêm component Counter:
import logo from './logo.svg';
import './App.css';
import { Counter } from './feature/counter/Counter';

function App() {
  return (
    <div className="App">
      <Counter></Counter>
    </div>
  );
}

export default App;
Output:
Bước tiếp theo, chúng ta tiếp tục phát triển demo với tính năng số theo giá trị từ input, tăng số sử dụng Async.
Bước 6: bổ sung thêm vài phương thức bên trong file src/counter/counterSlice.js
// reducer
import { createSlice } from "@reduxjs/toolkit";
export const counterSlice = createSlice({
name: 'counter',
initialState: {
value: 0,
},
reducers: {
increment: (state) => {
state.value +=1;
},
decrement: (state) =>{
state.value -=1;
},
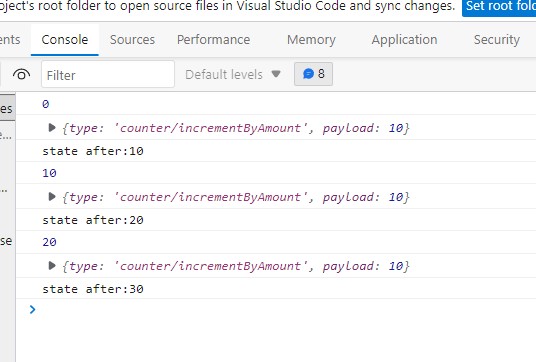
incrementByAmount: (state,action) => {
console.log(state.value);
console.log(action);
state.value += action.payload
console.log("state after:"+state.value)
},
}
})
export default counterSlice.reducer
export const {increment, decrement, incrementByAmount} = counterSlice.actions
// hàm tăng giá trị bất đồng bộ
export const incrementAsync = (amount) => (dispatch) => {
setTimeout(() => {
dispatch(incrementByAmount(amount))
}, 1000)
}
// export selectCount giúp lấy giá trị nhanh hơn trong component Counter thông qua useSelector(selectCount)
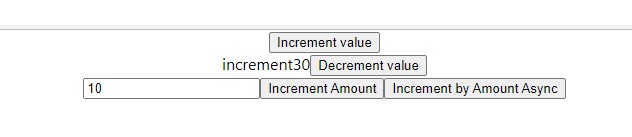
export const selectCount = (state) => state.counter.valueBước 7: sửa component src/feature/counter/Counter.js và component src/feature/counter/Counter.css
//counter component
import React, { useState } from "react";
import { useDispatch, useSelector } from "react-redux";
import { increment,decrement, selectCount,incrementByAmount, incrementAsync } from "./counterSlice";

export function Counter(){
    // lay count truc tiep tu selectCount trong counterSlice
    const count = useSelector(selectCount)
    // khai bao dispatch
    // khi gap su kien onclick, ham dispatch (gui di) se goi toi cho reducer chay vao ham increment()
    const dispatch = useDispatch()
    // dinh nghia thuoc tinh incrementAmount cho state va phuong thuc setInCrementAmount de cap nhat gia tri moi cho state
    const [incrementAmount,setInCrementAmount] = useState('10');
    return (
        <>
            <div>
                <button onClick={() => dispatch(increment())}>Increment value</button>
            </div>
            increment
            <span>{count}</span>
            <button onClick={() => dispatch(decrement())}>
                Decrement value
            </button>
          <div>
          <input value={incrementAmount} onChange={(e) => setInCrementAmount(e.target.value)} />
          <button onClick={() => dispatch(incrementByAmount(parseInt(incrementAmount)))}>Increment Amount</button>
          <button onClick={() => dispatch(incrementAsync(incrementAmount))}>Increment by Amount Async</button>
          </div>
        </>
    )
}
.asyncButton{
position: relative;
}
.asyncButton:after {
content: "";
background-color: rgba(112, 76, 182, 0.15);
display: block;
position: absolute;
width: 100%;
height: 100%;
left: 0;
top: 0;
opacity: 0;
transition: width 1s linear, opacity 0.5s ease 1s;
}
.asyncButton:active:after {
width: 0%;
opacity: 1;
transition: 0s
}Output:
Bài viết liên quan:

Dịch vụ thiết kế Wesbite