Kiến trúc Onion trong ASP.NET Core – Phần II
Mục lục
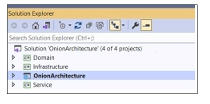
10.1 Cấu trúc dự án trong Kiến trúc Onion
Thiết kế đồng tâm của các lớp trong kiến trúc Onion giúp dễ dàng giao tiếp và phát triển ứng dụng. Thiết kế dạng phân lớp giúp:
- Ứng dụng dễ kiểm thử
- Đồng bộ và rõ ràng
Các lớp chính trong kiến trúc Onion gồm:
- Lớp thực thể miền (Domain Entities Layer)
- Lớp Repository
- Lớp Service
- Lớp UI
Mỗi lớp trên sẽ tương ứng với một project riêng biệt trong ứng dụng ASP.NET Core.
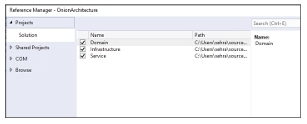
Hình 10.1 minh họa các project này trong Solution Explorer:
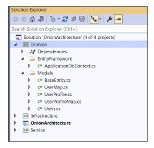
10.2 Lớp Thực thể Miền (Domain Entities Layer)
Đây là lớp quan trọng nhất trong kiến trúc Onion, như được thể hiện trong Hình 10.2.
Lớp này bao gồm:
- Class Library
- POCO (Plain Old CLR Object – các class đơn giản)
- Các class cấu hình (configuration)
Lớp này cũng giúp tạo các bảng trong cơ sở dữ liệu.
🖼️ Hình 10.2: Lớp Thực thể Miền
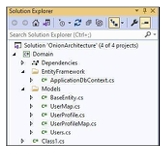
Quy trình triển khai lớp Domain Entities:
- Tạo thư mục Models và Entity Framework trong project Domain:
- Trong thư mục
Entity Framework: tạo fileApplicationDbContext.cs - Trong thư mục
Models: tạo 5 class:BaseEntityUserMapUserProfileUserProfileMapUsers
- Trong thư mục
🖼️ Hình 10.3: Thư mục Model và Entity Framework
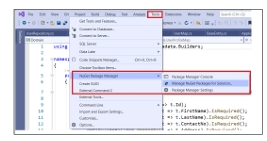
- Trong menu Tools, chọn:
NuGet Package Manager → Manage NuGet Packages for Solutionđể cài đặt các package cần thiết cho lớp Domain.
🖼️ Hình 10.4: Trình quản lý NuGet Package
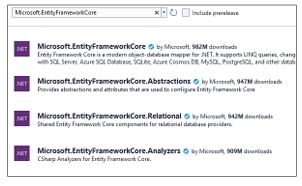
- Chọn và cài đặt lần lượt các package sau:
Microsoft.EntityFrameworkCoreMicrosoft.EntityFrameworkCore.DesignMicrosoft.EntityFrameworkCore.ToolsMicrosoft.EntityFrameworkCore.SqlServer
🖼️ Hình 10.5: Các package Entity Framework
- Trong class
Userstrong thư mục Models, thêm đoạn mã như trong Code Snippet 1 (sẽ được hiển thị ở trang tiếp theo).
Dưới đây là bản dịch chi tiết cho phần tiếp theo trong Session 10: Onion Architecture in ASP.NET Core – II, bao gồm các đoạn mã và hướng dẫn cài đặt, cấu hình:
Tiếp tục triển khai lớp Domain Entities
Đoạn mã 1: Users.cs
public class Users : BaseEntity {
    public string UserName { get; set; }
    public string Password { get; set; }
    public string EMail { get; set; }
}
Đoạn mã 2: UserProfile.cs
public class UserProfile : BaseEntity {
    public string FirstName { get; set; }
    public string LastName { get; set; }
    public string Address { get; set; }
    public string ContactNo { get; set; }
}
Đoạn mã 3: BaseEntity.cs
public class BaseEntity {
    public Int64 Id { get; set; }
    public DateTime ModifiedDate { get; set; }
    public string IPAddress { get; set; }
}
Đoạn mã 4: UserMap.cs
public class UserMap {
    public UserMap(EntityTypeBuilder<Users> entityTypeBuilder) {
        entityTypeBuilder.HasKey(t => t.Id);
        entityTypeBuilder.Property(t => t.UserName).IsRequired();
        entityTypeBuilder.Property(t => t.EMail).IsRequired();
        entityTypeBuilder.Property(t => t.Password).IsRequired();
    }
}
Đoạn mã 5: UserProfileMap.cs
using Microsoft.EntityFrameworkCore;
using Microsoft.EntityFrameworkCore.Metadata.Builders;

public class UserProfileMap {
    public UserProfileMap(EntityTypeBuilder<UserProfile> entityTypeBuilder) {
        entityTypeBuilder.HasKey(t => t.Id);
        entityTypeBuilder.Property(t => t.FirstName).IsRequired();
        entityTypeBuilder.Property(t => t.LastName).IsRequired();
        entityTypeBuilder.Property(t => t.ContactNo).IsRequired();
        entityTypeBuilder.Property(t => t.Address).IsRequired().HasMaxLength(100);
    }
}
Đoạn mã 6: ApplicationDbContext.cs
public class ApplicationDbContext : DbContext {
    public ApplicationDbContext(DbContextOptions opt) : base(opt) { }

    protected override void OnModelCreating(ModelBuilder modelBuilder) {
        new UserMap(modelBuilder.Entity<Users>());
        new UserProfileMap(modelBuilder.Entity<UserProfile>());
    }
}
Thiết lập mối quan hệ giữa Users và UserProfile
Đoạn mã 7: thêm UserProfile vào lớp Users
public class Users : BaseEntity {
    public string UserName { get; set; }
    public string Password { get; set; }
    public string EMail { get; set; }

    public UserProfile userProfile { get; set; }
}
Đoạn mã 8: thêm Users vào UserProfile
public class UserProfile : BaseEntity {
    public string FirstName { get; set; }
    public string LastName { get; set; }
    public string Address { get; set; }
    public string ContactNo { get; set; }

    public Users user { get; set; }
}
Đoạn mã 9: cập nhật UserMap.cs để định nghĩa quan hệ
public class UserMap {
    public UserMap(EntityTypeBuilder<Users> entityTypeBuilder) {
        entityTypeBuilder.HasKey(t => t.Id);
        entityTypeBuilder.Property(t => t.EMail).IsRequired();
        entityTypeBuilder.Property(t => t.UserName).IsRequired();
        entityTypeBuilder.Property(t => t.Password).IsRequired();

        entityTypeBuilder.HasOne(t => t.userProfile)
            .WithOne(u => u.user)
            .HasForeignKey<UserProfile>(x => x.Id);
    }
}
Bước cấu hình cho dự án OnionArchitecture
Đoạn mã 10: Thêm tham chiếu vào OnionArchitecture.csproj
<ItemGroup>
  <ProjectReference Include="..\Domain\Domain.csproj" />
</ItemGroup>
Đoạn mã 11: Thêm cấu hình vào appsettings.json
{
  "Logging": {
    "LogLevel": {
      "Default": "Information",
      "Microsoft": "Warning",
      "Microsoft.Hosting.Lifetime": "Information"
    }
  },
  "ConnectionStrings": {
    "OnionConnection": "Data Source=DESKTOP-...;Initial Catalog=OnionDB;Integrated Security=SSPI"
  },
  "AllowedHosts": "*"
}
Đoạn mã 12: Cấu hình trong Program.cs
using Domain.EntityFramework;
using Microsoft.EntityFrameworkCore;

var builder = WebApplication.CreateBuilder(args);

builder.Services.AddDbContext<ApplicationDbContext>(options =>
    options.UseSqlServer(
        builder.Configuration.GetConnectionString("OnionConnection"),
        b => b.MigrationsAssembly("OnionArchitecture")));

var app = builder.Build();
Dưới đây là phần dịch tiếp theo trong Session 10: Onion Architecture in ASP.NET Core – II, bao gồm các bước hoàn tất phần Domain Layer và bắt đầu vào Infrastructure Layer:
Tiếp tục các bước cài đặt và kiểm tra database
Hình 10.6: Package Manager Console
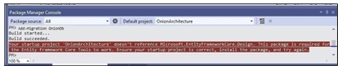
Bước 17:
- Thêm package
Microsoft.EntityFrameworkCore.Designvào solution nếu có thông báo lỗi thiếu package khi chạy lệnh migrate.
Hình 10.7: Thông báo Build thành công
Bước 18:
- Build lại dự án. Nếu build thành công, sẽ nhận được thông báo như hình.
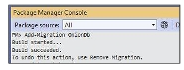
Hình 10.8: Lệnh cập nhật cơ sở dữ liệu
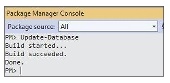
Bước 19:
- Trong Package Manager Console, chạy lệnh sau để cập nhật cơ sở dữ liệu:
Update-Database
Hình 10.9: Database và bảng đã được tạo
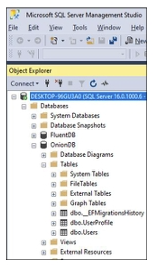
Bước 20:
- Mở SQL Server Management Studio, bạn sẽ thấy database
OnionDBvà các bảng nhưUsers,UserProfileđược tạo ra.
Bước 21:
- Mở cửa sổ query mới và chèn một bản ghi vào mỗi bảng:
INSERT INTO UserProfile (Id, FirstName, LastName, Address, ContactNo, ModifiedDate, IPAddress)
VALUES (1, 'Tyler', 'King', 'LA', '0129-8276-353', '01/01/2022', '192.168.1.1');

INSERT INTO USERS (UserName, Password, Email, ModifiedDate, IPAddress)
VALUES ('Tyler', 'King', '[email protected]', '01/01/2022', '192.168.1.1');
Bước 22:
- Đảm bảo
UsersvàUserProfileđược liên kết với nhau qua cùng mộtId.
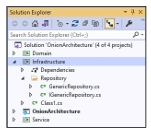
10.3 Lớp Hạ tầng (Infrastructure Layer)
Lớp Infrastructure là một thư viện class cấp hai, sau domain trong kiến trúc Onion có trách nhiệm:
- Lớp này triển khai interface cho repository tổng quát (
IRepository). - Đồng thời chứa các class kế thừa từ
DbContext. - → Code của Entity Framework trong lớp này giúp xây dựng các context truy cập dữ liệu.
Các bước triển khai Infrastructure Layer:
1. Tạo Project Infrastructure
- Trong cùng một solution, tạo project mới tên là
Infrastructure.
2. Tạo thư mục Repository bên trong Infrastructure
- Tạo một interface:
IGenericRepository<T> - Tạo lớp thực thi:
GenericRepository<T>
🖼️ Hình 10.10: Cấu trúc thư mục Repository trong project Infrastructure
3. Thêm tham chiếu đến project Domain
Đoạn mã 13
<ItemGroup>
  <ProjectReference Include="..\Domain\Domain.csproj" />
</ItemGroup>
4. Tạo Interface GenericRepository
Đoạn mã 14
public interface IGenericRepository<T> where T : BaseEntity
{
    IEnumerable<T> GetAll();
    T Get(long id);
    void Insert(T entity);
    void Update(T entity);
    void Delete(T entity);
    void Remove(T entity);
    void SaveChanges();
}
5. Triển khai GenericRepository và tiêm ApplicationDbContext
Đoạn mã 15
using Domain.EntityFramework;
using Domain.Model;
using Microsoft.EntityFrameworkCore;
using System.Linq;

public class GenericRepository<T> : IGenericRepository<T> where T : BaseEntity
{
    private readonly ApplicationDbContext dbContext;
    private DbSet<T> entities;

    public GenericRepository(ApplicationDbContext _dbContext)
    {
        dbContext = _dbContext;
        entities = dbContext.Set<T>();
    }
6. Định nghĩa các phương thức thao tác dữ liệu
Đoạn mã 16 – Delete
public void Delete(T entity)
{
    if (entity == null)
        throw new ArgumentNullException("Entity Missing");

    entities.Remove(entity);
    dbContext.SaveChanges();
}
Đoạn mã 17 – GetAll và Get
public IEnumerable<T> GetAll()
{
    return entities.AsEnumerable();
}

public T Get(long id)
{
    return entities.SingleOrDefault(s => s.Id == id);
}
Insert
public void Insert(T entity)
{
    if (entity == null)
        throw new ArgumentNullException("Entity Missing");

    entities.Add(entity);
    dbContext.SaveChanges();
}
Đoạn mã 18 – Remove
public void Remove(T entity)
{
    if (entity == null)
        throw new ArgumentNullException("Entity Missing");

    entities.Remove(entity);
}
Đoạn mã 19 – SaveChanges và Update
public void SaveChanges()
{
    dbContext.SaveChanges();
}

public void Update(T entity)
{
    if (entity == null)
        throw new ArgumentNullException("Entity Missing");

    entities.Update(entity);
    dbContext.SaveChanges();
}
7. Cuối cùng, build lại project.
➡️ Lúc này bạn đã hoàn thành Domain Layer và Infrastructure Layer, với các thao tác CRUD được đóng gói trong GenericRepository.
Dưới đây là phần dịch chi tiết tiếp theo cho Lớp Service Layer và Onion Architecture Web API:
10.4 Lớp Service (Service Layer)
Lớp service chứa logic nghiệp vụ và giao diện người dùng (UI). Giao diện và logic truy xuất dữ liệu giao tiếp với nhau tại đây, giúp tạo ra các ứng dụng ràng buộc lỏng lẻo (loose coupling).
🖼️ Hình 10.11: Cấu trúc Service Layer
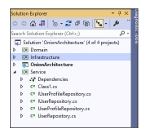
Các bước triển khai Service Layer:
1. Thêm tham chiếu đến các project Domain và Infrastructure
Đoạn mã 20:
<ItemGroup>
  <ProjectReference Include="..\Domain\Domain.csproj" />
  <ProjectReference Include="..\Infrastructure\Infrastructure.csproj" />
</ItemGroup>
2. Tạo Interface IUserRepository
Đoạn mã 21:
public interface IUserRepository
{
    IEnumerable<Users> GetUsers();
    Users GetUser(long id);
    void InsertUser(Users user);
    void UpdateUser(Users user);
    void DeleteUser(long id);
}
3. Tạo Interface IUserProfileRepository
Đoạn mã 22:
public interface IUserProfileRepository
{
    UserProfile GetUserProfile(long id);
}
4. Tạo lớp UserProfileRepository
Đoạn mã 23:
public class UserProfileRepository : IUserProfileRepository
{
    IGenericRepository<UserProfile> userProfileRepository;

    public UserProfileRepository(IGenericRepository<UserProfile> _userProfileRepository)
    {
        userProfileRepository = _userProfileRepository;
    }

    public UserProfile GetUserProfile(long id)
    {
        return userProfileRepository.Get(id);
    }
}
5. Tạo lớp UserRepository
Đoạn mã 24 và 25:
public class UserRepository : IUserRepository
{
    IGenericRepository<Users> userRepository;
    IGenericRepository<UserProfile> userProfileRepository;

    public UserRepository(IGenericRepository<Users> _userRepository,
                          IGenericRepository<UserProfile> _userProfileRepository)
    {
        userRepository = _userRepository;
        userProfileRepository = _userProfileRepository;
    }

    public void DeleteUser(long id)
    {
        UserProfile userProfile = userProfileRepository.Get(id);
        userProfileRepository.Remove(userProfile);

        Users user = userRepository.Get(id);
        userRepository.Remove(user);
        userRepository.SaveChanges();
    }

    public Users GetUser(long id)
    {
        return userRepository.Get(id);
    }

    public IEnumerable<Users> GetUsers()
    {
        return userRepository.GetAll();
    }

    public void InsertUser(Users user)
    {
        userRepository.Insert(user);
    }

    public void UpdateUser(Users user)
    {
        userRepository.Update(user);
    }
}
10.5 Web API của Onion Architecture
Web API là lớp giao diện người dùng (UI Layer) trong kiến trúc Onion.
- Đây là điểm bắt đầu chính của chương trình
- Giao tiếp với người dùng qua Postman hoặc trình duyệt
- Tích hợp Dependency Injection để giảm ràng buộc
1. Thêm tham chiếu các project Domain, Infrastructure, Service
🖼️ Hình 10.12: Thêm tham chiếu trong project OnionArchitecture
2. Tạo thư mục DTO và class UserDto
Đoạn mã 26:
public class UserDto
{
    public Int64 Id { get; set; }
    public string FirstName { get; set; }
    public string LastName { get; set; }
    public string Name { get; set; }
    public string Address { get; set; }
    public string UserName { get; set; }
    public string Password { get; set; }
    public string EMail { get; set; }
    public DateTime AddedDate { get; set; }
    public string ContactNo { get; set; }
}
3. Cấu hình Dependency Injection trong Program.cs
Đoạn mã 27:
builder.Services.AddScoped(typeof(IGenericRepository<>), typeof(GenericRepository<>));
builder.Services.AddTransient<IUserProfileRepository, UserProfileRepository>();
builder.Services.AddTransient<IUserRepository, UserRepository>();
builder.Services.AddControllers();
4. Tạo lớp Controller: UserController
Đoạn mã 28:
[ApiController]
[Route("[controller]")]
public class UserController : ControllerBase
{
    IUserRepository userRepository;
    IUserProfileRepository userProfileRepository;

    public UserController(IUserRepository _userRepository,
                          IUserProfileRepository _userProfileRepository)
    {
        userRepository = _userRepository;
        userProfileRepository = _userProfileRepository;
    }
}
5. Thêm phương thức ListUsers()
Đoạn mã 29:
[HttpGet]
public ActionResult ListUsers()
{
    List<Users> listUser = new List<Users>();
    userRepository.GetUsers().ToList().ForEach(u =>
    {
        Users user = null;
        UserProfile userProfile = userProfileRepository.GetUserProfile(u.Id);

        user = new Users()
        {
            Id = u.Id,
            UserName = u.UserName,
            EMail = u.EMail,
            Password = u.Password,
            IPAddress = u.IPAddress,
            ModifiedDate = u.ModifiedDate,
            userProfile = new UserProfile()
            {
                FirstName = userProfile.FirstName,
                LastName = userProfile.LastName,
                ContactNo = userProfile.ContactNo,
                Address = userProfile.Address,
                ModifiedDate = userProfile.ModifiedDate,
                IPAddress = userProfile.IPAddress,
                user = u,
                Id = u.Id
            }
        };
        listUser.Add(user);
    });
    return Ok(listUser);
}
6. Thêm phương thức CreateUser()
Đoạn mã 30:
[HttpGet]
public int CreateUser(UserDto model)
{
    Users userEntity = new Users
    {
        UserName = model.UserName,
        EMail = model.EMail,
        Password = model.Password,
        ModifiedDate = DateTime.UtcNow,
        IPAddress = Request.HttpContext.Connection.RemoteIpAddress.ToString()
    };

    UserProfile profile = new UserProfile
    {
        FirstName = model.FirstName,
        Address = model.Address,
        LastName = model.LastName,
        ContactNo = model.ContactNo,
        ModifiedDate = DateTime.UtcNow,
        IPAddress = Request.HttpContext.Connection.RemoteIpAddress.ToString()
    };

    userEntity.userProfile = profile;
    userRepository.InsertUser(userEntity);
    return 1;
}
Dưới đây là bản dịch chi tiết phần kết thúc Session 10: Onion Architecture in ASP.NET Core – II, bao gồm thiết lập chạy, bảo mật, logging, monitoring và tối ưu hiệu suất:
7. Thiết lập chạy chương trình
Bước 7:
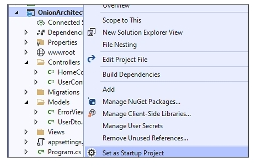
Nhấp phải vào project OnionArchitecture và chọn Set as Startup Project
🖼️ Hình 10.13: Thiết lập project khởi động
Bước 8:
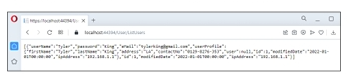
Thêm các view thích hợp và chạy ứng dụng. Dữ liệu người dùng sẽ được hiển thị dưới dạng JSON trên trình duyệt.
🖼️ Hình 10.14: Kết quả hiển thị JSON trên trình duyệt
Bước 9:
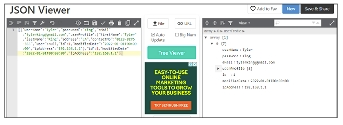
Copy dữ liệu JSON và dán vào trình format/beautifier JSON như:
- https://jsonformatter.org
- https://jsonbeautifier.org
🖼️ Hình 10.15 & 10.16: Hiển thị chi tiết user profile sau khi format JSON

10.6 Cân nhắc về Bảo mật (Security Considerations)
Bảng 10.1: Cân nhắc bảo mật theo từng lớp trong kiến trúc Onion:
| Lớp | Loại bảo mật | Ghi chú |
|---|---|---|
| Domain Layer | Xác thực đầu vào (Input Validation) | – Kiểm tra chặt chẽ các giá trị thực thể, đảm bảo đúng business rules- Loại bỏ dữ liệu độc hại sớm nhất có thể |
| Infrastructure Layer | Xác thực dữ liệu (Data Validation) | – Làm sạch dữ liệu từ các dịch vụ hoặc nguồn ngoài- Ngăn chặn tấn công như SQL Injection |
| Service Layer | Xác thực người dùng (Authentication) | – Cài đặt xác thực sử dụng ASP.NET Core- Kết hợp OAuth hoặc các dịch vụ xác thực bên thứ 3 |
| Web API Layer | Xác thực đầu vào | – Kiểm tra đầu vào từ client- Sử dụng Data Annotation để xác thực dữ liệu (model validation) |
10.7 Thiết lập Monitoring và Tracing: Phát hiện lỗi và phân tích hiệu năng
Thiết lập monitoring giúp theo dõi tình trạng ứng dụng; tracing giúp hiểu luồng xử lý và xác định lỗi hiệu quả.
10.7.1 Monitoring cho Phát hiện lỗi
- Logging:
Dùng framework như Serilog hoặc ILogger để ghi log ứng dụng. - Công cụ theo dõi lỗi:
Dùng Sentry, Raygun, Application Insights để ghi nhận lỗi runtime. - Alerting:
Gửi thông báo đến team khi có lỗi nghiêm trọng xảy ra.
10.7.2 Monitoring cho Phân tích hiệu suất
- Instrumentation:
Gắn code đo hiệu suất bằng thư viện nhưApplication Insights SDK. - APM (Application Performance Monitoring):
Dùng New Relic, Datadog hoặc Azure Application Insights. - Custom Metrics:
Ghi nhận và đo đạc các chỉ số hiệu suất theo yêu cầu riêng của hệ thống.
10.7.3 Thiết lập Tracing
- Distributed Tracing:
Theo dõi luồng xử lý qua nhiều service khác nhau – dùng Zipkin, Jaeger. - Instrumentation Libraries:
Gắn mã theo dõi vào code để trace luồng xử lý. - Correlation IDs:
Gắn mã định danh cho mỗi request để trace toàn bộ lifecycle.
10.7.4 Logging và Hạ tầng Monitoring
- Logging tập trung (Centralized Logging):
Dùng ELK Stack (ElasticSearch – Logstash – Kibana) hoặc Azure Monitor Logs. - Lưu trữ & Trực quan hóa số liệu:
Dùng Prometheus hoặc InfluxDB để lưu trữ và vẽ biểu đồ dữ liệu performance.
10.7.5 Cải tiến liên tục (Continuous Improvement)
- Kiểm thử hiệu năng:
Gắn vào pipeline CI/CD – kiểm tra tự động mỗi lần deploy. - Đánh giá & tối ưu định kỳ:
Phân tích dữ liệu log và trace để cải tiến hiệu năng ứng dụng.
✅ Tổng kết:
Bạn đã hoàn thành toàn bộ các bước xây dựng một hệ thống theo Onion Architecture từ:
- Domain → Infrastructure → Service → Web API
- Thêm kiểm thử, logging, bảo mật và tối ưu vận hành.
Bài tập
Bài tập
Bài viết liên quan:


Dịch vụ thiết kế Wesbite