Hướng dẫn mở rộng phân cùng ổ cứng CentOS
Mục lục
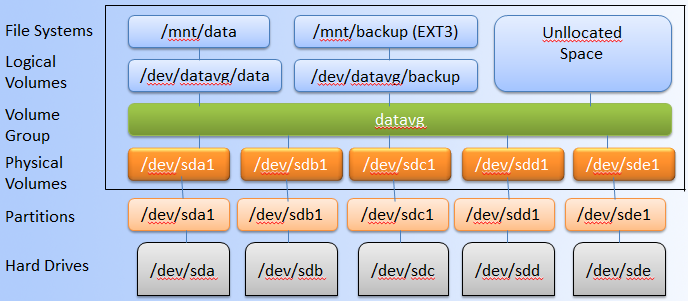
Khái niệm LVM (Logical Volume Manager)
- Tạo 1 hoặc nhiều phần vùng logic hoặc phân vùng với toàn bộ đĩa cứng (hơi giống với RAID 0, nhưng tương tự như JBOD), cho phép thay đổi kích thước volume.
- Quản lý trang trại đĩa cứng lớn (Large hard Disk Farms) bằng cách cho phép thêm và thay thế đĩa mà không bị ngừng hoạt động hoặc gián đoạn dịch vụ, kết hợp với trao đổi nóng (hot swapping).
- Trên các hệ thống nhỏ (như máy tính để bàn), thay vì phải ước tính thời gian cài đặt, phân vùng có thể cần lớn đến mức nào, LVM cho phép các hệ thống tệp dễ dàng thay đổi kích thước khi cần.
- Thực hiện sao lưu nhất quán bằng cách tạo snapshot nhanh các khối một cách hợp lý.
- Mã hóa nhiều phân vùng vật lý bằng một mật khẩu.
Bài viết này sẽ hướng dẫn các bạn mở rộng dung lượng ổ cứng của Centos.
Mở rộng dung lượng ổ cứng của Centos
Để thực hiện mình sẽ chuẩn bị một máy ảo Centosvới ổ cứng có dung lượng 20GB.
Các bạn có thể kiểm tra dung lượng của phân vùng, ổ cứng bằng lệnh df và fdisk như sau:
[root@localhost ~]# df -h
Filesystem               Size  Used Avail Use% Mounted on
devtmpfs                 1.9G     0  1.9G   0% /dev
tmpfs                    1.9G     0  1.9G   0% /dev/shm
tmpfs                    1.9G  8.6M  1.9G   1% /run
tmpfs                    1.9G     0  1.9G   0% /sys/fs/cgroup
/dev/mapper/centos-root   17G  1.5G   16G   9% /
/dev/sda1               1014M  173M  842M  17% /boot
tmpfs                    379M     0  379M   0% /run/user/0
[root@localhost ~]# fdisk /dev/sda
Welcome to fdisk (util-linux 2.23.2).

Changes will remain in memory only, until you decide to write them.
Be careful before using the write command.


Command (m for help): p

Disk /dev/sda: 21.5 GB, 21474836480 bytes, 41943040 sectors
Units = sectors of 1 * 512 = 512 bytes
Sector size (logical/physical): 512 bytes / 512 bytes
I/O size (minimum/optimal): 512 bytes / 512 bytes
Disk label type: dos
Disk identifier: 0x000c6ffe

   Device Boot      Start         End      Blocks   Id  System
/dev/sda1   *        2048     2099199     1048576   83  Linux
/dev/sda2         2099200    41943039    19921920   8e  Linux LVM
Sau khi tắt máy và mở rộng ổ cứng của máy ảo lên 40GB, thực thi lệnh fdisk một lần nữa để xác nhận.
[root@localhost ~]# fdisk /dev/sda
Welcome to fdisk (util-linux 2.23.2).

Changes will remain in memory only, until you decide to write them.
Be careful before using the write command.


Command (m for help): p

Disk /dev/sda: 42.9 GB, 42949672960 bytes, 83886080 sectors
Units = sectors of 1 * 512 = 512 bytes
Sector size (logical/physical): 512 bytes / 512 bytes
I/O size (minimum/optimal): 512 bytes / 512 bytes
Disk label type: dos
Disk identifier: 0x000c6ffe

   Device Boot      Start         End      Blocks   Id  System
/dev/sda1   *        2048     2099199     1048576   83  Linux
/dev/sda2         2099200    41943039    19921920   8e  Linux LVM
Chúng ta thấy sda đã được tăng dung lượng lên 42,9GB.
Để tăng dung lương phân vùng /dev/mapper/centos-root lên 40GB các bạn làm theo các bước sau:
Tạo phân vùng sda3
[root@localhost ~]# fdisk /dev/sda
Welcome to fdisk (util-linux 2.23.2).

Changes will remain in memory only, until you decide to write them.
Be careful before using the write command.


Command (m for help): p

Disk /dev/sda: 42.9 GB, 42949672960 bytes, 83886080 sectors
Units = sectors of 1 * 512 = 512 bytes
Sector size (logical/physical): 512 bytes / 512 bytes
I/O size (minimum/optimal): 512 bytes / 512 bytes
Disk label type: dos
Disk identifier: 0x000c6ffe

   Device Boot      Start         End      Blocks   Id  System
/dev/sda1   *        2048     2099199     1048576   83  Linux
/dev/sda2         2099200    41943039    19921920   8e  Linux LVM

Command (m for help): n
Partition type:
   p   primary (2 primary, 0 extended, 2 free)
   e   extended
Select (default p): p
Partition number (3,4, default 3):
First sector (41943040-83886079, default 41943040):
Using default value 41943040
Last sector, +sectors or +size{K,M,G} (41943040-83886079, default 83886079):
Using default value 83886079
Partition 3 of type Linux and of size 20 GiB is set

Command (m for help): w
The partition table has been altered!

Calling ioctl() to re-read partition table.

WARNING: Re-reading the partition table failed with error 16: Device or resource busy.
The kernel still uses the old table. The new table will be used at
the next reboot or after you run partprobe(8) or kpartx(8)
Syncing disks.
Sau khi tạo xong phân vùng sda3 các bạn nhớ REBOOT máy bằng lệnh reboot hoặc shutdown -r now
Lưu ý nếu không reboot, sẽ không chạy được lệnh dưới
Tiếp theo thực thi lệnh pvcreate
[root@localhost ~]# pvcreate /dev/sda3
  Physical volume "/dev/sda3" successfully created.
Tiếp theo thực thi lệnh vgextend
[root@localhost ~]# vgextend centos /dev/sda3 Volume group "centos" successfully extendedKiểm tra kích thước Volume group bẳng lệnh vgdisplay
[root@localhost ~]# vgdisplay
  --- Volume group ---
  VG Name               centos
  System ID
  Format                lvm2
  Metadata Areas        2
  Metadata Sequence No  4
  VG Access             read/write
  VG Status             resizable
  MAX LV                0
  Cur LV                2
  Open LV               2
  Max PV                0
  Cur PV                2
  Act PV                2
  VG Size               38.99 GiB
  PE Size               4.00 MiB
  Total PE              9982
  Alloc PE / Size       4863 / <19.00 GiB
  Free  PE / Size       5119 / <20.00 GiB
  VG UUID               C8wTDr-LdU3-1UZA-hLmN-M6TE-noTJ-uwiVSX
Mở rộng kích thước phân vùng /dev/mapper/centos-root
[root@localhost ~]# lvextend -l +100%FREE /dev/mapper/centos-root
  Size of logical volume centos/root changed from <17.00 GiB (4351 extents) to 36.99 GiB (9470 extents).
  Logical volume centos/root successfully resized.
Kiểm tra kích thước Logical volume bẳng lệnh lvdisplay
[root@localhost ~]# lvdisplay
  --- Logical volume ---
  LV Path                /dev/centos/swap
  LV Name                swap
  VG Name                centos
  LV UUID                3hj2GP-mbog-Yd1G-SU83-2in0-LEoU-ltkSlD
  LV Write Access        read/write
  LV Creation host, time localhost, 2019-10-02 12:35:39 +0900
  LV Status              available
  # open                 2
  LV Size                2.00 GiB
  Current LE             512
  Segments               1
  Allocation             inherit
  Read ahead sectors     auto
  - currently set to     8192
  Block device           253:1

  --- Logical volume ---
  LV Path                /dev/centos/root
  LV Name                root
  VG Name                centos
  LV UUID                pOIcHS-E0R2-6frL-Xza2-jWdl-z51k-rTApGW
  LV Write Access        read/write
  LV Creation host, time localhost, 2019-10-02 12:35:40 +0900
  LV Status              available
  # open                 1
  LV Size                36.99 GiB
  Current LE             9470
  Segments               2
  Allocation             inherit
  Read ahead sectors     auto
  - currently set to     8192
  Block device           253:0
Chúng ta thấy /dev/centos/root đã được mở rộng lên 36,99 GB
Tiếp theo chúng ta tiến hành resize filesystem:
Trên Centos 6:
resize2fs /dev/mapper/centos-rootTrên Centos 7
[root@localhost ~]# xfs_growfs /dev/mapper/centos-root
meta-data=/dev/mapper/centos-root isize=512    agcount=4, agsize=1113856 blks
         =                       sectsz=512   attr=2, projid32bit=1
         =                       crc=1        finobt=0 spinodes=0
data     =                       bsize=4096   blocks=4455424, imaxpct=25
         =                       sunit=0      swidth=0 blks
naming   =version 2              bsize=4096   ascii-ci=0 ftype=1
log      =internal               bsize=4096   blocks=2560, version=2
         =                       sectsz=512   sunit=0 blks, lazy-count=1
realtime =none                   extsz=4096   blocks=0, rtextents=0
data blocks changed from 4455424 to 9697280
Kiểm tra lại một lên nữa bằng lệnh df
[root@localhost ~]# df -h
Filesystem               Size  Used Avail Use% Mounted on
devtmpfs                 1.9G     0  1.9G   0% /dev
tmpfs                    1.9G     0  1.9G   0% /dev/shm
tmpfs                    1.9G  8.6M  1.9G   1% /run
tmpfs                    1.9G     0  1.9G   0% /sys/fs/cgroup
/dev/mapper/centos-root   37G  1.3G   36G   4% /
/dev/sda1               1014M  186M  829M  19% /boot
tmpfs                    379M     0  379M   0% /run/user/0
Việc thay đổi kích thước ổ cứng hay phân vùng có thể mang đến các rủi ro như thao tác nhầm hay mất dữ liệu, do đó các bạn nên sao lưu cẩn thận trước khi thực hiện. Chúc các bạn thành công.