Hướng dẫn sử dụng Rclone backup VPS lên google drive
rclone là một ứng dụng dòng lệnh mạnh mẽ và linh hoạt được thiết kế để quản lý và đồng bộ hóa dữ liệu giữa máy tính và các dịch vụ lưu trữ đám mây. Được phát triển bởi Nick Craig-Wood, rclone hỗ trợ hơn 40 dịch vụ lưu trữ đám mây phổ biến như Google Drive, Dropbox, OneDrive, Amazon S3 và nhiều dịch vụ khác. Với khả năng sao lưu, đồng bộ hóa, tải lên và tải xuống dữ liệu, rclone cung cấp các tính năng quản lý tệp tin tương tự như rsync, nhưng dành riêng cho các dịch vụ đám mây.
Ứng dụng này nổi bật với khả năng mã hóa dữ liệu, hỗ trợ xác thực OAuth, và khả năng xử lý các tệp lớn và nhiều tệp nhỏ một cách hiệu quả. rclone còn có thể làm việc trong nền, hỗ trợ chuyển dữ liệu theo lịch trình và có khả năng tích hợp dễ dàng vào các hệ thống tự động hóa. Với giao diện dòng lệnh dễ sử dụng và tài liệu chi tiết, rclone là công cụ lý tưởng cho các quản trị viên hệ thống, nhà phát triển và người dùng cá nhân muốn quản lý dữ liệu của mình trên các nền tảng đám mây một cách hiệu quả và an toàn.
Bài viết này tập trung hướng dẫn các bạn cấu hình rclone trên ubuntu/centos và backup dữ liệu sang google drive.
Mục lục
Cài đặt Rclone
Với ubuntu/centos, chạy lệnh:
sudo -v ; curl https://rclone.org/install.sh | sudo bashVới windows, xem bản tải về và đưa vào biến môi trường thông qua link sau:
Cấu hình Rclone
Bước 1: mở tính năng config của Rclone
Để tiến hành cấu hình rclone, chạy lệnh:
rclone configOutput:
2024/08/03 01:11:28 NOTICE: Config file "/root/.config/rclone/rclone.conf" not found - using defaults
No remotes found, make a new one?
n) New remote
s) Set configuration password
q) Quit config
n/s/q> n
Enter name for new remote.
name> remote google drive
Option Storage.
Type of storage to configure.
Choose a number from below, or type in your own value.
....Chọn google drive:
Storage> 17
#đây là option google drive

Option client_id.
Google Application Client Id
Setting your own is recommended.
See https://rclone.org/drive/#making-your-own-client-id for how to create your own.
If you leave this blank, it will use an internal key which is low performance.
Enter a value. Press Enter to leave empty.
client_id>
Bước 2: truy cập google drive để tạo client_id, client_sercet sử dụng để xác thực và kết nối rclone
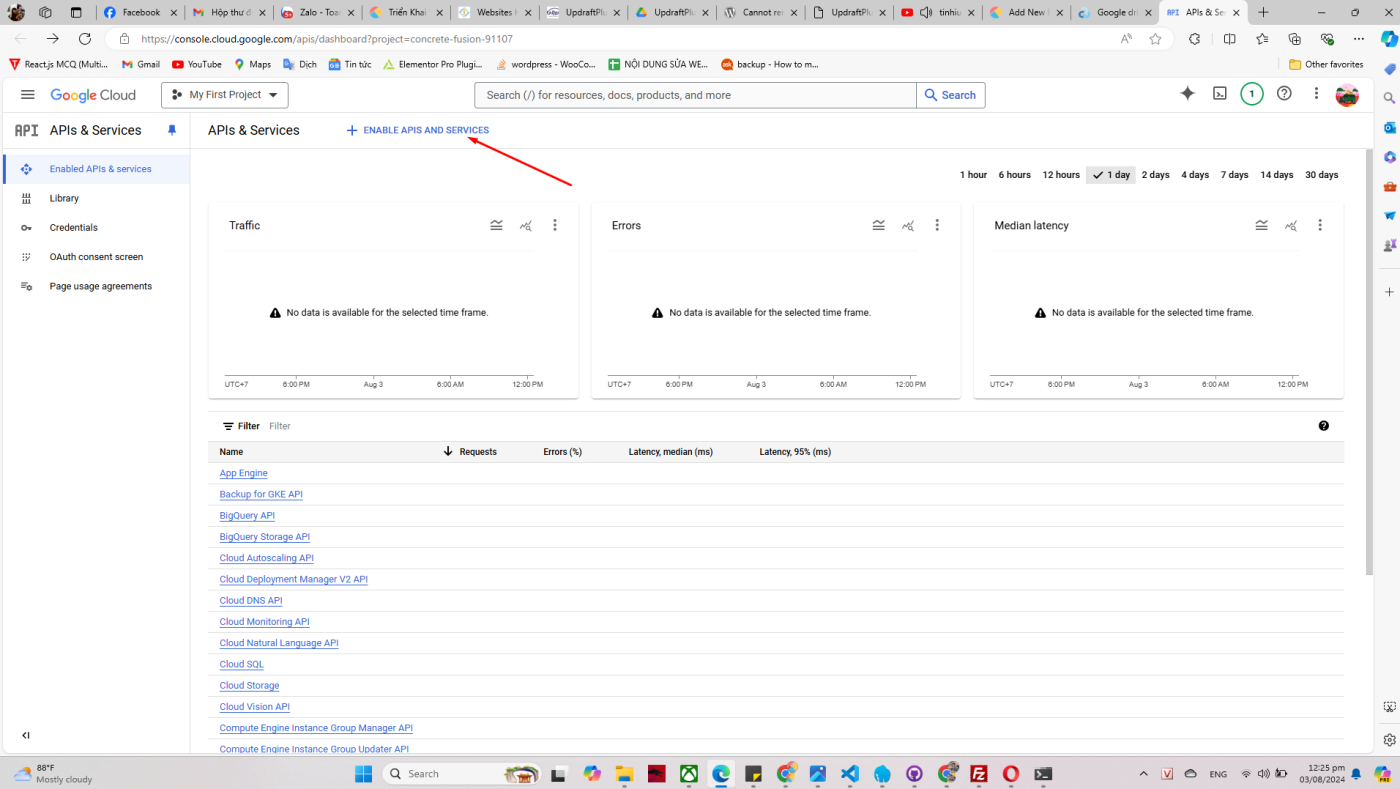
Truy cập https://console.developers.google.com/ và chọn ENABLE APIS AND SERVICES
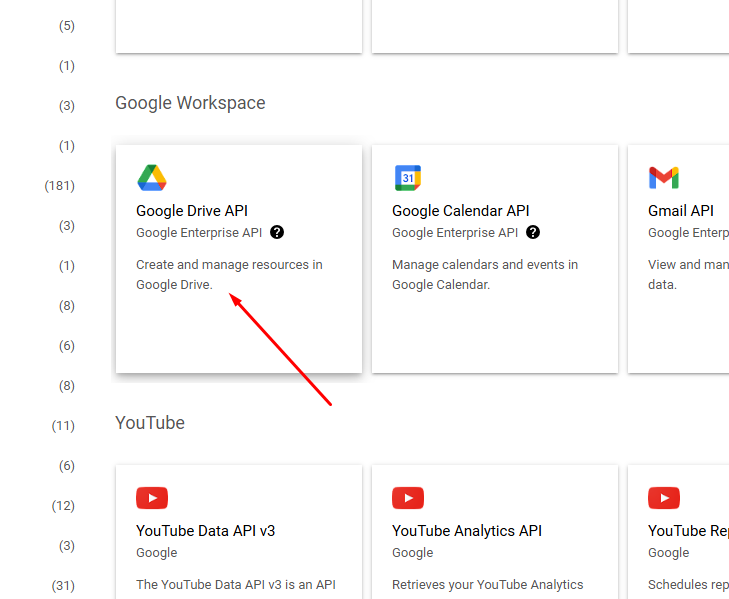
Chọn Google Drive API:
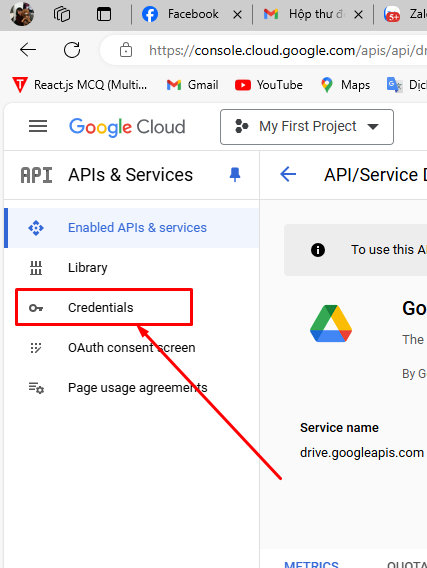
Bấm Credentials ở góc phải trình duyệt:
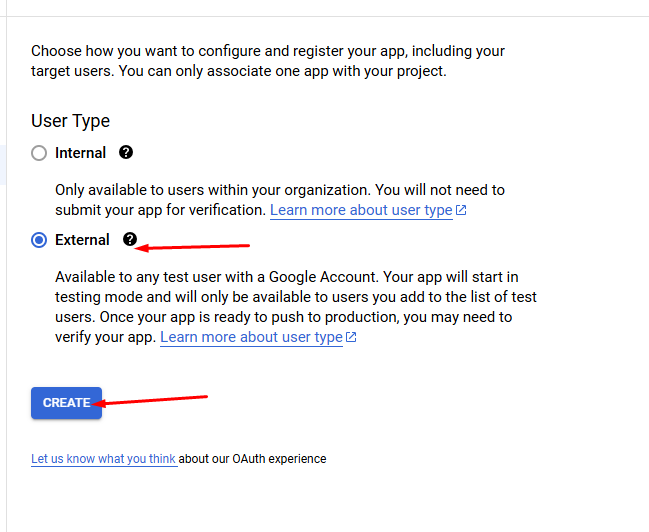
Bấm CONFIGURE CONSENT SCREEN

Chọn External , bấm CREATE
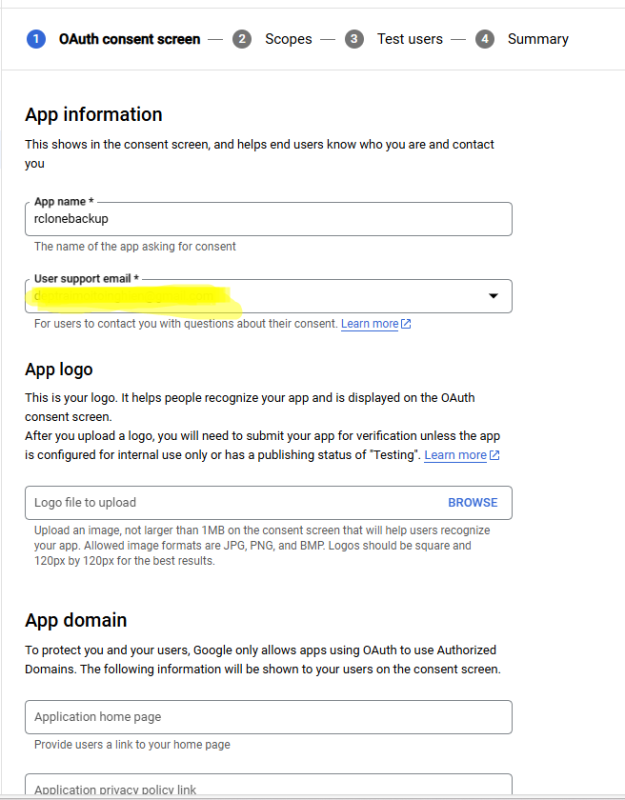
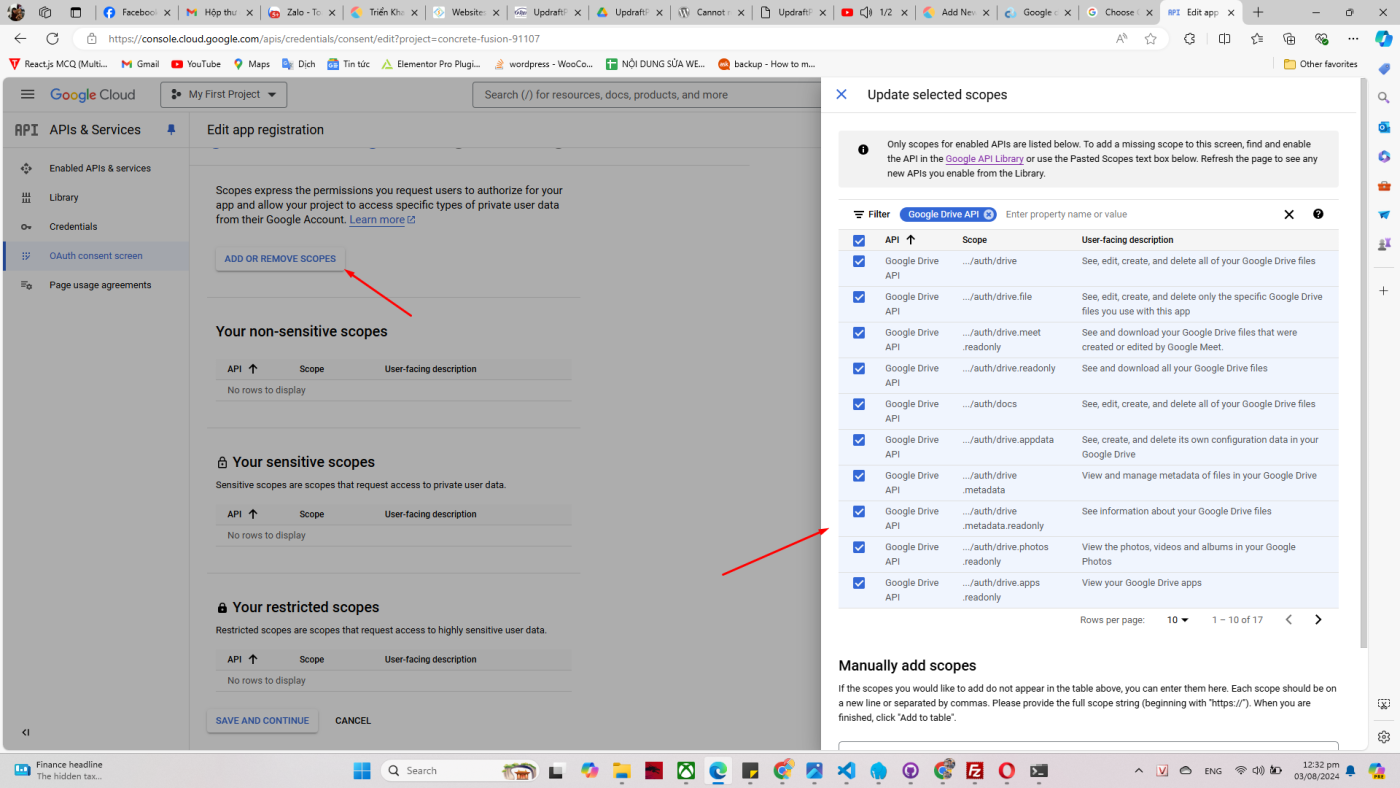
Mở màn hình tiếp theo, nhập thông tin ứng dụng, bước scopes chọn các phạm vi và quyền cho API
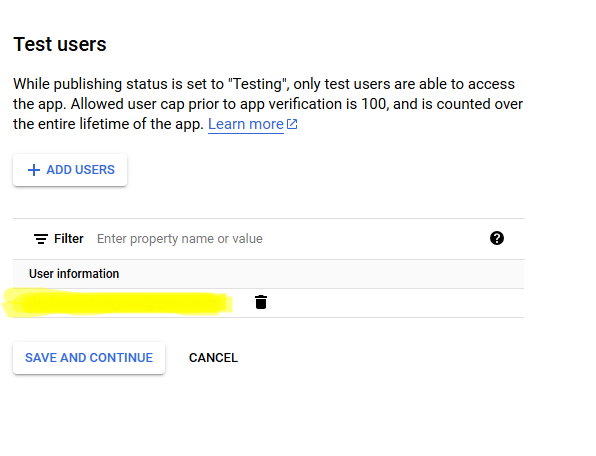
Chọn test user chính là email của bạn
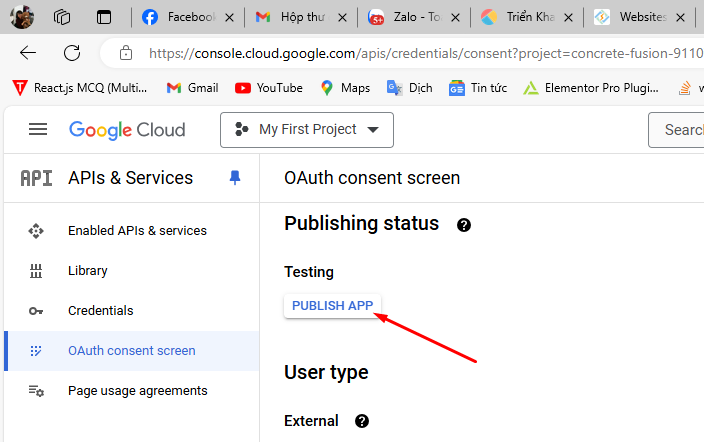
Sau khi hoàn thành, bấm PUBLISH APP
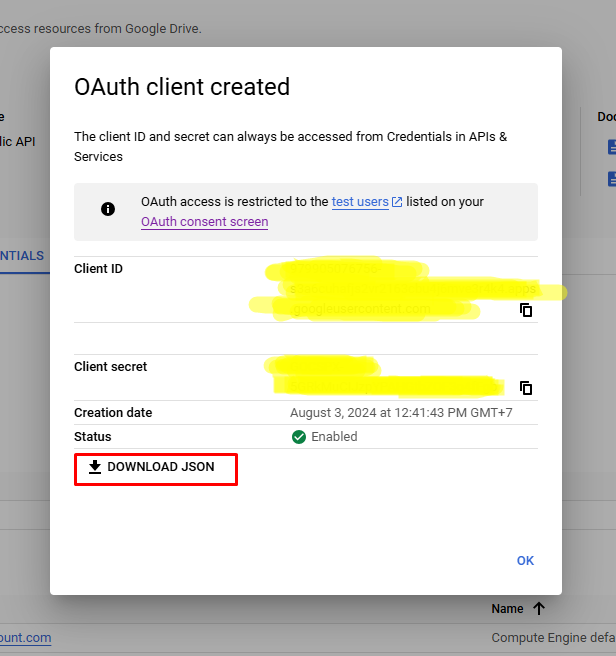
Bước tiếp theo tạo OAuth Client ID

Sau đó, lấy Client ID và Client Secret đưa vào phần cấu hình rclone:
Bước 3: quay lại rclone để tiếp tục cấu hình
Điền secret_id và client_id vào cấu hình rclone
Option client_id.
Google Application Client Id
Setting your own is recommended.
See https://rclone.org/drive/#making-your-own-client-id for how to create your own.
If you leave this blank, it will use an internal key which is low performance.
Enter a value. Press Enter to leave empty.
client_id>{điền client id vào đây}
Option client_secret.
OAuth Client Secret.
Leave blank normally.
Enter a value. Press Enter to leave empty.
client_secret>{điền secret id vào đây}
Option scope.
Comma separated list of scopes that rclone should use when requesting access from drive.
Choose a number from below, or type in your own value.
Press Enter to leave empty.
1 / Full access all files, excluding Application Data Folder.
\ (drive)
2 / Read-only access to file metadata and file contents.
\ (drive.readonly)
/ Access to files created by rclone only.
3 | These are visible in the drive website.
| File authorization is revoked when the user deauthorizes the app.
\ (drive.file)
/ Allows read and write access to the Application Data folder.
4 | This is not visible in the drive website.
\ (drive.appfolder)
/ Allows read-only access to file metadata but
5 | does not allow any access to read or download file content.
\ (drive.metadata.readonly)
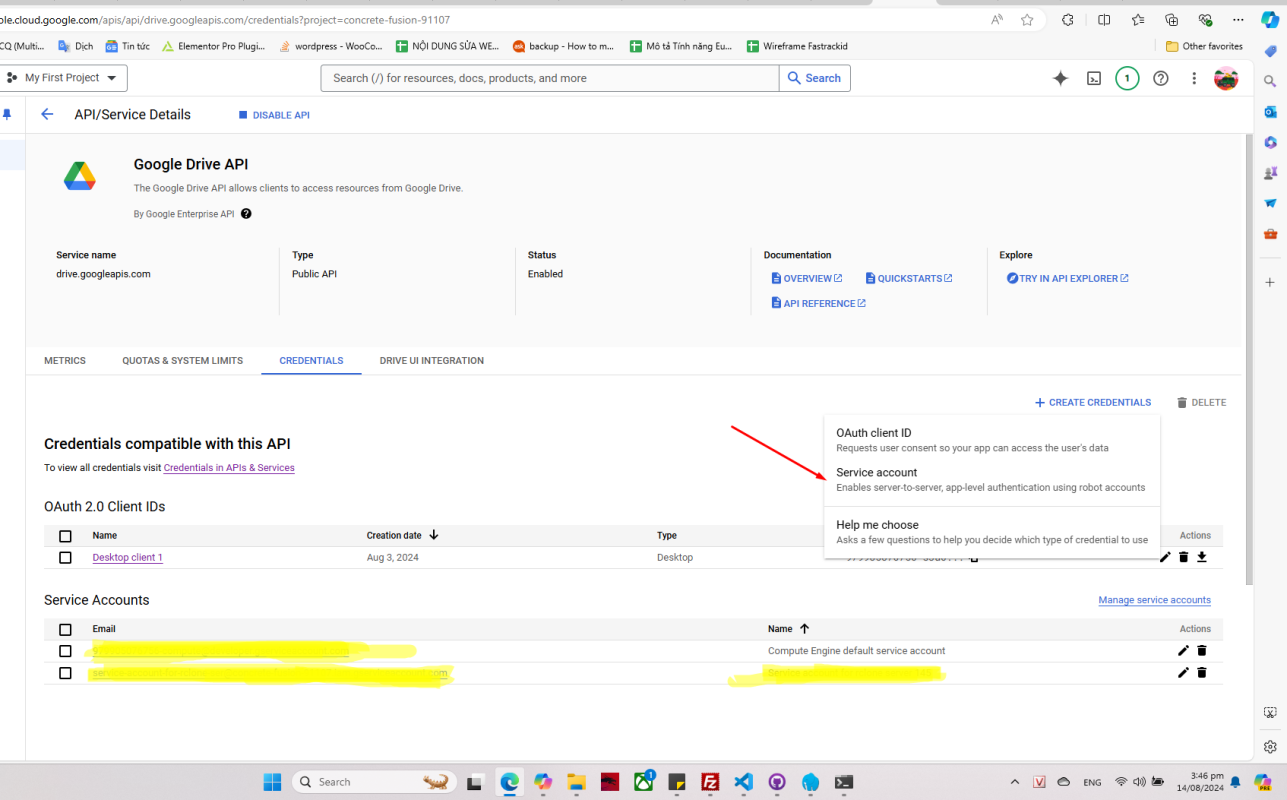
scope> 1Ở phần ccount service, nếu bạn muốn sử dụng account service, thao tác như sau, tuy nhiên lưu ý về limit quota của account service chỉ được 15GB:
Truy cập goolge console API, bấm CREATE CREDENTIALS
Tham khảo: How can I get the file “service_account.json” for Google Translate API? – Stack Overflow
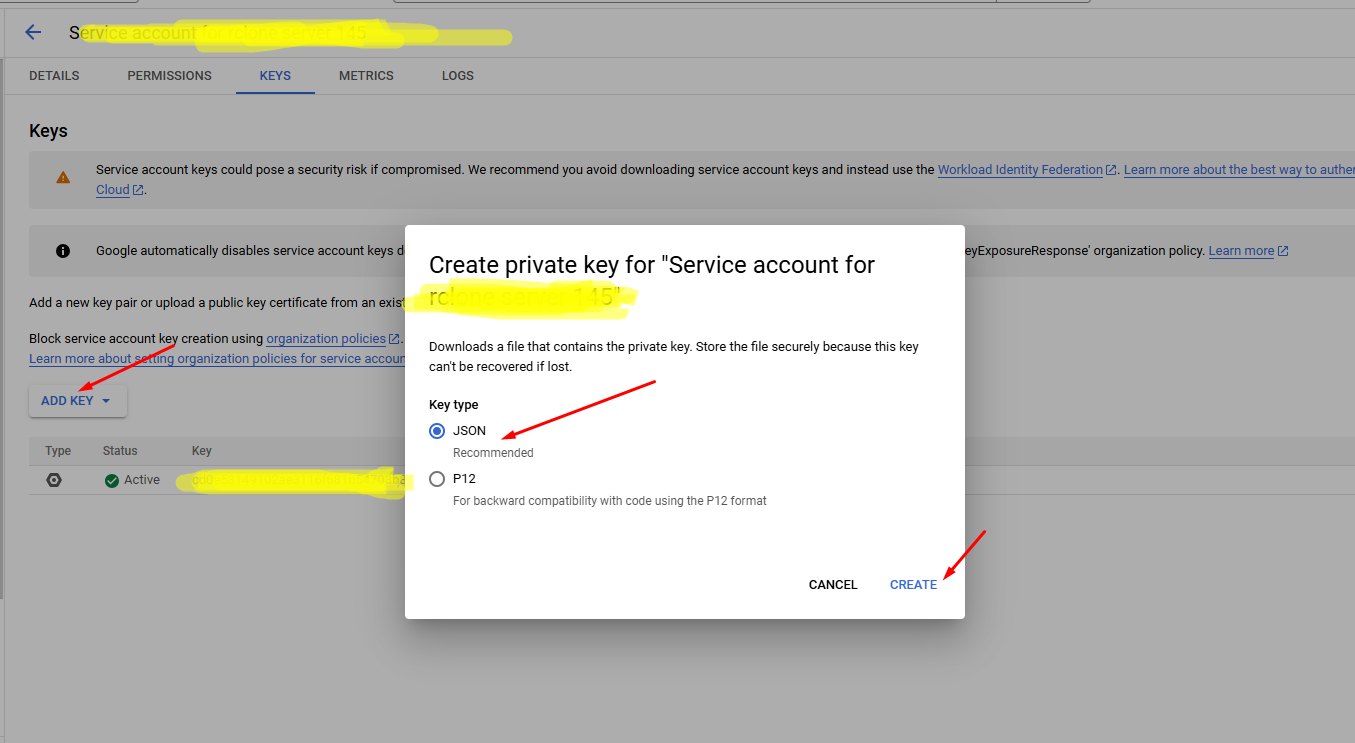
Sau khi tạo xong, tệp json sẽ được tự động tải về, đưa đường dẫn json phù hợp vào rclone dựa theo cấu trúc thư mục server.
Lưu ý: nếu sử dụng account service để backup dữ liệu, có 3 bước cần phải làm
Vào thư mục cần backup trong google drive, chia sẻ quyền với account service vừa tạo.
Chọn advance config trong rclone để cấu hình root_folder_id:
Option service_account_file.
Service Account Credentials JSON file path.
Leave blank normally.
Needed only if you want use SA instead of interactive login.
Leading `~` will be expanded in the file name as will environment variables such as `${RCLONE_CONFIG_DIR}`.
Enter a value. Press Enter to leave empty.
service_account_file>

Edit advanced config?
y) Yes
n) No (default)
y/n> y
# skip toàn bộ trừ option sau:
Option root_folder_id.
ID of the root folder.
Leave blank normally.
Fill in to access "Computers" folders (see docs), or for rclone to use
a non root folder as its starting point.
Enter a value of type string. Press Enter for the default (backup_103.155.81.145).
root_folder_id> 1_rW4ZcrnvHi7DUzTZbvc9W9FlM81dccA
Use web browser to automatically authenticate rclone with remote?
 * Say Y if the machine running rclone has a web browser you can use
 * Say N if running rclone on a (remote) machine without web browser access
If not sure try Y. If Y failed, try N.
Đến đoạn này,, nếu bạn đang sử dụng trên máy cá nhân có giao diện, bấm Y, nếu đang truy cập rclone thông qua SSH bấm N, cài đặt Rclone tương tự trên máy có giao diện và làm đến bước này chọn Y để lấy được token, sau khi có token quay lại điền thủ công vào rclone trên SSH:
Option config_token.
For this to work, you will need rclone available on a machine that has
a web browser available.
For more help and alternate methods see: https://rclone.org/remote_setup/
Execute the following on the machine with the web browser (same rclone
version recommended):
rclone authorize "drive" "eyJjbGllbnRfaWQiOiI5Nzk5MDUwNzY3NTYtczNhNmN1aGFmanMydnIyMTYzY2J1NGo2bXZlM3I0azQuYXBwcy5nb29nbGV1c2VyY29udGVudC5jb20iLCJjbGllbnRfc2VjcmV0IjoiR09DU1BYLTVHUmtNdUNJSnpwWVBBSEd0YlpPRjNvNGZGZ2IiLCJzY29wZSI6ImRyaXZlIn0"
Then paste the result.
Enter a value.
config_token> {"access_token":"yourtoken"}
Configure this as a Shared Drive (Team Drive)?
y) Yes
n) No (default)
y/n> n
Configuration complete.
Options:
- type: drive
- client_id: {your_client_id}
- client_secret: {your_client_secret}
- scope: drive
- team_drive:
- token: {"access_token":"your_access_token"}
Keep this "google_drive" remote?
y) Yes this is OK (default)
e) Edit this remote
d) Delete this remote
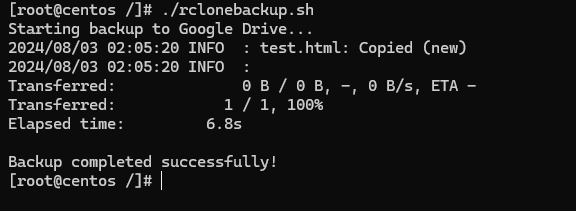
y/e/d> ySau khi cài đặt thành công, tạo 1 tệp bash script trên server để test, lưu ý:
- Thư mục /test/test.html cần có dữ liệu
- REMOTE_NAME là tên của remote vừa cấu hình
- BACKUP_DIR là thư mục backup của server
#!/bin/bash

# Định nghĩa các biến
SOURCE_DIR="/test/test.html"
REMOTE_NAME="google_drive"
BACKUP_DIR="/backup/website_$(date +%Y%m%d_%H%M%S)"

# Tạo bản sao lưu
echo "Starting backup to Google Drive..."
rclone copy $SOURCE_DIR $REMOTE_NAME:$BACKUP_DIR --verbose

if [ $? -eq 0 ]; then
    echo "Backup completed successfully!"
else
    echo "Backup failed!"
fi
Chạy tệp và tận hưởng kết quả, chúc bạn thành công !
Bài viết liên quan:


Dịch vụ thiết kế Wesbite