Directive (chỉ thị) trong angularJS và danh sách các directive
Như chúng ta đã tiếp cận, angularJS được gọi là framework sử dụng để xây dựng ứng dụng web, nghĩa là được cung cấp một số các cấu trúc được xây dựng sẵn giúp cấu trúc giúp chúng ta phát triển ứng dụng dễ dàng và mạch lạc hơn.Directives là một trong những thành phần quan trọng nhất của angularJS, giúp chúng ta kế thừa các phần tử HTML cơ bản, giúp các mẫu giao diện html có khả năng sử dụng lại, dễ dàng kiểm thử.
Mục lục
Khái niệm Directives AngularJS
Directives (chỉ thị) là một hành vi sẽ được kích hoạt khi gặp cấu trúc cụ thể trong quá trình biên dịch AngularJS. Đọc thêm chuyên sâu về HTML Compiler của angularJS tại đây: https://docs.angularjs.org/guide/compiler
Ví dụ dưới đây thể hiện 2 cách sử dụng directive ng-bind thông qua thuộc tính hoặc class:
<!DOCTYPE html>
<html lang="en" ng-app="exampleviewApp">
<head>
    <meta charset="UTF-8">
    <meta http-equiv="X-UA-Compatible" content="IE=edge">
    <meta name="viewport" content="width=device-width, initial-scale=1.0">
    <title>Example View AngularJS</title>
    <script src="http://ajax.googleapis.com/ajax/libs/angularjs/1.2.15/angular.min.js"></script>
</head>
<body ng-controller="mainController">
    <h2>Hello {{name}}</h2>
    <input type="text" ng-model="name" ng-change="change()" />
    <span class="ng-bind: name;"></span>
</body>
<script>
    var exampleviewApp = angular.module('exampleviewApp', []);
    exampleviewApp.controller('mainController', function($scope) {
        $scope.name = '';
        $scope.length = 0;
    });
</script>
</html>
Directives builtin thường viết theo cấu trúc như một thuộc tính của HTML,(có thể viết theo phong cách class hay có thể là thẻ), angular nhận diện các thuộc tính đặc biệt này và chúng ta có thể hình dung giống việc đưa ra chỉ thị khi sử dụng các thuộc tính này, vì vậy cần tuân thủ theo đặc tính riêng của Angular và nguyên tắc của nó là chữ bắt đầu luôn luôn là ký tự ng, tuân theo cấu trúc ví dụ ng-directivename, trong đó directivename là tên của directive mà chúng ta sử dụng. Như ở các ví dụ trước, để khởi tạo ứng dụng, để khai báo là một Directive Controller thì chúng ta khai báo ng-controller, khai báo một directive model chúng ta khai báo ng-model, hay để data binding chúng ta sử dụng ng-bind …
Một vài lưu ý:
- ng-app luôn luôn phải định nghĩa và với các phiên bản sau bản legacy, luôn phải đặt tên ng-app và khai báo tường minh.
- Trong cấu trúc html, luôn luôn chỉ có 1 ng-app, có thể có nhiều các directive ng khác.
- Tài liệu danh sách directives: https://docs.angularjs.org/api/ng/directive
Matching Directives ( khớp directives)
Danh sách AngularJS Directives phổ biến
ng-app
Docs: https://docs.angularjs.org/api/ng/directive/ngApp
Khi chúng ta khai báo một Directive ng-app thì AngularJS sẽ hiểu là bắt đầu một ứng dụng Angular, nó sẽ xác định đây là thẻ gốc (element root) và tiếp theo sẽ khởi tạo các thông số cấu hình bên trong mà ta gọi là bootstraps. Ngoài ra ng-app còn được sử dụng để mô tả các module khác nhau trong ứng dụng. Về ví dụ thì chúng ta demo rất nhiều rồi nên tôi không trình bày thêm về nó nũa.
ng-init
Docs: https://docs.angularjs.org/api/ng/directive/ngInit
ng-model
Docs: https://docs.angularjs.org/api/ng/directive/ngModel
Sử dụng directive ng-model sử dụng để trói buộc (bind) dữ liệu bên trong các thẻ nhập liệu trong form như input, select, textarea với các thuộc tính của biến $scope trên tầng controller.
ng-model directives cung cấp một số tính năng như sau:
- Cung cấp validation các kiểu dữ liệu cho ứng dụng (number,email,required)
- Cung cấp trạng thái cho dữ liệu ứng dụng (invalid,dirty,touch,error)
- Cung cấp css class cho phần tử HTML ( sẽ được nói ở bài validate form)
- Trói buộc (bind) dữ liệu của phần tử theo HTML Forms
ng-repeat
Docs: https://docs.angularjs.org/api/ng/directive/ngRepeat
Sử dụng directive ng-repeat để có thể duyệt vòng lặp để lặp lại các phần tử HTML khi bạn có một model là danh sách, có thể là array hoặc object, đây là directives rất hữu dụng và được sử dụng thường xuyên, hỗ trợ lặp thẻ trực tiếp trong HTML, điều mà javascript thuần không làm được.
Ví dụ về ng-repeat
<!DOCTYPE html>
<html lang="en">

<head>
    <meta charset="UTF-8">
    <meta http-equiv="X-UA-Compatible" content="IE=edge">
    <meta name="viewport" content="width=device-width, initial-scale=1.0">
    <title>Example ng-repeat</title>
    <script src="https://ajax.googleapis.com/ajax/libs/angularjs/1.8.2/angular.min.js"></script>
</head>

<body ng-app="myApp">
    <div ng-controller="mainController">
        <table>
            <thead>
                <tr>
                    <th>Name</th>
                    <th>Country</th>
                </tr>
            </thead>
            <tbody>
                <tr ng-repeat="item in names">
                    <td>{{item.name}}</td>
                    <td>{{item.country}}</td>
                </tr>
            </tbody>
        </table>
        <ul>
            <li ng-repeat="item in listnotes">{{item.id}} - {{item.title}} - {{item.content}}</li>
        </ul>
    </div>
</body>
<script>
    var myApp = angular.module('myApp', []);
    myApp.controller('mainController', function ($scope) {
        $scope.names = [
            { name: 'Jani', country: 'Norway' },
            { name: 'Hege', country: 'Sweden' },
            { name: 'Kai', country: 'Denmark' }
        ];
        $scope.listnotes = [
            {'id': 1, 'title': 'Note 1', 'content': 'Content 1'},
            {'id': 2, 'title': 'Note 2', 'content': 'Content 2'},
            {'id': 3, 'title': 'Note 3', 'content': 'Content 3'}
        ]
    });
</script>
</html>
ng-hide / ng-show
Sử dụng ng-hide khi chúng ta muốn ẩn phần tử HTML trong một điều kiện, tình huống cụ thể, ngược lại với ng-hide là ng-show, hữu dụng trong tình huống ứng dụng SPA thu thập dữ liệu nhiều bước, ví dụ bên dưới là một tình huống sử dụng ng-hide cho việc tạo một survey thu thập dữ liệu người dùng nhiều bước:
<!DOCTYPE html>
<html lang="en">

<head>
    <meta charset="UTF-8">
    <meta http-equiv="X-UA-Compatible" content="IE=edge">
    <meta name="viewport" content="width=device-width, initial-scale=1.0">
    <title>ng-hide/ng-show example</title>
    <script src="https://ajax.googleapis.com/ajax/libs/angularjs/1.8.2/angular.min.js"></script>
</head>

<body ng-app="surveyApp">
    <div ng-controller="mainController">
        <h1>Survey Form</h1>
        <form name="surveyForm" ng-submit="handleSubmit()">
            <div ng-hide="step1">
                <div>
                    <label>What is your name ?</label>
                    <input type="text" ng-model="user.name" required />
                </div>
                <div>
                    <label>How old are you ?</label>
                    <input type="number" placeholder="" ng-model="user.age" required />
                </div>
                <div>
                    <label>Do you get married ?</label>
                    <input type="radio" ng-model="user.married" value="yes" />Yes
                    <input type="radio" ng-model="user.married" value="no" />No
                </div>
                <div>
                    <label>What kind of job are you doing ?</label>
                    <select ng-model="user.job">
                        <option value="developer">Developer</option>
                        <option value="teacher">Teacher</option>
                        <option value="businessconsult">Business Consultant</option>
                        <option value="other">Other</option>
                    </select>
                </div>
                <button type="button" data-step="1" ng-click="nextstep($event)">Next step</button>
            </div>
            <div ng-hide="step2">
                <div>
                    <label>What is your favorite sports ?</label>
                    <input type="text" ng-model="interest.sports" required />
                </div>
                <div>
                    <label>What is your favorite music ?</label>
                    <input type="text" ng-model="interest.music" required />
                </div>
                <div>
                    <label>What is your favorite movies ?</label>
                    <input type="text" ng-model="interest.movies" required />
                </div>
                <div>
                    <label>What is your favorite books ?</label>
                    <input type="text" ng-model="interest.books" required />
                </div>
                <div>
                    <label>What is your favorite games ?</label>
                    <input type="text" ng-model="interest.games" required />
                </div>
                <button type="button" data-step="2" ng-click="prevstep($event)">Previous step</button>
                <button type="button" data-step="2" ng-click="nextstep($event)">Next step</button>
            </div>
            <div ng-hide="step3">
                <div>
                    <label>Please provide your salary ?</label>
                    <input type="text" ng-model="finances.salary" required />
                </div>
                <div>
                    <label>Please provide your savings ?</label>
                    <input type="text" ng-model="finances.savings" required />
                </div>
                <div>
                    <label>Please provide your investments ?</label>
                    <input type="text" ng-model="finances.investments" required />
                </div>
                <div>
                    <label>Please provide your debt ?</label>
                    <input type="text" ng-model="finances.debt" required />
                </div>
                <button type="button" data-step="3" ng-click="prevstep($event)">Previous step</button>
                <button>submit form</button>
            </div>
            <div ng-hide="step4">
                Thanks for your submission
                Let us show what you provide:
                <br />
                Your name: {{user.name}}
                <br />
                Your age: {{user.age}}
                <br />
                Your job: {{user.job}}
                <br />
                Your favorite sports: {{interest.sports}}
                <br />
                Your favorite music: {{interest.music}}
                <br />
                Your favorite movies: {{interest.movies}}
                <br />
                Your favorite books: {{interest.books}}
                <br />
                Your favorite games: {{interest.games}}
                <br />
                Your salary: {{finances.salary}}
                <br />
                Your savings: {{finances.savings}}
                <br />
                Your investments: {{finances.investments}}
                <br />
                Your debt: {{finances.debt}}
                <br />
                Thanks for contact us !
            </div>
        </form>
</body>
<script>
    var surveyApp = angular.module('surveyApp', []);
    surveyApp.controller('mainController', ($scope) => {
        $scope.step1 = false;
        $scope.step2 = true;
        $scope.step3 = true;
        $scope.step4 = true;
        $scope.user = {
            name: 'sdfsdf',
            age: '',
            married: 'no',
            job: 'developer',
        }
        $scope.interest = {
            sports: '',
            music: '',
            movies: '',
            books: '',
            games: '',
        }
        $scope.finances = {
            salary: 0,
            savings: 0,
            investments: 0,
            debt: 0,
        }

        $scope.prevstep = ($event) => {
            switch ($event.target.dataset.step) {
                default:
                case '2':
                    $scope.step2 = true;
                    $scope.step1 = false;
                    break;
                case '3':
                    $scope.step3 = true;
                    $scope.step2 = false;
                    break;
            }
            if ($event.target.dataset.step == 1) {

            } else if ($event.target.dataset.step == 2) {

            }
        }

        $scope.nextstep = ($event) => {
            switch ($event.target.dataset.step) {
                default:
                case '1':
                    $scope.step1 = true;
                    $scope.step2 = false;
                    break;
                case '2':
                    $scope.step2 = true;
                    $scope.step3 = false;
                    break;
                case '3':
                    $scope.step3 = true;
                    $scope.step4 = false;
                    break;
            }
            if ($event.target.dataset.step == 1) {

            } else if ($event.target.dataset.step == 2) {

            }
        }

        $scope.handleSubmit = () => {
            // handle submit to send data to server or send email ...
            $scope.step3 = true;
            $scope.step4 = false;
            console.log($scope.user);
            console.log($scope.interest);
            console.log($scope.finances);
        }
    });
</script>
</html>
ng-include
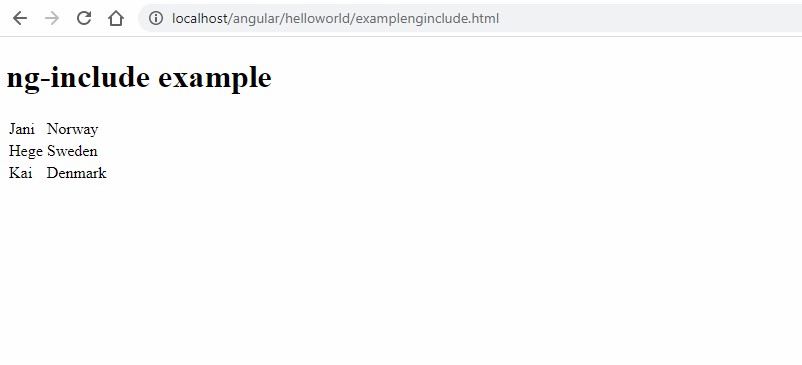
Mặc định, HTML không cung cấp giải pháp để có thể nhúng nội dung trang HTML này vào trang HTML khác, nhưng với angularJS, vấn đề này được giải quyết thông qua directive ng-include, chúng ta hoàn toàn có thể nhúng trực tiếp một file HTML vào một file khác, hữu dụng khi cấu trúc HTML quá dài, chúng ta có thể chia nhỏ thành các file nhỏ hơn để dễ dàng maintain và cập nhật code cho từng thành phần, giảm thiểu lỗi phát sinh trong quá trình phát triển ứng dụng.
Ví dụ về ng-include, truyền dữ liệu từ controller sang file include để duyệt thông qua thuộc tính onload, tuy nhiên đây không phải là cách hay để sử dụng, vì có vấn đề ở tính phạm vi, trong tình huống này chúng ta nên sử dụng custom directive (directive tự định nghĩa) sẽ được tiếp cận ở mục dưới.
Xem thêm tài liệu:
Bước 1: tạo file index.html
<!DOCTYPE html>
<html lang="en">
<head>
    <meta charset="UTF-8">
    <meta http-equiv="X-UA-Compatible" content="IE=edge">
    <meta name="viewport" content="width=device-width, initial-scale=1.0">
    <title>Example ng-include</title>
    <script src="https://ajax.googleapis.com/ajax/libs/angularjs/1.8.2/angular.min.js"></script>
</head>
<body>
    <div ng-app="myApp">
        <div ng-controller="myController">
            <h1>ng-include example</h1>
            <div ng-include="'table.html'" onload="items = items"></div>
        </div>
    </div>
</body>
<script>
    var myApp = angular.module('myApp', []);
    myApp.controller('myController', function($scope) {
        $scope.items = [
            {name: 'Jani', country: 'Norway'},
            {name: 'Hege', country: 'Sweden'},
            {name: 'Kai', country: 'Denmark'}
        ]
    });
</script>
</html>
Bước 2: tạo file table.html
<table>
    <tr ng-repeat="item in items">
        <td>{{item.name}}</td>
        <td>{{item.country}}</td>
    </tr>
</table>
Kết quả sau khi in ra màn hình
ng-form / ng-submit
Docs: https://docs.angularjs.org/api/ng/directive/ngForm
Với việc tạo form trong HTML thuần để submit dữ liệu lên máy chủ, chúng ta sử dụng thẻ <form> và xử lý sự kiện submit thông qua directive ng-submit, tuy nhiên chúng ta tiếp cận với directive ng-form vì directive này liên kết trực tiếp với đối tượng ngForm trên tầng script, và đối tượng này có lưu trữ các thuộc tính sử dụng trong việc validate dữ liệu, còn khi tạo thẻ html, chúng ta vẫn tạo thẻ <form> bình thờng, bạn có thể đọc thêm docs của angularJS. Để xử lý xự kiện submit dữ liệu, chúng ta sử dụng chỉ thị ng-submit. Có một điểm chúng ta để ý ở đây, nếu các bạn học HTML và JS thuần, mặc định sau khi submit, trang web sẽ được load lại, nhưng với ng-submit này thì không, vì như mình đã nói, angularJS sử dụng để xây dựng ứng dụng SPA, nên sau khi submit, dữ liệu sẽ được đưa vào một list, và chúng ta sử dụng ajax request để đưa dữ liệu lên server mà không cần load lại trang.
Ví dụ về ng-form kết hợp với ng-submit:
<!DOCTYPE html>
<html lang="en">
<head>
    <meta charset="UTF-8">
    <meta http-equiv="X-UA-Compatible" content="IE=edge">
    <meta name="viewport" content="width=device-width, initial-scale=1.0">
    <title>Example ngform</title>
    <script src="https://ajax.googleapis.com/ajax/libs/angularjs/1.8.2/angular.min.js"></script>
</head>
<body ng-app="myApp">
    <div ng-controller="mycontroller">
        <form ng-submit="submit()">
            <input ng-model="myForm.name" type="text" name="name" placeholder="Name">
            <input ng-model="myForm.email" type="email" name="email" placeholder="Email">
            <input ng-model="myForm.password" type="text" name="password" placeholder="password">
            <input ng-model="myForm.confirmPassword" type="text" name="confirmpassword" placeholder="confirmpassword">
            <input type="submit" value="Register">
        </form>
    </div>
</body>
<script>
    var app = angular.module('myApp', []);
    app.controller('mycontroller', function($scope) {
        $scope.myForm = {};
        $scope.myForm.name = "sdfsdf";
        $scope.myForm.email = "";
        $scope.myForm.password = "";
        $scope.myForm.confirmPassword = "";
        $scope.submit = function() {
            console.log($scope.myForm);
            // send ajax to server or database
            // in this case, we just save data to localstorage
            localStorage.setItem('listuser', JSON.stringify($scope.myForm));
        }
    });
</script>
</html>
Tự định nghĩa Directives trong angularJS (custom directives)
Docs: https://docs.angularjs.org/guide/directive
Mặc dù angularJS cung cấp rất nhiều directives giúp chúng ta có thể đáp ứng hầu hết các yêu cầu khi xây dựng ứng dụng, tuy nhiên chúng ta hoàn toàn có thể tạo ra một directive tự định nghĩa để đáp ứng nghiệp vụ trong trường hợp directives mặc định không đáp ứng được.
.Ứng dụng AngularJS trong quá trình khởi động sẽ tự động tìm các phần tử phù hợp và thực hiện một lần hoạt động bằng cách sử dụng phương thức compile() của chỉ thị tùy chỉnh, sau đó xử lý phần tử bằng phương thức link() của chỉ thị tùy chỉnh dựa trên phạm vi của chỉ thị. Trước khi đi vào ví dụ, chúng ta cần hiểu tổng quan khái niệm về directives type ( kiểu chỉ thị)
- Element directives (chỉ thị phần tử) − Chỉ thị kích hoạt khi gặp phần tử phù hợp.
- Attribute (chỉ thị thuộc tính) − Chỉ thị kích hoạt khi gặp thuộc tính phù hợp.
- Class (chỉ thị class) − Chỉ thị kích hoạt khi gặp class phù hợp.
- Comment (chỉ thị comment) − Chỉ thị kích hoạt khi gặp comment phù hợp.
Các directives type này dùng để xác định giá trị cho thuộc tính restrict khi khởi tạo directives: E (Element) A(Attributes) C (Class) M (comment). Thông tờng, chúng ta chủ yếu hay sử dụng EA (chỉ thị Element và Attribute)
Ví dụ tự khởi tạo một custom directive cơ bản trong angularJS
<!DOCTYPE html>
<html lang="en">
<head>
    <meta charset="UTF-8">
    <meta http-equiv="X-UA-Compatible" content="IE=edge">
    <meta name="viewport" content="width=device-width, initial-scale=1.0">
    <title>Example custom directive</title>
    <script src="http://ajax.googleapis.com/ajax/libs/angularjs/1.2.15/angular.min.js"></script>
</head>
<body ng-app="myApp">
    <div ng-controller="myController">
        <customdirective></customdirective>
        <div customdirective></div>
        <div class="customdirective"></div>
    </div>
</body>
<script>
    var app = angular.module('myApp', []);
    app.directive('customdirective', function() {
        return {
            restrict: 'EAC',
            template: '<h2>Hello World custom directive</h2>'
        };
    });
    app.controller('myController', function($scope) {
        $scope.name = "";
    });
</script>
</html>
Kết quả khi in ra trình duyệt

Ví dụ khởi tạo một ứng dụng với nhiều directive, mỗi directive chứa các tham số truyền vào tăng tính linh hoạt của chương trình, với tính năng này, chúng ta có thể khởi tạo những cấu trúc HTML riêng, có thể sử dụng lại và dữ liệu được cập nhật động theo tham số truyền vào.
Bước 1: tạo file index.html code mẫu như sau
<!DOCTYPE html>
<html lang="en">

<head>
    <meta charset="UTF-8">
    <meta http-equiv="X-UA-Compatible" content="IE=edge">
    <meta name="viewport" content="width=device-width, initial-scale=1.0">
    <title>Example custom directive</title>
    <script src="http://ajax.googleapis.com/ajax/libs/angularjs/1.2.15/angular.min.js"></script>
</head>

<body ng-app="myApp">
    <div ng-controller="myController">
        <form ng-submit="handlesubmit($event)">
            <div surveyform name="person1" submit="directiveSubmit"></div>
        </form>
        <form ng-submit="handlesubmit($event)">
            <div surveyform name="person2"></div>
        </form>
    </div>
</body>
<script>
    var app = angular.module('myApp', []);
    app.controller('myController', function ($scope) {
        $scope.person1 = {
            fullname: "John",
            email: "[email protected]",
            phonenumber: 1234567890
        }
        $scope.person2 = {
            fullname: "Toanngo92",
            email: "[email protected]",
            phonenumber: 2123456789
        }
        $scope.handlesubmit = function ($event) {
            console.log($event);
            // todo here
        }
    });
    app.directive('surveyform', function () {
        let directive = {};
        directive.restrict = 'EAC';
       directive.templateUrl = 'surveyForm.html';

        directive.scope = {
            person: '=name',
            submit: '='
        };

        directive.compile = function (element, attributes) {
           // console.log(element);
            element.css("border", "1px solid #cccccc");
            element.css("padding", "10px");
            //linkFunction is linked with each element with scope to get the element specific data.
            var linkFunction = function ($scope, element, attributes) {
            }
            return linkFunction;
        }

        return directive;
    });


</script>

</html>
Bước 2: Tạo file surveyForm.html với cấu trúc phía dưới
<label>fullname</label>
<br />
<input type="text" ng-model="person.fullname" />
<br />
<label>Email</label>
<br />
<input type="text" ng-model="person.email" />
<br />
<label>Phone</label>
<br />
<input type="number" ng-model="person.phonenumber" />
<br />
<button type="submit">submit</button>
Kết quả khi in ra trình duyệt:
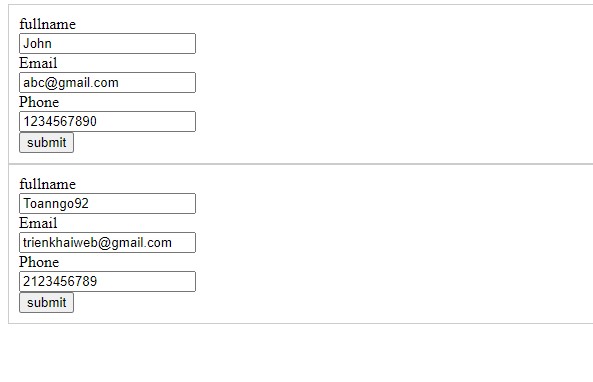
Chúng ta thấy đã có thể sử dụng lại 2 form html mà không cần viết lại, 2 form chạy chung cấu trúc và sử dụng 2 model tách biệt nhau.
Dưới đây là kết thúc các khái niệm cơ bản về directives, thực chất nếu sử dụng các directives mặc định đã rất đủ trong quá trình học rồi, đối với dự án phức tạp cần sử dụng lại nhiều components, chúng ta có thể sử dụng giải pháp áp dụng custom directives để giải quyết.
Bài tập
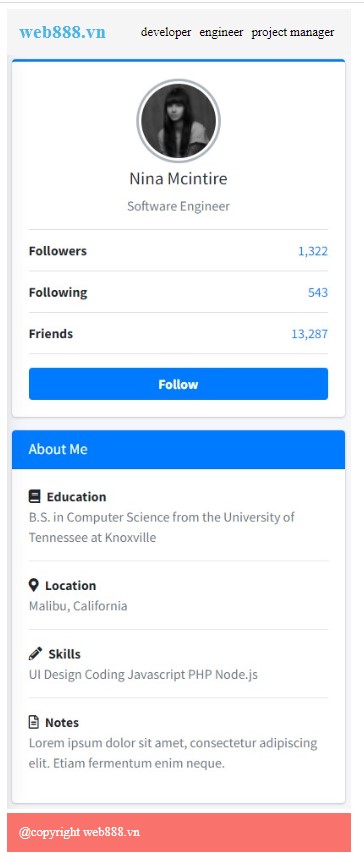
Khởi tạo một ứng dụng với giao diện như hình dưới với yêu cầu:
- Khi người dùng bấm vào từng vị trí trên thanh menu, hiện lên các profile của những nhân sự khác nhau (mẫu giao diện không thay đổi, chỉ thay đổi số liệu , thông tin giới thiệu của từng profile)
- Khi người dùng bấm follow, trạng thái của nút đổi thành màu đỏ, text đổi thành Followed
- Số follower, following, friends sử dụng builtin filters currency để ưa dấu "," vào số hàng nghìn
Hướng dẫn
Tầng controller:
Khởi tạo 3 biến hoặc mảng 3 phần tử (model) biểu diễn một nhân sự với các thông tin tương ứng hiển thị trên giao diện, Kiểu dữ liệu các thuộc tính như sau:
- Name: string
- Desription: string
- Followers: number
- Following: number
- Friends: number
- Education: string
- Location: string
- Skills: string
- Notes: string
Tạo một custom directive với mẫu html chung hiển thị các đối tượng trên
Thêm phương thức để handle sự kiện click follow
Tầng view:
Hiển thị directive vừa khởi tạo 3 lần, với tham số truyền vào là 3 model tạo trên controller
Sử dụng ng-click để bắt sự kiện người dùng bấm vào các nút trên thanh menu, dùng logic áp dụng ng-show/ng-hide để ẩn/hiện các profile tương ứng
Bài viết liên quan:

Dịch vụ thiết kế Wesbite