
Form validation trong angularJS
Trức khi tìm hiểu bài này, trước hết bạn phải hiểu khái niệm về thẻ form trong HTML, cơ chế submit dữ liệu lên tầng server, nếu chưa, hãy quay lại bài viết form trong HTML để tìm hiểu.
Với form trong HTML, chúng ta biết rằng trước khi submit dữ liệu, form cần được validate để đảm bảo dữ liệu người dùng nhập liệu đúng định dạng trước khi gửi lên server. AngularJS cũng cung cấp cho chúng ta cơ chế để validate form.
Mục lục
Service validate trong angularJS
Docs: https://docs.angularjs.org/guide/forms
Xét ví dụ đầu tiên chúng ta có một form đăng ký với các trường như sau:
<!DOCTYPE html>
<html lang="en">
<head>
    <meta charset="UTF-8">
    <meta http-equiv="X-UA-Compatible" content="IE=edge">
    <meta name="viewport" content="width=device-width, initial-scale=1.0">
    <title>Form Validate</title>
    <script src="https://ajax.googleapis.com/ajax/libs/angularjs/1.8.2/angular.min.js"></script>
    <style>
        input{
            margin-bottom: 15px;
        }
    </style>
</head>
<body ng-app="myApp">
    <div ng-controller="myCtrl">
        <form name="myForm" ng-submit="submit()">
            <input type="text" ng-model="name" name="name" placeholder="Enter your name" required />
            <span>{{myForm.name.$valid}}</span>
            <br/>
            <input type="email" ng-model="email" name="email" placeholder="Enter your email" required />
            <span>{{myForm.email.$valid}}</span>
            <br/>
            <input type="password" ng-model="password" name="password" placeholder="Enter your password" required />
            <span>{{myForm.password.$valid}}</span>
            <br/>
            <input type="password" ng-model="confirmpassword" name="confirmpassword" placeholder="Confirm your password" required />
            <span>{{myForm.confirmpassword.$valid}}</span>
            <br/>
            <button>Register</button>
        </form>
    </div>
</body>
<script>
    var app = angular.module('myApp', []);
    app.controller('myCtrl', function($scope) {
        $scope.name = "";
        $scope.email = "";
        $scope.password = "";
        $scope.confirmpassword = "";
        $scope.submit = function() {
            console.log($scope.myForm);
        }
    });
</script>
</html>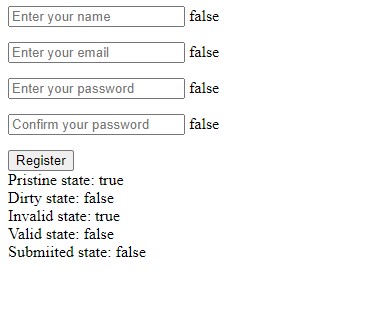
Sau khi chạy trên trình duyệt và tiến hành nhập liệu, chúng ta thấy, mặc định đối tượng các {{myForm.$valid}} ,… giá trị bằng false ( ý nghĩa là form chưa được validate ), hay {{myForm.name.$valid}} cũng được cập nhật ngay lập tức sau khi nhập liệu giá trị hợp lệ, model đó lập tức chuyển thành true. Vì vậy ta hiểu Service $valid này sử dụng để kiểm tra trạng thái validate của form, và trạng thái validate của từng input như sau:
Form states ( trạng thái form)
Các biến service dưới đây đại diện cho trạng thái của các input trong form:
- $pristine – nguyên thủy – form chưa được chỉnh sửa
- $dirty – form đã được chỉnh sửa
- $invalid – nội dung form chưa hợp lệ
- $valid – nội dung form đã hợp lệ
- $submitted – form đã được submit
Luồng trạng thái:
- pristine & invalid ( trường nguyên thủy, chưa hợp lệ)
- dirty & invalid ( trường đã được chỉnh sửa nhưng chưa hợp lệ)
- dirty & valid ( trường đã được chỉnh sửa và hợp lệ)
Input states ( trạng thái nhập liệu)
- $untouched – trường nhập liệu chưa được chạm
- $touch – trường nhập liệu đã chạm
- $pristine – nguyên thủy – trường nhập liệu chưa được chỉnh sửa
- $dirty – trường nhập liệu chưa được chỉnh sửa
- $invalid – trường nhập liệu chưa hợp lệ
- $valid – trường nhập liệu hợp lệ
Các states này dùng để xác định trạng thái nhập liệu của người dùng, hoàn toàn có thể dựa theo giá trị true/false của các service state này trả về để hiển thị các thông báo chưa hợp lệ hoặc đã hợp lệ cho người dùng
CSS classes
AngularJS cung cấp danh sách các builtin CSS Class cho phép lập trình viên định kiểu cho các trường nhập liệu (input) dựa theo trạng thái của form hoặc input:
- ng-valid
- ng-invallid
- ng-pristine
- ng-dirty
- ng-touched
- ng-untouched
- ng-submitted
Chúng ta có thể dựa theo chúng để css cho các form giúp tăng trải nghiệm người dùng.
Ví dụ validate form trong một form đăng ký bằng angularJS:
Bước 1: khởi tạo file index.html cấu trúc như sau:
<!DOCTYPE html>
<html lang="en">
<head>
    <meta charset="UTF-8">
    <meta http-equiv="X-UA-Compatible" content="IE=edge">
    <meta name="viewport" content="width=device-width, initial-scale=1.0">
    <title>Example validate form and submit</title>
    <script src="https://ajax.googleapis.com/ajax/libs/angularjs/1.8.2/angular.min.js"></script>
</head>
<body>
    <!DOCTYPE html>
<html lang="en">

<head>
    <meta charset="UTF-8">
    <meta http-equiv="X-UA-Compatible" content="IE=edge">
    <meta name="viewport" content="width=device-width, initial-scale=1.0">
    <title>Examole Routes AngularJS</title>
    <script src="https://ajax.googleapis.com/ajax/libs/angularjs/1.8.2/angular.min.js"></script>
    <script src="https://code.angularjs.org/1.8.2/angular-route.min.js"></script>
    <style>
        .container {
            max-width: 400px;
            margin: 0 auto;
            padding: 15px;
            align-items: center;
        }

        .flex-wrap {
            display: flex;
            flex-wrap: wrap;
        }

        .list-none {
            list-style: none;
        }

        .menu-list {
            padding: 0px;
            margin: 0px;
            justify-content: flex-end;
        }

        .menu-list li {
            margin: 0px 5px;
        }

        .menu-list li a {
            text-decoration: none;
            color: #000;
        }

        .menu-list li a:hover {
            color: #46b8e6;
        }

        .no-margin {
            margin: 0;
        }

        .main-header {
            display: flex;
            background: #f5f5f5;
        }

        .logo-wrap {
            width: 45px;
        }

        .main-header nav {
            width: calc(100% - 46px);
        }

        .main-footer {
            background: #fa726c;
        }

        .white {
            color: #fff;
        }

        .blue {
            color: #46b8e6;
        }
        .form-wrap{
            margin-top: 15px;
        }
        .form-wrap > *{
            display: block;
            width: 100%;
            margin-bottom: 5px;
        }
        .form-wrap > input{
            border: 1px solid #e1e1e1;
            height: 36px;
            line-height: 36px;
            padding: 5px;
            box-sizing: border-box;
        }
        .form-wrap > input:focus{
            outline: none;
        }
        .w100{
            width: 100%;
        }
        .button{
            background: #ffc856;
            color: #fff;
            transition: all 0.3s;
            border: none;
            height: 40px;
            line-height: 40px;
            cursor: pointer;
        }
        .button:hover{
            background: #47b7e5;
            color: #fff;
        }
        label{
            font-weight: bold;
        }
        .error{
            color: red;
        }
        input.ng-invalid{
            border: 1px solid red;
        }
        input.ng-valid{
            border: 1px solid green;
        }
    </style>
</head>

<body ng-app="myApp">
    <div ng-controller="headerController" ng-class="[gc.container, gc.mainheader ,gc.flexwrap]">
        <div ng-class="gc.logowrap">
            <h2 ng-class="[gc.nomargin, gc.blue]">{{logotext}}</h2>
        </div>
        <nav>
            <ul ng-class="[gc.flexwrap , gc.listnone, gc.menulist]">
                <li><a ng-href="#!">Home</a></li>
                <li><a ng-href="#!about">About</a></li>
                <li><a ng-href="#!contact">Contact</a></li>
            </ul>
        </nav>
    </div>
    <div ng-controller="mainController" ng-class="[gc.container, gc.mainbox, gc.flexwrap]">
        <div ng-class="gc.w100" ng-view></div>
    </div>
    <div ng-controller="footerController" ng-class="[gc.container,gc.flexwrap,gc.mainfooter,gc.white]">
        {{copyRight}}
    </div>
</body>
<script>
    var app = angular.module('myApp', ['ngRoute']);
    app.config(function ($routeProvider) {
        $routeProvider.
            when('/', {
                templateUrl: 'templates/register.html'
            })
            .when('/about', {
                template: '<div><h2>{{aboutdata.title}}</h2><p>{{aboutdata.description}}</p></div>'
            })
            .when('/contact', {
                template: "<div><h2>{{contactdata.title}}</h2><p>{{contactdata.description}}</p></div>"
            });
    });
    app.run(function ($rootScope) {
        // global class variable
        $rootScope.gc = {
            container: 'container',
            mainheader: 'main-header',
            mainfooter: 'main-footer',
            flexwrap: 'flex-wrap',
            listnone: 'list-none',
            menulist: 'menu-list',
            nomargin: 'no-margin',
            white: 'white',
            logowrap: 'logo-wrap',
            blue: 'blue',
            formwrap: 'form-wrap',
            w100: 'w100',
            button: 'button',
            error: 'error'
        };
    });
    app.filter('validmessage', function () {
        return function (input) {
            if (input == true) {
                return 'All data validated';
            } else {
                return 'Please enter valid data';
            }
        }
    });
    app.controller('headerController', function ($scope, $location) {
        $scope.navigation = [
            {
                name: 'Home',
                url: '/',
                controller: 'mainController'
            },
            {
                name: 'About',
                url: '/about',
                controller: 'mainController'
            },
            {
                name: 'Contact',
                url: '/contact',
                controller: 'mainController'
            }
        ];
        $scope.logotext = 'web888.vn';

    });
    app.controller('mainController', function ($scope, $location,$rootScope) {
            $scope.homedata = {
                title: 'Home',
                description: 'This is home page'
            };
            $scope.aboutdata = {
                title: 'About',
                description: 'This is about page'
            };
            $scope.contactdata = {
                title: 'Contact',
                description: 'This is contact page'
            };

            $scope.submit =  function() {
                console.log(this.registerForm);
                alert('submited');
            };
        });
    app.controller('footerController', function ($scope) {
        $scope.copyRight = '@copyright web888.vn';
    });
</script>
</html>
</body>
</html>
Bước 2: khởi tạo file register.html bên trong thư mục template ( thư mục templates cùng cấp cấu trúc file index.html):
<form name="registerForm" ng-class="gc.w100" ng-submit="submit()">
<h2 ng-class="gc.nomargin">Register Account</h2>
<div ng-class="gc.formwrap">
<label>Username</label>
<input type="text" ng-model="username" placeholder="username" ng-class="gc.input" required minlength="5"/>
<label>Password</label>
<input type="password" ng-model="password" placeholder="password" ng-class="gc.input" required minlength="5" />
<label>Confirm Password</label>
<input type="password" ng-model="confirmpassword" placeholder="confirmpassword" ng-class="gc.input" required minlength="5" />
<button ng-class="gc.button">Register</button>
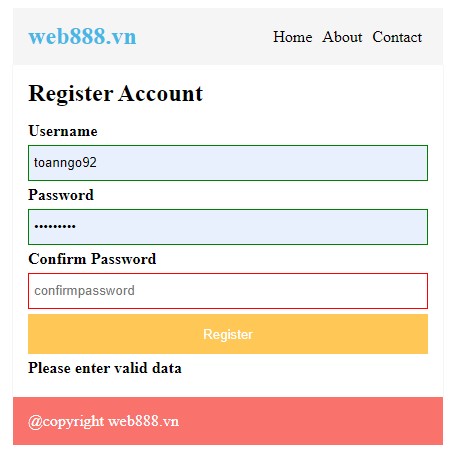
<label>{{registerForm.$valid | validmessage}}</label>
</div>
</form>Giao diện sau khi chạy ứng dụng:
Bài tập
Bài 1:
Yêu cầu:
(ko cần vẽ header, footer)
Form cần validate required cho trường username và password
Username có độ dài tối thiểu 5 ký tự
Password có độ dài tối thiểu 5 ký tự
Nếu username và password của người dùng nhập so khới với giá trị 'admin'/'123456'
Khi người dùng nhập liệu sai không đăng nhập được thông báo lỗi dưới chân input cho người dùng, đường viền input đổi màu thành đỏ. Nếu người dùng nhập liệu đúng đổi màu thành xanh
Sau khi login thành côg chuyển route sang listuser hoặc dùng ng-hide/ng-show để làm
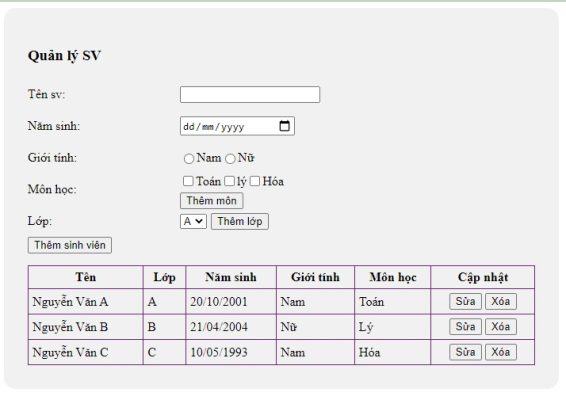
Giao diện qlsv tương tự bài html, tuy nhiên sử dụng angularJS để làm bài
Lưu ý:
- có thể bỏ tính năng thêm môn nếu chưa biết giải quyết.
- các giá trị trong bài đổi thành tiếng việt không dấu để dễ xử lý.
Bài 2: Sử dụng kiến thức về localstorage xây dựng ứng dụng angularJS theo yêu cầu
Bước 1: khi bắt đầu vào ứng dụng, chương trình yêu cầu người dùng hiển thị giao diện đăng nhập , kèm link đăng ký giao diện như hình ( thay đổi trường username thành email)
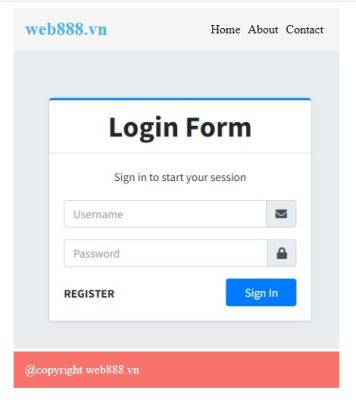
Yêu cầu:
- Form cần validate required cho trường username và password
- Username có độ dài tối thiểu 7 ký tự, type input là email
- Password có độ dài tối thiểu 7 ký tự
- Nếu username và password của người dùng nhập liệu với giá trị bằng "admin"/123456 , tiến hành chuyển route sang route index, route này hello world người dùng và giữ nguyên header, footer (không chuyển trang)
- Khi người dùng nhập liệu sai không đăng nhập được thông báo lỗi dưới chân input cho người dùng, đường viền input đổi màu thành đỏ
- Sử dụng custom filter và service $valid cho các trường để thông báo cho người dùng biết khi nhập liệu không hợp lệ.
Bài viết liên quan:

Dịch vụ thiết kế Wesbite